Last updated on
All you need to know about building a DIY bench for indoors at home. Read this before you even start planning your project.

► Our top choice: Modern Wood Bench
There are plenty of DIY projects that will be both decorative and functional around your house. One of our favorites is a DIY bench, which is always a great way to provide a practical and decorative accent both inside and out. Benches are appropriate both, indoors and outdoors, and can be used for storage, for decoration, or just to sit on and reflect.
A DIY bench can follow many styles and types, from the casual farmhouse or rustic to a more modern decorative look. The tutorials below will give you ideas for a wide range of DIY benches, most of which are both easy to make and affordable.
How to Build a Bench
Before you go shopping for wood boards and wood stain for your new bench, we highly encourage you to consider several key points. This will save you time and money.
What Materials Will You Need?
Benches may not necessarily be made of wood. While most projects are using wood, you may not necessarily want to get into woodworking to build a bench. Here are your all options:
- 2×2/2×4/2×6/2×8 wood boards
- Reclaimed wood boards and scrap wood
- Pallets
- Plywood
Other materials that you will need:
- Piping
- Hairpin legs
- Balustrade legs
- Fabric for upholstery
- Fiber filler
- Batting
- Wood stain and paint
- Pockets screws, grabber screws
You can also reuse some items for this DIY project:
- Rugs for upholstery
- Rope
- Bookcases
- Old doors
What Tools and Skill Will You Need?
It’s not a complicated project so if you’ve ever done any home improvement yourself at all, you are likely to have all you need:
- Some type of saw (ideally miter saw, or circular saw)
- Sander (with sandpaper of multiple grit)
- A power drill
- Kreg Jig hole system
- Paintbrushes
Obviously, you will need to know how to operate the tools. If you’re not fully comfortable yet, leave some room for error – get materials in surplus. You’ll use what you have left for other projects.
The Process of Building a Bench
Here’s the basic process in 4 easy steps:
- Choose a material – usually, it’s wood (3 boards are enough for a simple bench).
- Measure and cut the boards.
- Attach the boards with wood glue and screws.
- Sand, stain and paint your new bench.
It’s that simple, and you can follow basic bench plans to build it. If you want to get fancy, we have a bunch of tutorials that you can choose from next.
DIY Farmhouse Bench
A farmhouse style bench can be used inside or outside on the porch. Such a piece of furniture is the centerpiece of farmhouse decor. So if you’re after this style, you have to build this DIY bench.
This project uses the farmhouse bench plans from Ana White. Its size is 76 inches long, which is ideal to seat four people. The cost to build such a bench from lumber is around $20.
What you will need for this project?
- 7 2×4 wooden boards
- 2.5-inch grabber and pocket screws
- Wood filler and glue
- Wood stain and paint
- Power tools
The project in steps:
- Cut the wood using the cut list
- Build the legs
- Build the bench seat
- Fill all holes with wood filler
- Sand all parts
- Stain and paint the parts
- Put it all together with grabber screws
Where can you use this bench?
- The porch or deck
- Entryway
- Kitchen
- Dining room
DIY Entryway Bench
Here’s a DIY bench that’s so simple to make that you can do it while your toddler naps. It also helps to create a neat and tidy space for storage underneath.
For this rustic entryway bench you will need:
- 8 foot 2×8 wooden board
- 6 foot 2×8 wooden board
- Screws and wood glue
- Wood stain and paint
- Power tools
The cut list:
- Cut the 8-foot board in half for the bench seat
- Cut the 6-foot wood into 4 parts for the legs
What about shoe storage?
Entryway benches usually have storage space for shoes – that’s what makes them fit the place so well. This design is simple but functional to store shoes underneath. There’s plenty of room to add storage boxes as well.
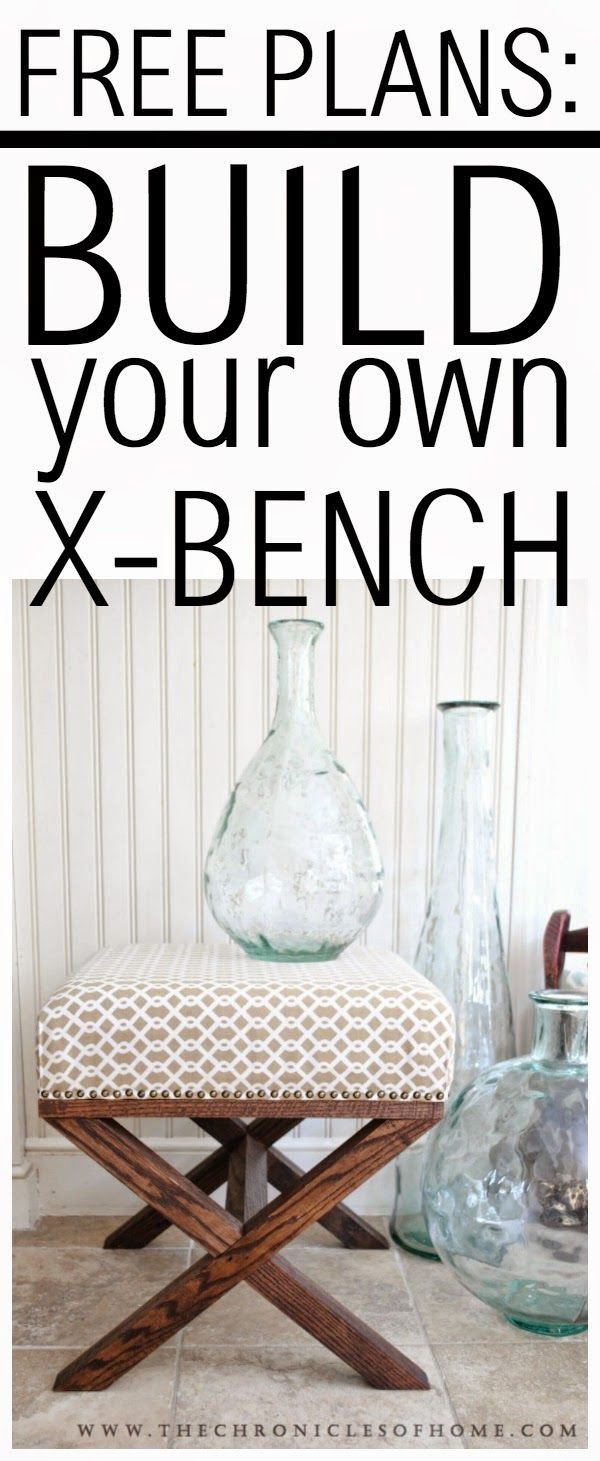
DIY Upholstered Bench
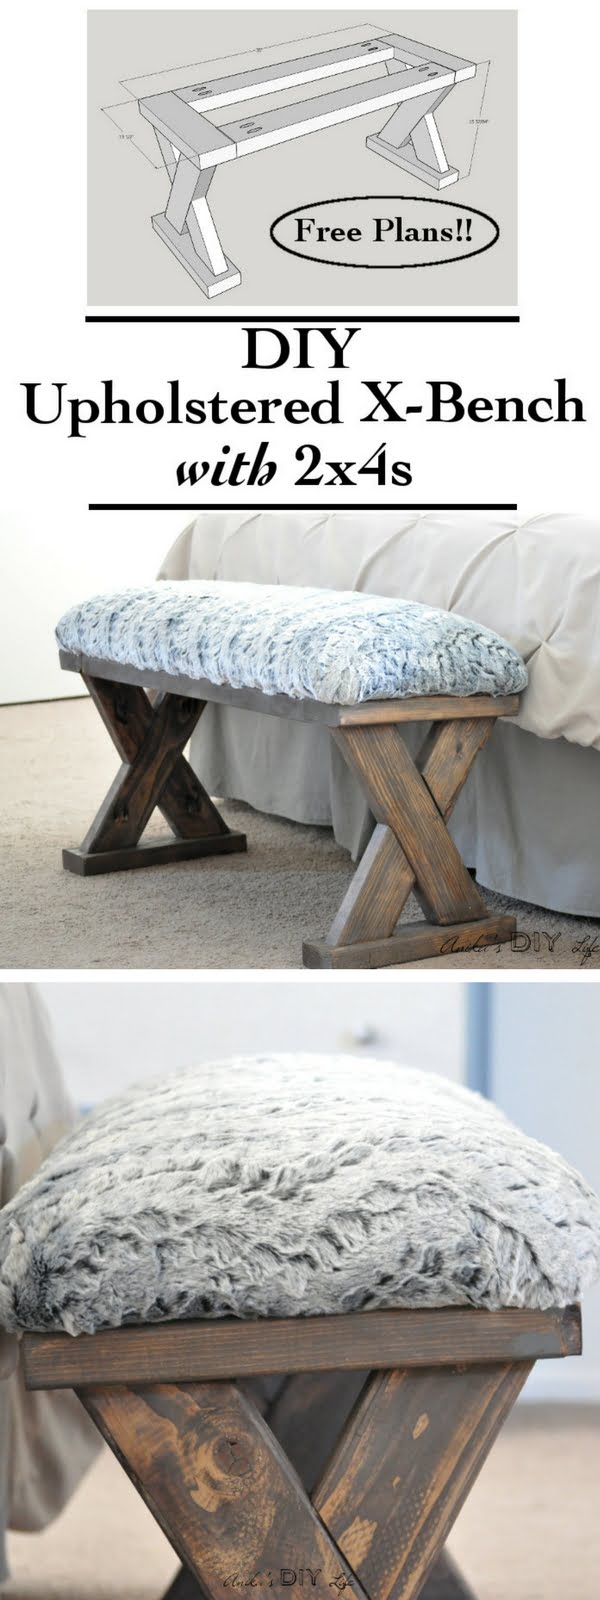
For an extra cute and comfortable bench add upholstery. Not only will this upholstered X-bench serves as a comfortable seat place, the addition of padding means you can customize the pattern and colors for any space in your home. This X-bench makes a great accent piece of furniture in any room.
Here’s what you will need:
- 2×4 wooden boards
- Polyester fiberfill
- Polyester padding
- The fabric of your choice
- Woodworking tools
How to make the X base for this bench?
- Cut the 2×4 wooden boards to measure the legs and the top base per the plan.
- Put it together with pocket screws and wood glue
- Stain and paint the wood to get your desired look.
How to upholster the bench?
- Cut the batting and fabric to measure the bench top. Leave some extra traffic to wrap the padding.
- Wrap the required amount of fiberfill to get as much padding as you need.
- Cover everything in fabric.
- Secure the fabric underneath the bench top with a staple gun.
Where would this bench fit?
The bench has a nice rustic look that will work in just about any room inside your home.
- Entryway
- End of the bed
- A cozy nook
2×6 Bench with Balustrade Legs
One simple to make, and always the welcome addition to your home, is the country-style farmhouse 2×6 bench. This DIY project will teach you how to make this classically country designed bench with a minimum amount of fuss and labor. Plus it’s an amazingly affordable way to add some country flair.
What materials you will need?
- 2 2×6 wooden boards
- 2 2×4 wooden boards
- Balustrade legs
- Screws and wood glue
- Woodworking tools
How to put it together?
- Cut the 2x6s to three parts at 41 inches for the top.
- Cut the remaining 2x6s into 15-inch parts for the ends.
- Cut 2x4s into 2 parts of 43 1/4 inches and 2 parts at 7.5 inches for the apron.
- Cut the legs to the desired height of the bench.
- Place the legs in the corners of the top and square them off with the apron.
- Glue everything together and secure with screws.
- Stain and paint the bench.
The tutorial shows you how to use biscuit slots and small wooden blocks to secure the frame, but you can use pocket screws as an alternative technique.
Where could you use this bench?
- The balustrade legs make it a classy piece of furniture in the entryway or the mudroom.
- The farmhouse look makes it an ideal addition to the kitchen or dining room.
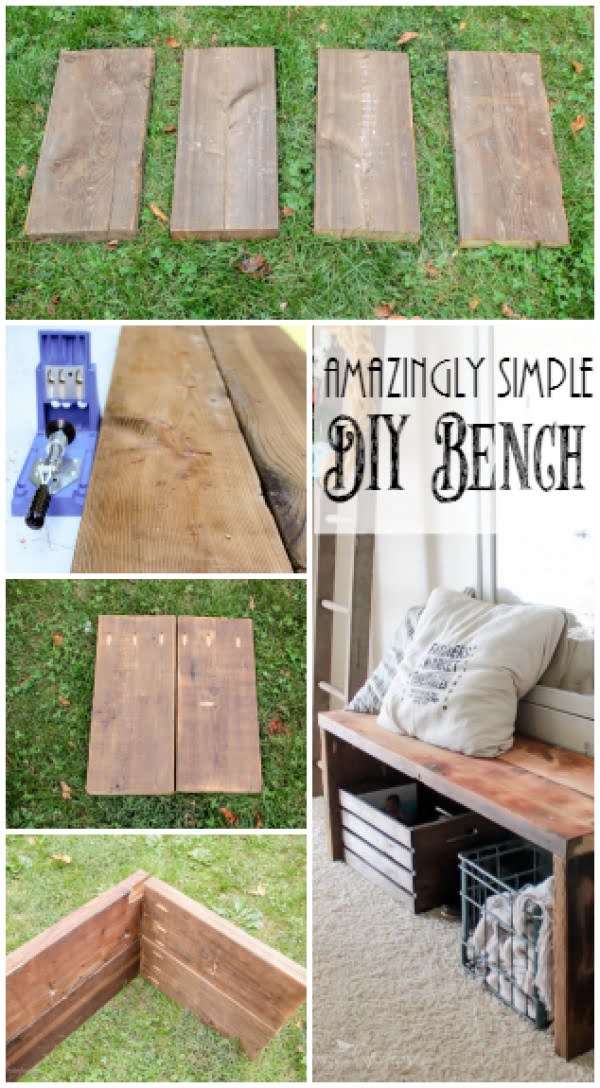
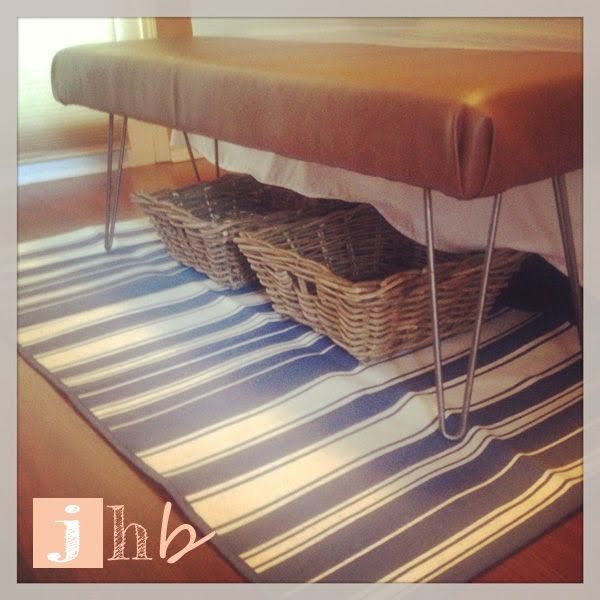
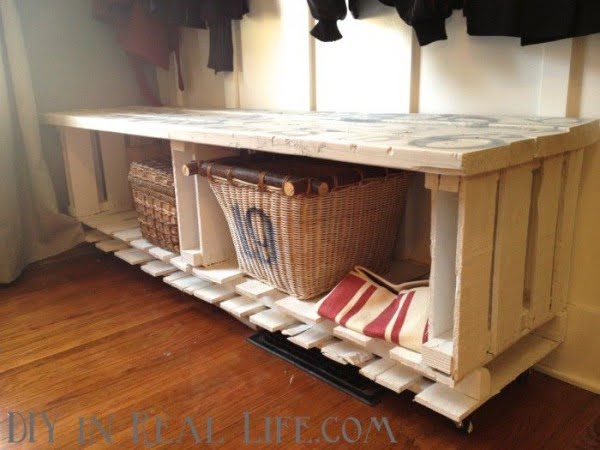
Rustic Wooden Bench with Storage

It’s one of the rustic benches that have the X-base style. It provides extra storage, and it looks special with the addition of woven baskets.
Here’s what you’ll need for this bench:
- 8 2×4 boards
- 1 2×2 board
- Pocket hole screws
- Brad nails
- Wood glue
- Wood stain
- Woodworking tools
All in all the wood will cost you around $30.
How to cut the wood:
- Top – 5 parts 51” of 2×4
- Shelves – 8 parts 20” of 2×4
- Frame sides – 6 parts of 18” of 2×4
- Frame bottom and top – 6 parts of 11” of 2×4
- Braces – 4 parts of 20” of 2×2
- X-legs – angle cut 4 parts of 16” of 2×4
How to put it together from these materials:
- Create the frames from the sides and bottoms/tops from your cut list. Attach the parts with wood glue and pocket screws.
- Add the X-legs. This is the tricky part. The key is to measure the angles before you cut and do it in increments. Secure them with brad nails and wood glue.
- Build the shelves by putting the wood together with glue and pocket holes.
- Attach the shelves to the frame (also using glue and screws).
- Add the braces for the top.
- Build the top.
- Attach the top.
- Stain the wood.
Where could you use this rustic bench?
The picture shows the bench being used on the porch. This isn’t the only place for such an attractive piece of furniture. It can easily be placed in the entryway (it has ample of storage for it) too. The bench will find a place in the kitchen as well (more storage space is always welcome here).
DIY Kitchen Bench
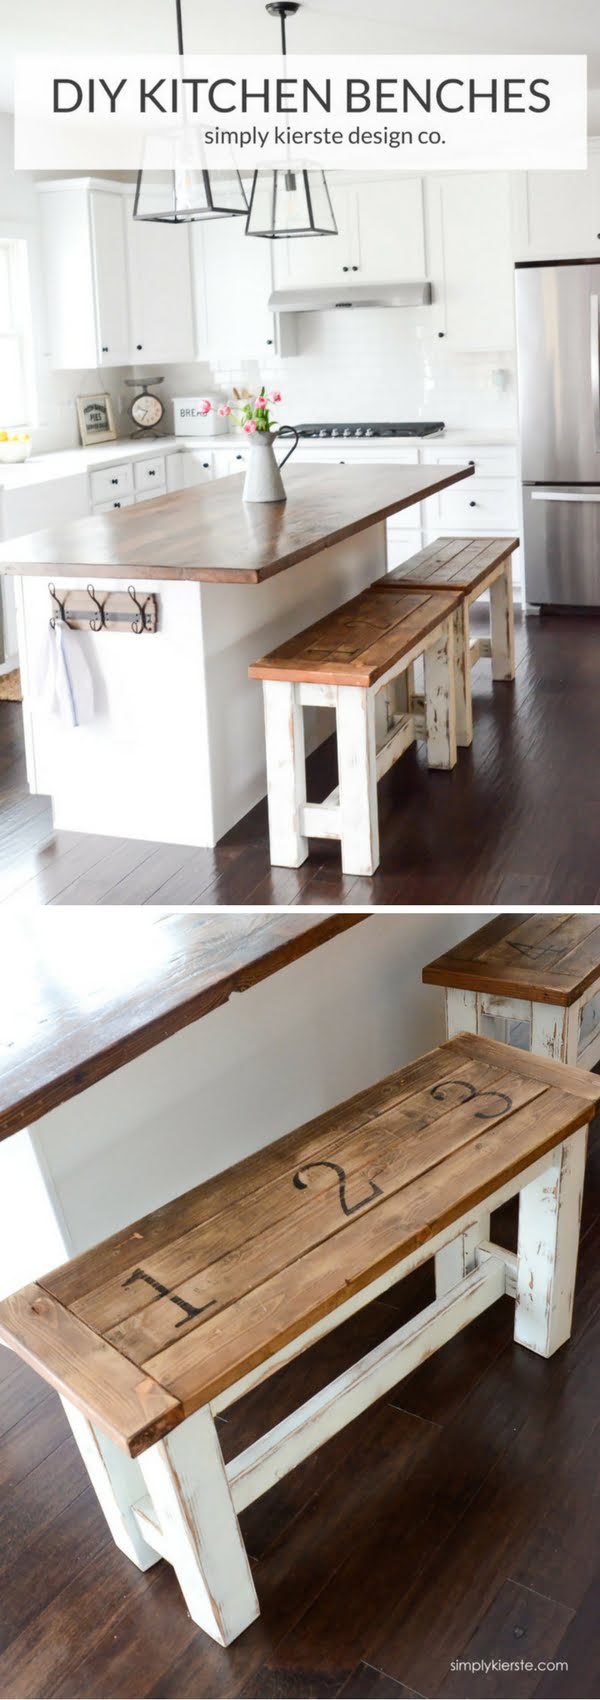
If you entertain a lot or have a big family, you need to check out one of these rustic kitchen benches. Not only do they look fantastic, but they also provide plenty of seat space without taking up loads of room.
You will need these materials:
- 4 posts of 4×4 wood at 22” for the legs.
- For the top:
- 4 boards of 2×4 wood at 35”
- 2 boards of 2×4 wood at 13 3/4”
- For the frame:
- 2 boards of 2×4 wood at 31”
- 1 board of 2×4 wood at 33”
- 2 boards of 2×4 wood at 5”
- Pocket screws
- Woodworking tools
- Wood stain
- Paint
How to put it together:
- Build the H shaped sides. Use pocket screws to attach everything together.
- Attach the sides together with the 33” 2×4 piece in the middle and the 2 boards of 31” at the top.
- Put the top together.
- Attach the top to the frame.
- Stain and paint the bench.
- Use a sander to get the weathered paint design.
Woven Bench Seat
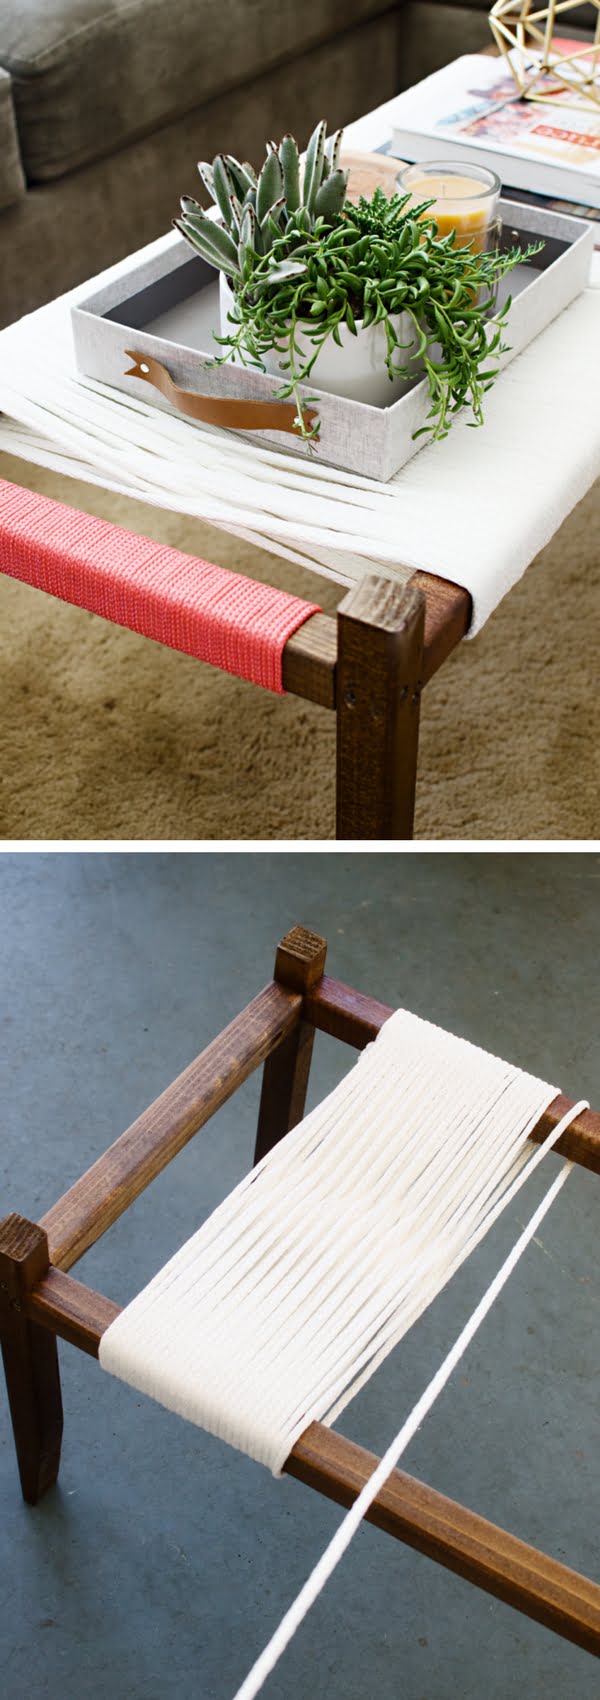
For a unique conversation piece, you try making one of these DIY woven seat benches. You’ll be amazed at how easy it is to make, and your guests will be impressed by your sense of style and creativity when they get their first look at your unique bench.
Here’s what is needed for the project:
- 2 boards of 2×2 wood at 45”
- 4 boards of 2×2 wood at 16”
- 2 boards of 2×2 wood at 14”
- Clothesline
- Tools
- Wood screws
- Wood stain
How to build it:
- Cut the 2×2 wood as per above list.
- Put together the frame – it’s pretty straightforward. Use wood screws.
- Apply wood stain.
- Weave the seat using the clothesline. The technique is simple – you can just wrap the rope around the frame crossing it like you would do shoelaces.
Where can you use this bench?
This bench is mostly decorative with the intent to be used as a small coffee or side table. It can hold some weight but we wouldn’t recommend it as a heavy-duty bench. I will hold the weight of an average person a while, though.
In place of clothesline, you can use other types of rope to get a different design.
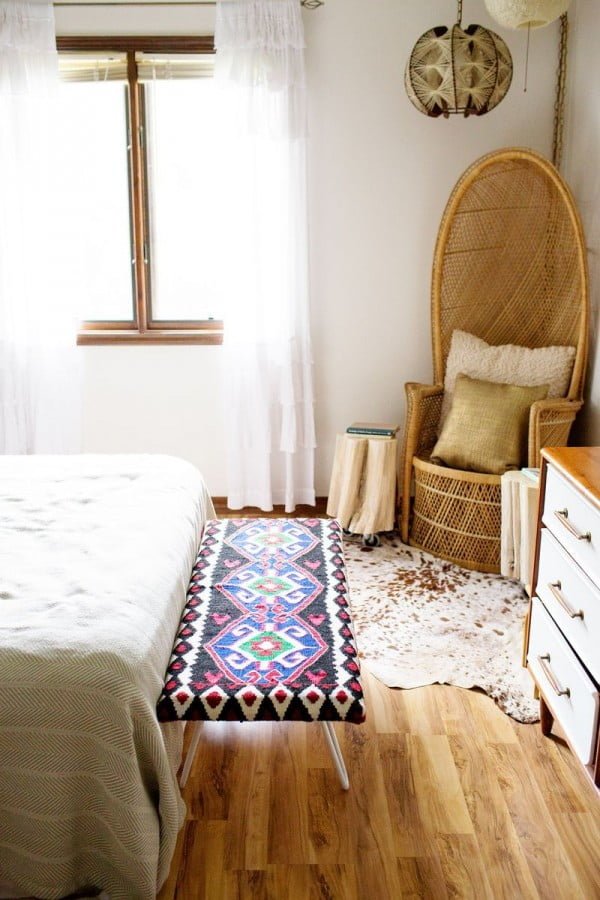
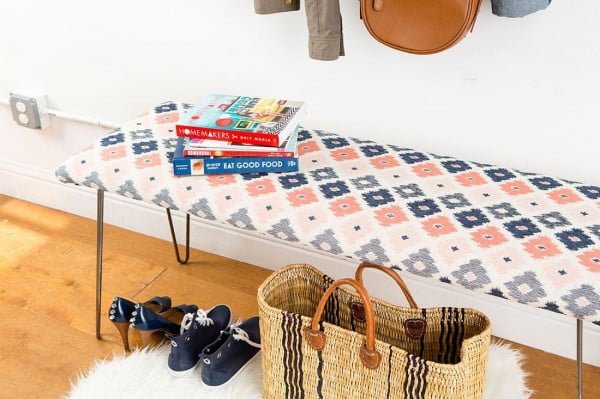
DIY Kilim Rug Bench

To make a real statement, and brighten up any room, this modern kilim rug bench is just the thing. If you’re looking for a bright and colorful accent bench that doubles as a useful piece of furniture in your home, then look no further. Kilim rug is an excellent fabric for upholstery and heavy-duty. The design features trendy hairpin legs for the mid-century modern design.
What this bench is made of:
- A Kilim rug – sized 3×5 feet.
- Particle board (or plywood) – sized 16×48”.
- Upholstery foam or batting and fiberfill to match the size of the board.
- Hairpin legs.
- Particle board glue.
- Spray adhesive.
- Staple gun.
- Woodworking tools.
How do you put it together?
- Spray one side of the board with the adhesive.
- Add the upholstery foam. Apply some pressure to let it stick for a few minutes.
- Put the Kilim rug over the foam and center the pattern.
- Flip the board with the Kilim and fold the edges over the board.
- Use the staple gun to secure the rug.
- Add the hairpin legs.
Where does it fit in your decor?
While this bench can be used anywhere from the entryway to the kitchen, the mid-century style best fits a living room or a bedroom.
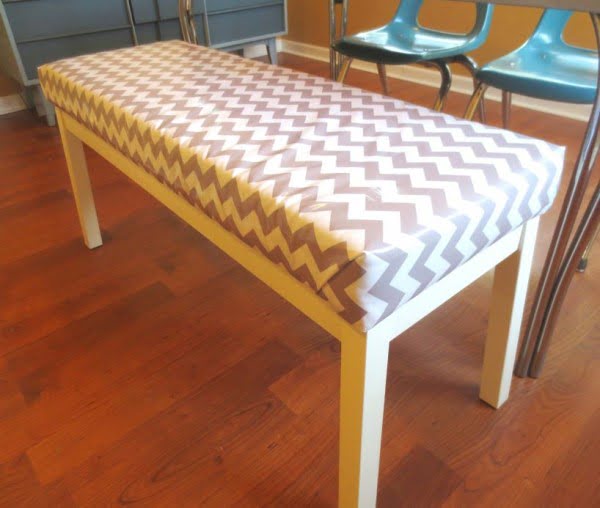
DIY Fabric Covered Bench
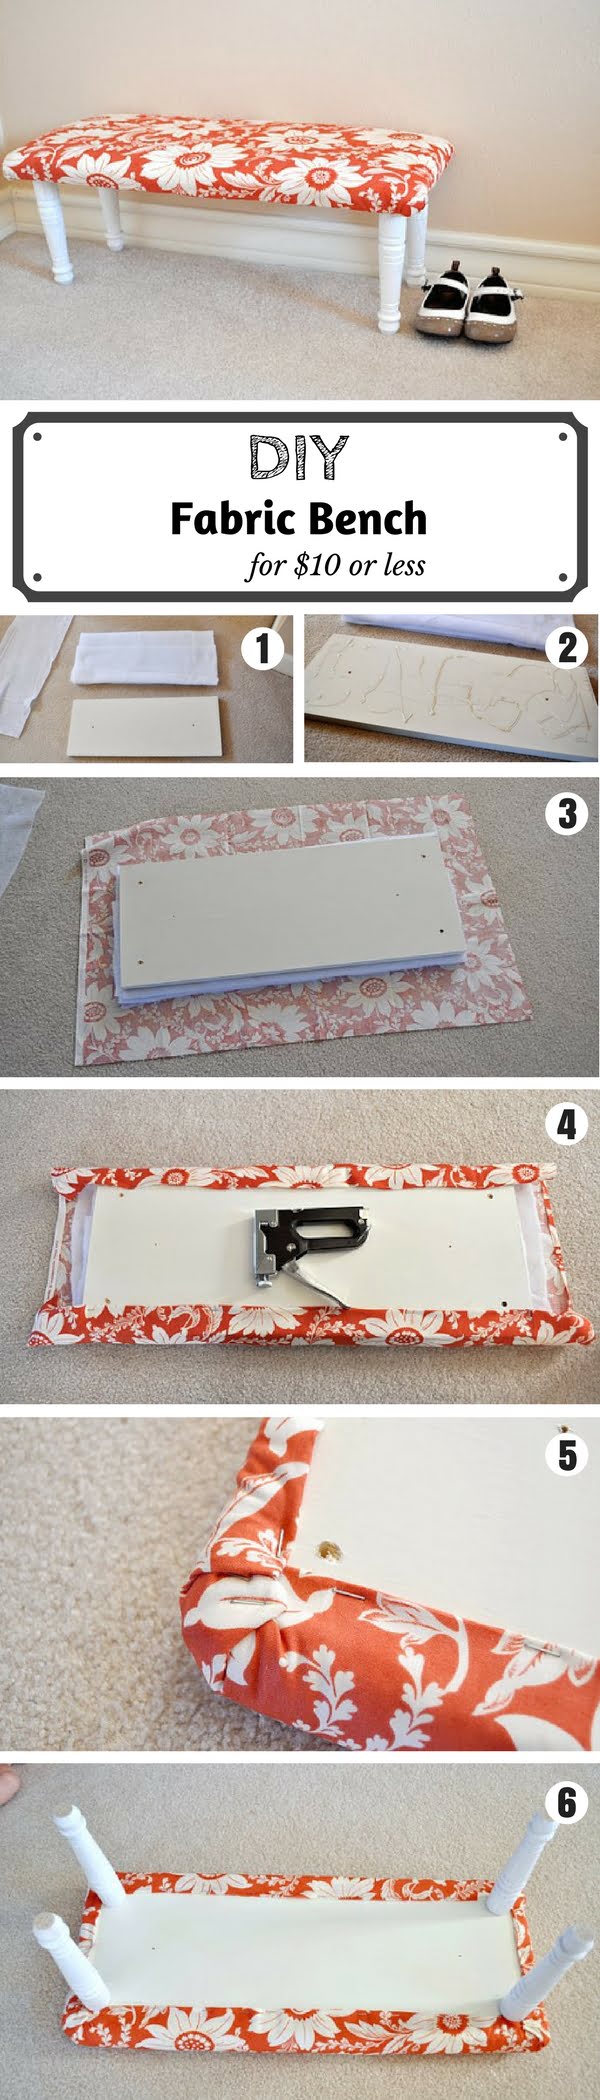
Brightly colored and patterned fabric benches seem to be all the rage these days, but they can be so expensive to buy or build. That’s not the case with this DIY project, which can be made for as little as $10 according to the tutorial.
Material list:
- A wood board of the size you want the bench to be.
- 4 legs of your choice – they can be balustrade, hairpin, or just 2×2 boards of required height.
- Fabric
- Batting
Directions:
- Cut the batting and fabric for the size of the board. Make sure the fabric is bigger enough so you can fold the edges over the board.
- Place batting on top of the board and cover with fabric.
- Alight the pattern of the fabric the way you want it to look.
- Fold the edges of the fabric and turn the board over.
- Secure the folds with a staple gun.
- Stain/paint the legs if needed and attach them to the board with screws.
- Enjoy your new bench.
This easy bench will make a great addition to your entryway or mudroom.
DIY Corner Bench
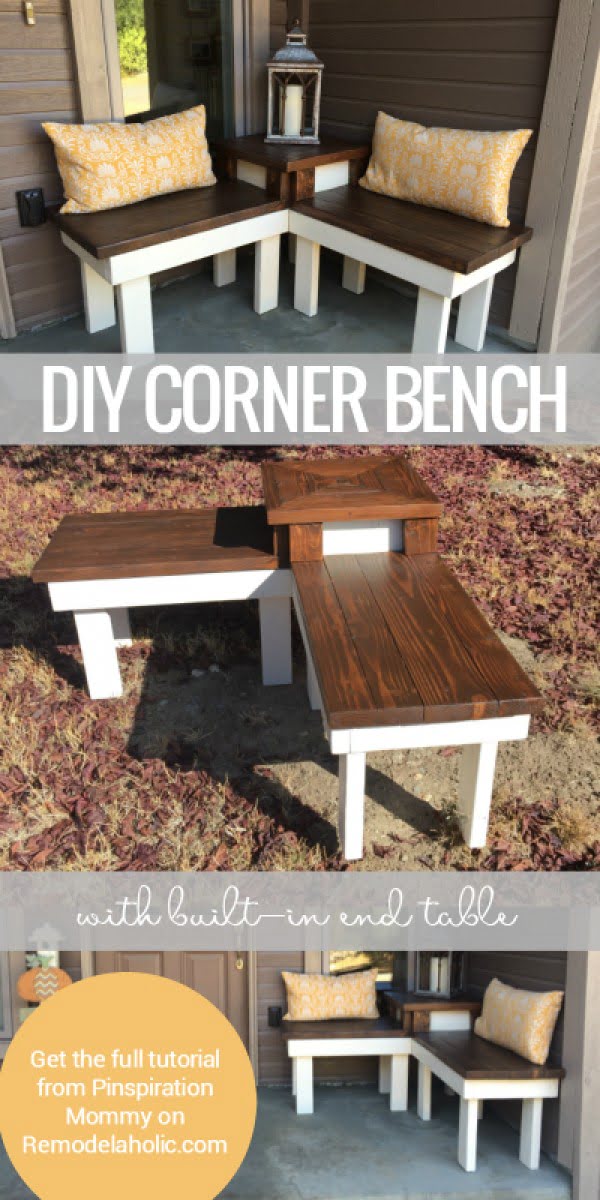
From a cozy reading nook inside your home to a special place on the porch or patio for relaxing, this corner bench is a hands-down winner. The addition of a built-in table makes for the perfect place to rest your drinks, a book, or to display some lovely spring or summer flowers.
Want one? Here’s what you will need:
- 2 boards of 2×6 wood at 8 feet.
- 7 boards of 2×4 wood at 8 feet.
- 1 board of 2×2 wood at 6 feet.
- Pocket screws and a Kreg jig.
- Woodworking tools.
- Wood screws and glue.
How to cut the wood?
Here’s the plan for this bench:
Consider this plan and the cut list to cut the wood boards for the frame and the tops.
How to put it together?
This bench is a bit more complicated to build compared to some others on the list. Follow the instructions carefully.
- Cut the wood for the frame and the three tops.
- Put it together as per the plan using wood glue and pocket screws.
- Cut the 2×4 wood for the legs at 16”.
- Attach them to the inside of the frame using wood screws.
- Sand and paint the wood frame and the legs.
- Make the built-in table box and its top.
- Attach it with pocket screws and wood glue to the bench frame.
- Make the bench tops.
- Sand and stain the tops.
- Attach them to the frame with wood screws.
- Fill any holes with wood filler and put more stain over them.
Where you can use this bench?
Any corner will fit. Think about creating a small reading nook or a banquette in the kitchen. This bench will be an excellent addition in a covered porch as well.
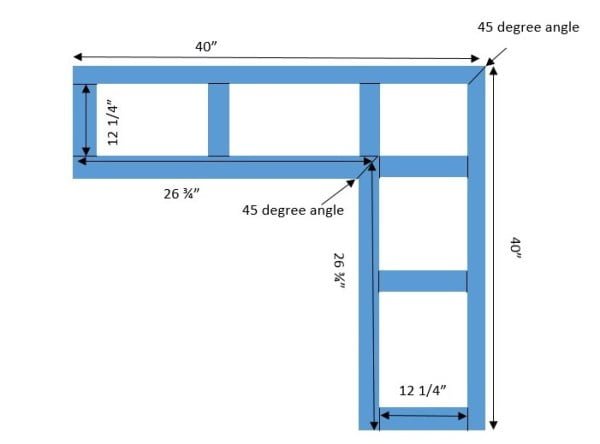
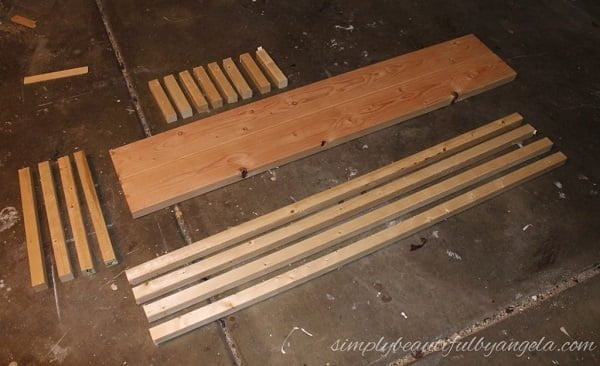
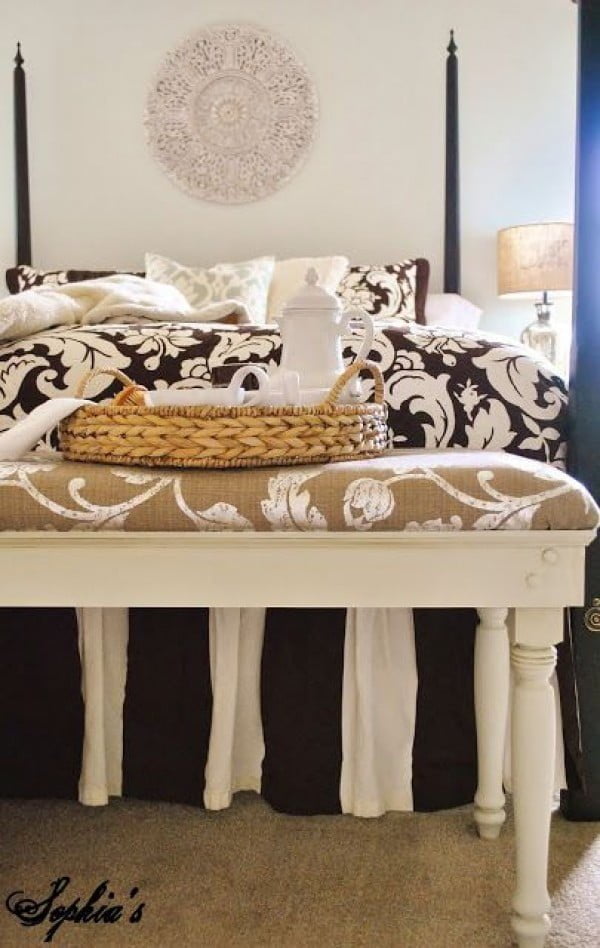
DIY End of Bed Bench
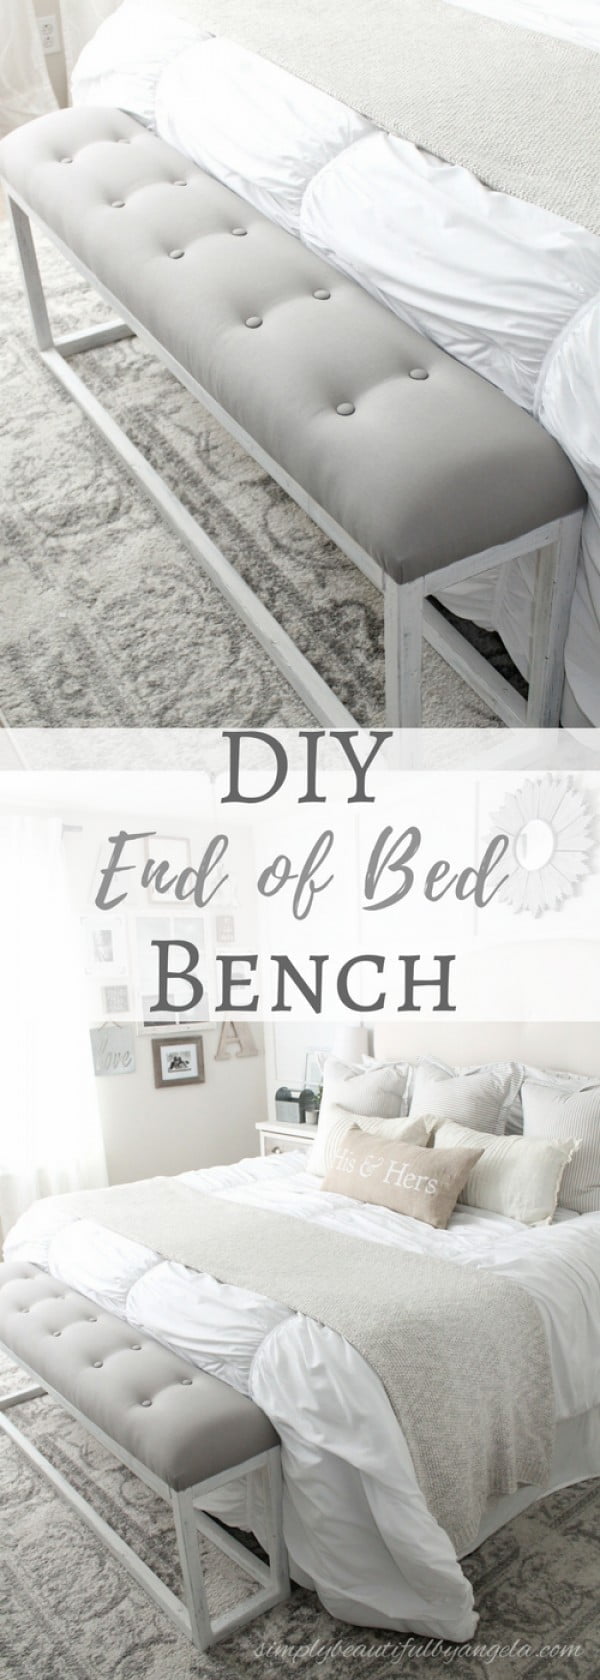
Here’s an end-of-bed bench that will serve to pull your master bedroom together, while serving as a focal point for the room. It will also help take up that space at the end of your bed frame, giving the bedroom a complete look.
What do you need to build one?
- 1 board of 2×6 wood at 10 feet.
- 5 boards of 2×2 wood at 8 feet.
- Foam mattress topping.
- Batting.
- Upholstery fabric.
- Cover button kit.
- Construction adhesive.
- Wood screws.
You can understand the cut list by looking at this picture:
Be sure to refer to the measurements on Angela’s site.
And here’s how to put it together:
- Cut the wood.
- Put the frame together using wood screws.
- Put together the top.
- Cut the foam and batting to measure the top.
- Secure them with construction adhesive.
- Cut the fabric to measure the top and enough to fold it over the edges.
- Secure it with a staple gun.
- Add cover buttons.
- Paint the frame and distress it with a sander for the rustic design.
- Attach the top to the frame with wood screws.
This turns out to be a gorgeous tufted bench to complete the design of your master bedroom. It will serve as a cozy place to sit down or leave a blanket on.
DIY Headboard Bench
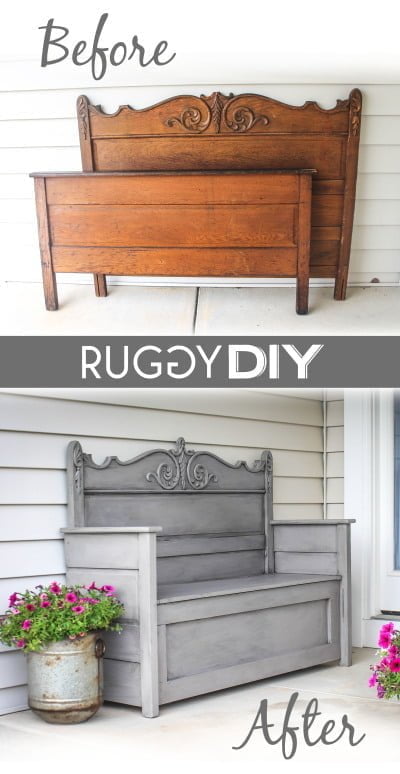
This bench is beautiful, stately, and functional. It takes an old headboard with footboard and turns them into a grand bench that also has a built-in storage space. And since you can use pretty much any old headboard, you can also build it as simple or ornate as you like, and it’s inexpensive as well.
How to build a bench from a headboard?
- Cut the footboard in half to use the halves as armrests.
- Use 2×4 wood and 3/4” thick plywood to create the bench frame.
- Optionally add hinges to the top (instead of using screws to attach it) for it to serve as the lid. This way the bench will have a lot of storage as well.
- Sand, and paint (or stain) the wood to get the design you want.
DIY Outdoor Bench
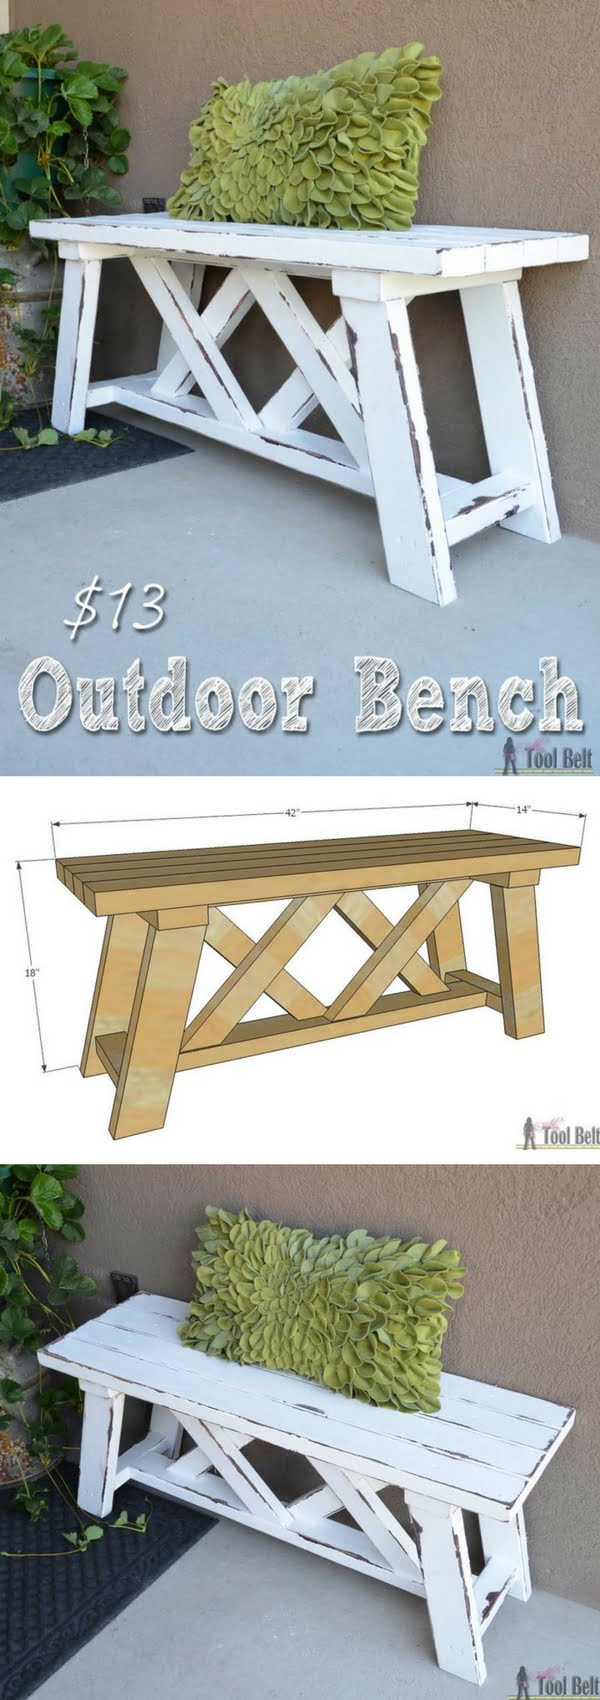
This cute outdoor bench features a double X frame to make it stand out. It can be perfect outdoors to provide a focal point but is equally at home indoors where it can be used to fill a space. Best of all it is very affordable and made easy to build as the tutorial will show.
What is needed?
- 4 boards of 2×4 at 8 feet.
- 1 board of 2×3 at 8 feet.
- Pocket screws
- Wood screws and glue
The cut list
- 4 boards of 2×4 wood at 15 1/2” with a 15 degree cut on both ends.
- 1 boards of 2×4 wood at x 27”.
- 4 boards of 2×4 wood at x 42” (for the bench top).
- 1 boards of 2×4 wood at x 34 1/2”.
- 2 boards of 2×4 wood at x 13”.
- 2 boards of 2×3 wood at x 9”
- 4 boards of 2×3 wood at x 16 1/4” with a 45 degree cut on both ends.
How to put it together?
Read the rest of the detailed tutorial for this bench on TheIdeaRoom.
DIY Dining Bench

The farmhouse bench is becoming increasingly popular both indoors and outdoors, and the benches shown in this tutorial become even more impressive when paired with a farmhouse table. You might think you aren’t ready to DIY the table, but these benches are merely a smaller version of one, so once you build the bench, the dining table will be a breeze as well.
Materials needed:
- 4 boards of 4×4 wood cut to 16 1/2” for the legs.
- 2 boards of 2×8 wood cut to 49 1/2” for the bench top.
- 2 boards of 2×8 wood cut to 14 1/2” for the bench top ends.
- 2 boards of 2×4 wood cut to 54 1/2” for the long apron.
- 2 boards of 2×4 wood cut to 5” for the short apron.
- 2 boards of 2×4 wood cut to 12” for the support.
- Kreg jig
- Pocket screws
- Wood screws
- Stain or paint
How to do it?
- Make the notches in the legs to add the support board. For this, but 1.5” deep with a circular saw at 3.5 and 7 inches from the bottom. Make a few cuts in between at a quarter-inch each. Removing the wood with a chisel and sand.
- Add the support with wood screws.
- Add the short apron at the top of the legs using pocket screws.
- Attach the long aprons to connect both pairs of legs.
- Make the bench top from the four boards using pocket screws.
- Attach the top to the base with wood screws.
How much does it cost?
It will cost you around $34 for the wood and about $25 for other materials.
DIY Pallet Bench
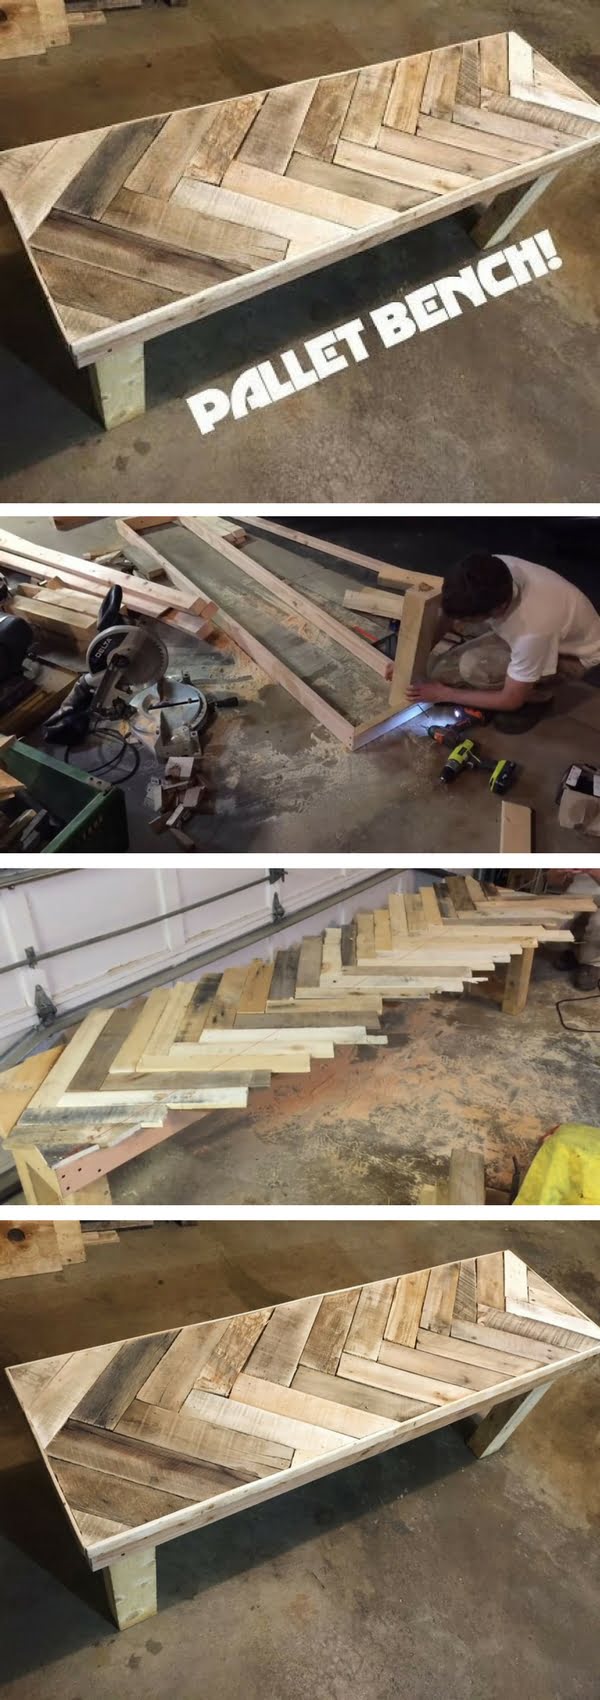
Discarded pallets are easy to find, making this pallet bench very affordable. It is also quite distinctive, with a herringbone pattern, although other designs are possible. With a few discard pallets, some 2x4s, and a few tools you too can have one of these unique pieces of furniture.
You will need these supplies:
- 2×4 wood for the frame (with ends cut at 45 degrees).
- 4×4 wood for the legs.
- Pallet wood cut to slats for the top.
- Gauge nails and a nail gun.
How to build this bench?
- Cut the 2x4s for the frame (two long and two shortboards based on the measures of your bench). Make sure your pallet slats are long enough for the width.
- Cut the pallet into slats.
- Build the frame with 2x4s and wood screws. The 45-degree cuts make it easier. Add the legs.
- Put the pallet slats in a herringbone pattern at 45-degree angle each. Use gauge nails to put fix the ends together.
- Attach slat ends with screws to the frame.
- Cut the ends of the slats for a smooth edge.
DIY Faux Fur Bench
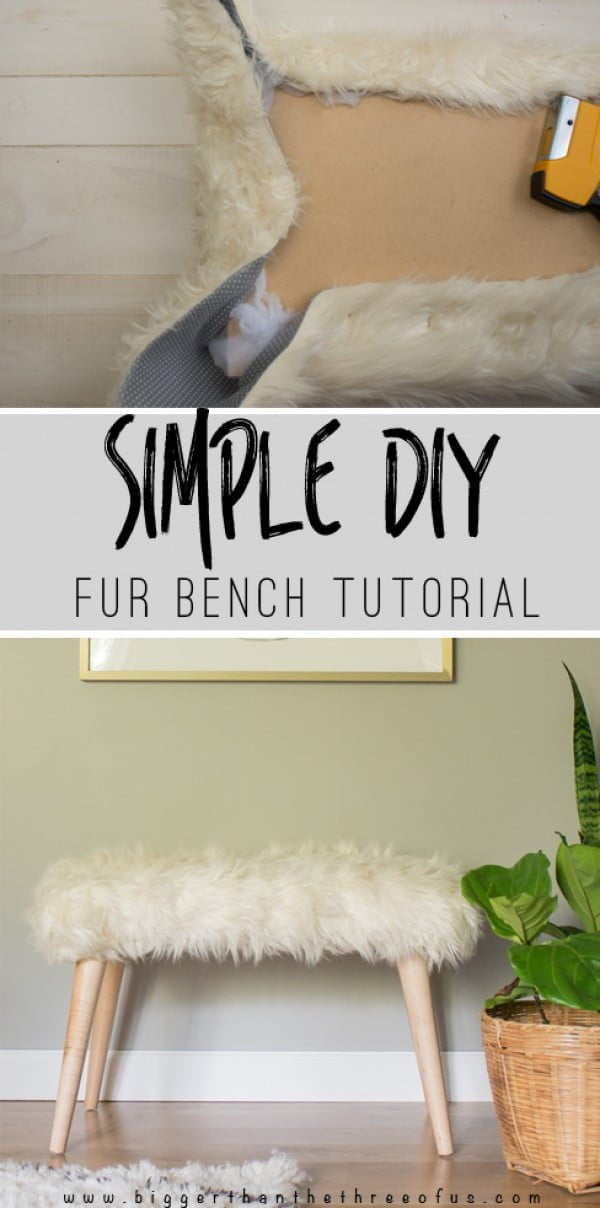
If your idea of comfort revolves around things that are soft, warm and furry, then you’ll love the plans for this faux furry bench. It seems great for when the weather turns colder and would go great for animal lovers or just those who appreciate the furrier things in life.
What do you need to make this project?
This project is very similar to other ideas that involve upholstery, so you will need much of the same materials and tools:
- Plywood board to measure the bench top.
- Batting and padding fill.
- Faux fur.
- Construction adhesive.
- Staple gun.
- Bench legs.
How to put it all together?
- Cut the faux fur to measure the plywood board.
- Place the padding fill and batting on the plywood and glue it with the adhesive.
- Fold the faux fur over the board and use the staple gun to attach it.
- Attach the legs with wood screws.
This bench will add pizzazz and luxe to any room. The faux fur design looks a lot more expensive than it actually is.
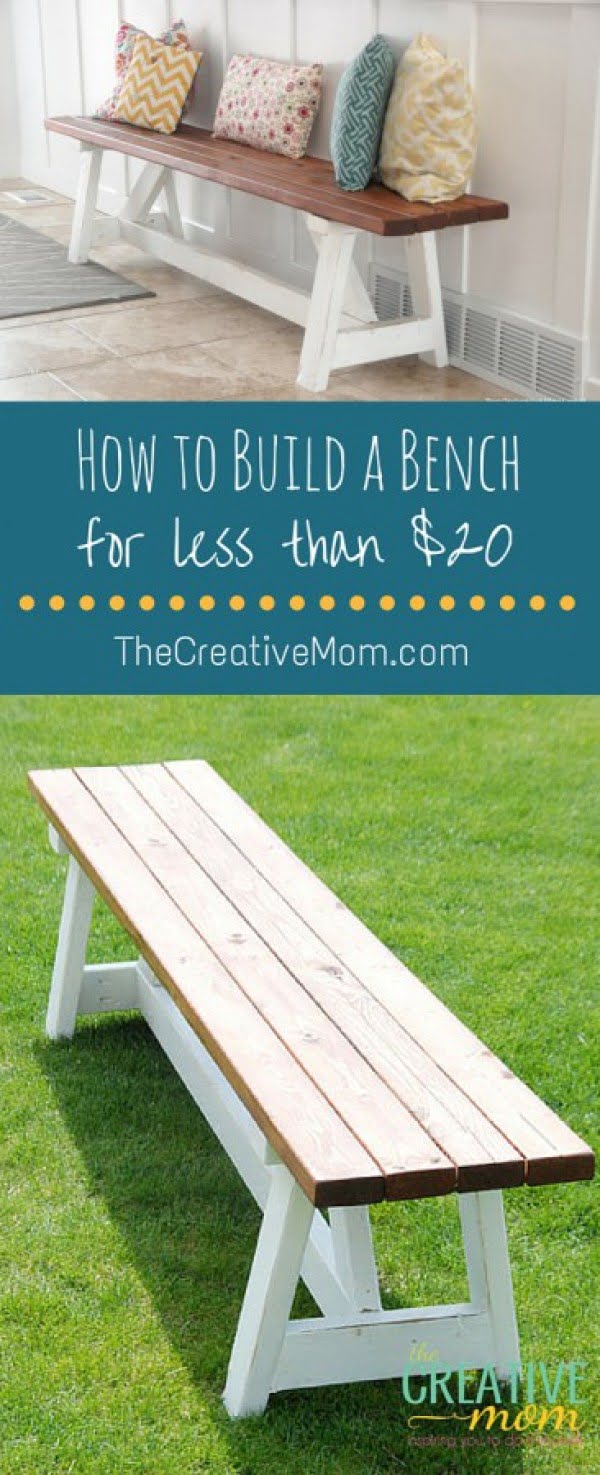
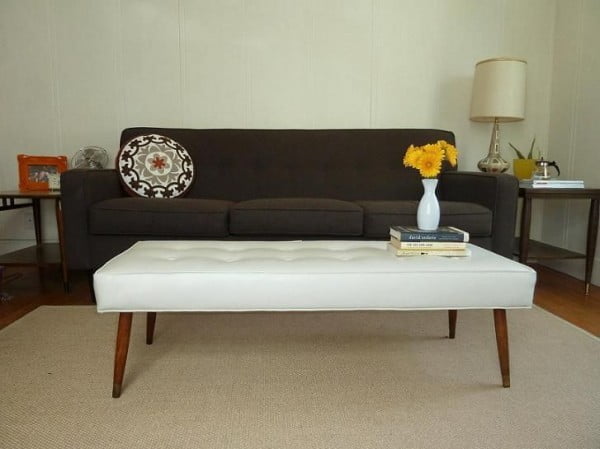
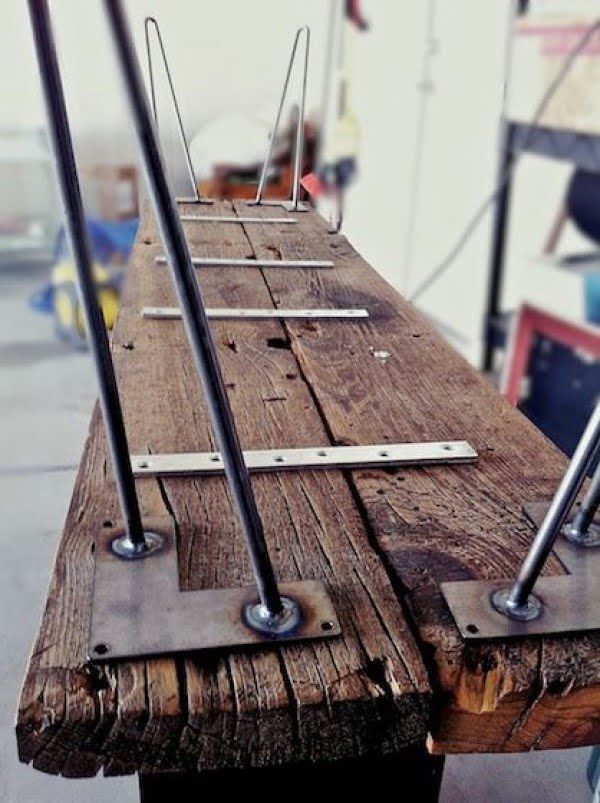
Modern Wood Bench
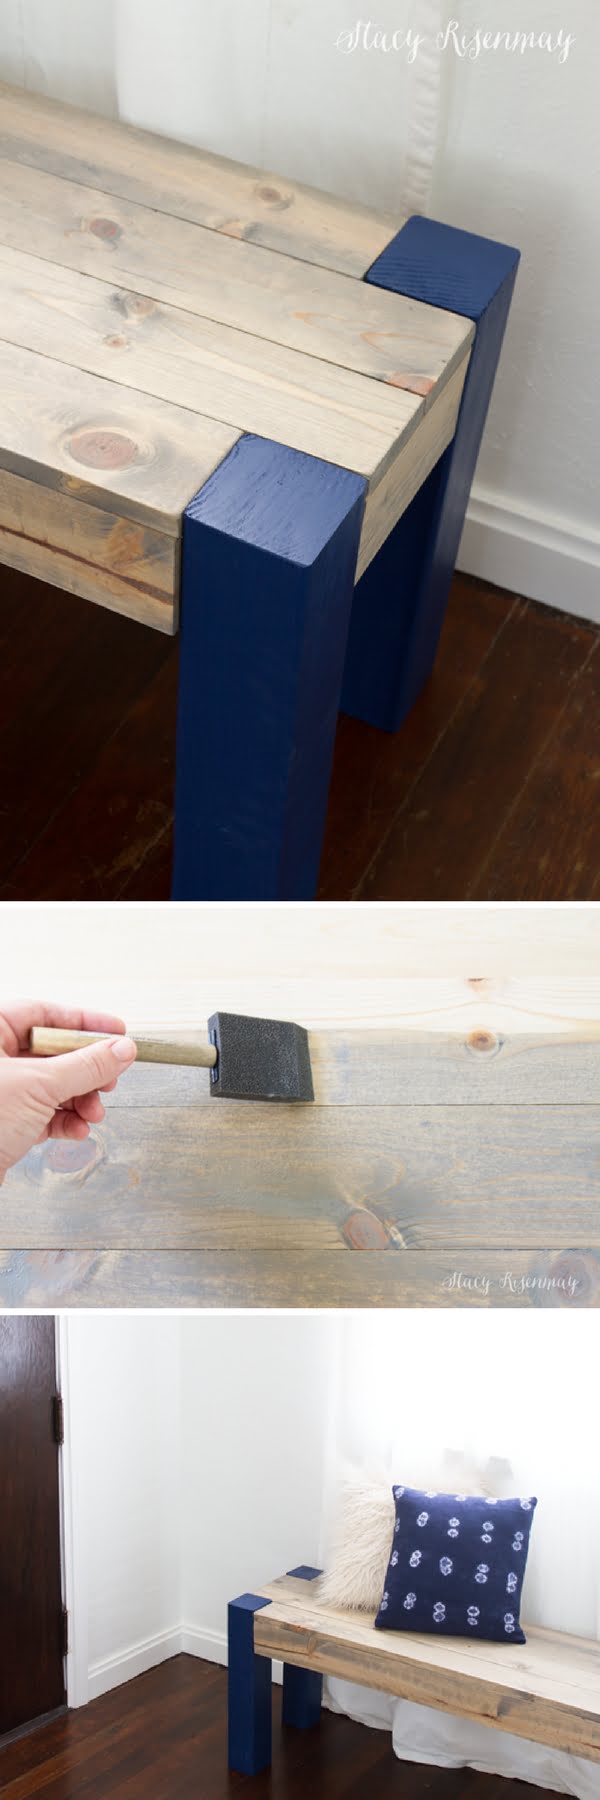
We pick this bench as the best idea and tutorial on our list. It’s very easy to build and the modern look is very appealing. The idea of painted legs is a nice accent and it’s straightforward to customize.
If you need a simple, functional bench look no further. Here’s an easy made modern design that anyone can build. It’s perfect for filling in empty spaces and would go great in a child’s room as it is not quite as tall as some other benches.
The wood needed:
- 4 boards of 1×4 wood at 41” (for the top)
- 2 boards of 1×4 wood at 48” (for the top)
- 3 boards of 1×4 wood at 12.5” (for the top braces)
- 2 boards of 1×4 wood at 7” (for the ends)
- 4 boards of 4×4 wood at 18” (for the legs)
- Wood screws
- Metal braces
- Stain and paint
Putting it together:
- Use the 12.5” braces to attach the top together.
- Attach the sides to the top using metal braces and wood screws.
- Stain the top.
- Paint the legs.
- Attach the legs to the top using metal braces and wood screws.
And there you have it – your new modern wooden bench that will serve as an excellent seat and decor accent.
DIY 5-Board Bench
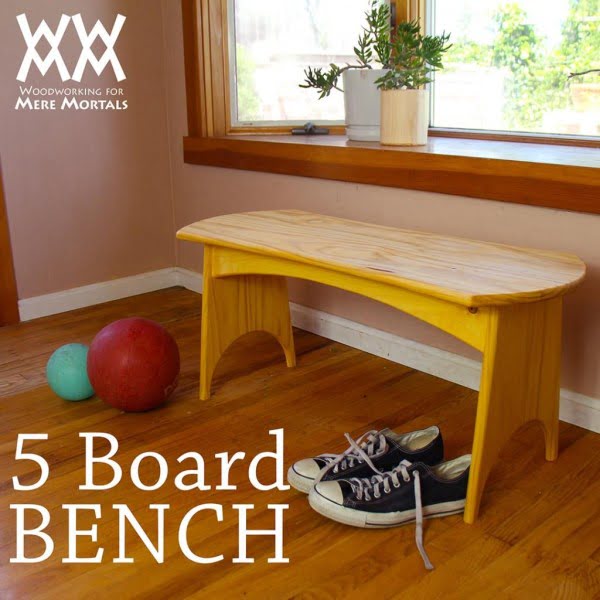
Here’s a nice little bench project that meets two critically essential benchmarks: It’s easy made for you to build one and it looks like you didn’t DIY. A very professional and understated little bench that appears to be something you’d find in a high-end shop.
DIY Benches for Beginners

You can also make this sturdy, familiar bench out of very ordinary materials, even things you have lying around or can find in scrap heaps. That can be easily made a very earth-friendly option for those who are into repurposing old materials.
West Elm Knockoff Bench
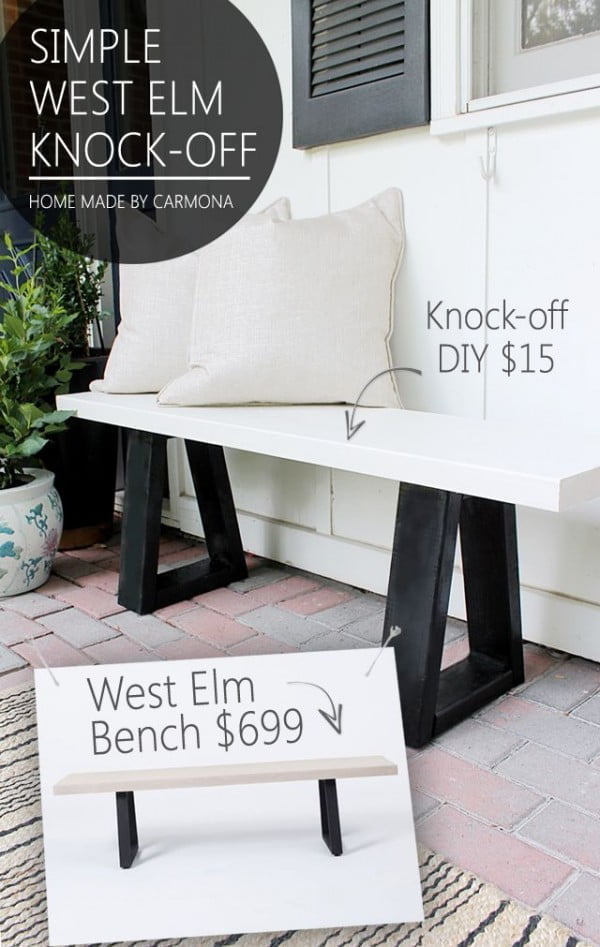
A great example of how much markup is found on even the simplest of mass-produced items. You can buy this bench in the West Elm catalog for a mere $699, or you can also make one yourself for practically a song and have it finished in the color that will complement your current decor.
Weathered Gray Finish Bench

How about building a tremendous antique design creation that is sturdy enough to carry any load but looks like it came out of Amish country? You can do it easily with this project, and you’ll learn a lot about antiquing finishes to boot.
Plumbers Pipe Benches

Of course, benches are made out of other materials than just wood. This simple little plumber’s pipe bench project is a great way to get involved in the art of bench making without needing a lot of woodworking skills or tools.
Tufted Benches
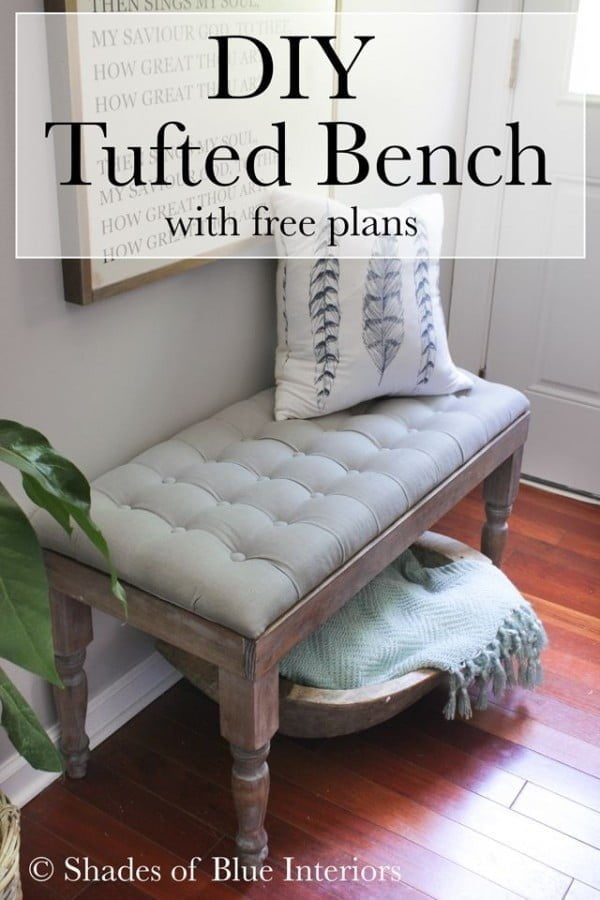
When you’re ready to try a DIY bench project that incorporates some comfy cushioning on top, this is the one you’ll want to do. Just beautiful, so practical, and you’d never guess these weren’t professionally made benches.
IKEA Hack Benches
Now here’s a great way to build benches without having to, you know, make one. Why not update a perfectly functional, yet dull, item you already own and turn it into something uniquely made?
Mid-century Modern Benches
One of the best ways to beat the high cost of retro furniture is to do your own retro-ing. This fabulous 50s Mid-century modern bench is such a perfect match for the era, and it will make all of your other period pieces look even better. It is, however, more about upholstery than it is about making of the bench.
X-bench
Finally, someone who understands that mistakes can happen and provides solid advice on how to avoid making them yourself. Oh, and it’s a tremendous little X-legged bench project that you’re going to love as well. It’s one of the best looking benches albeit one of the most involved projects.
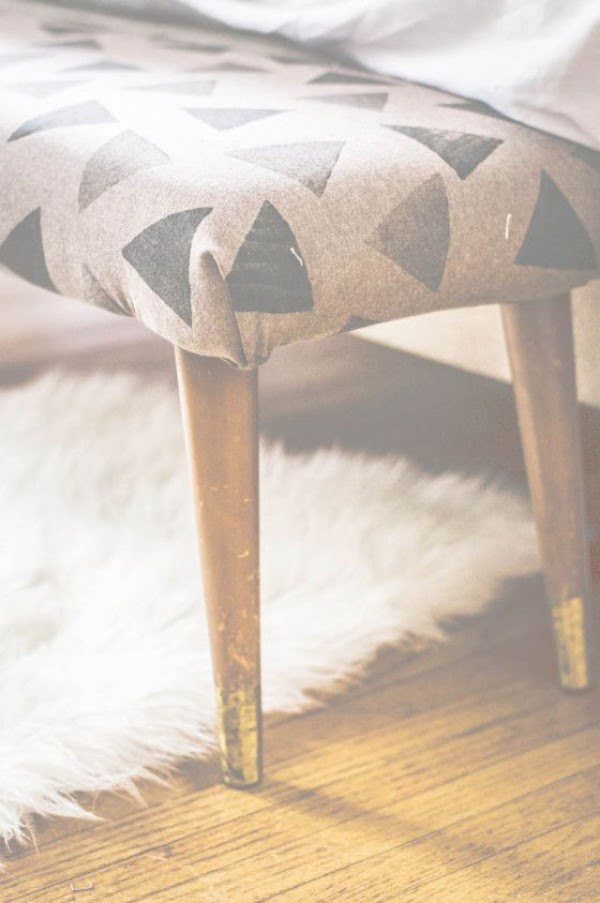
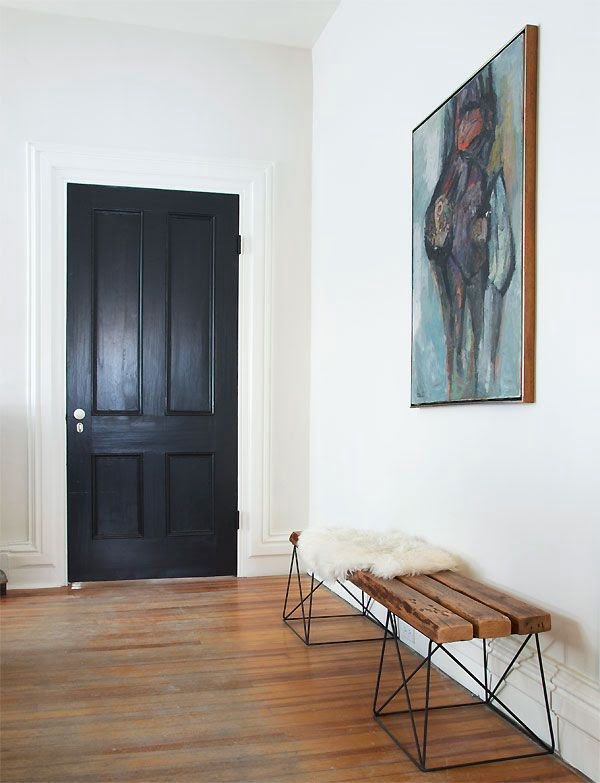
Benches with Hairpin Legs
Speaking of benches from the Atomic Age, this little jewel is not only a perfect ringer for something out of that era, but the materials only cost about as much as you’d spend in 1963. If that isn’t good enough, it also is a very quick and easy made project to create.
Brushstroke Upholstered Benches
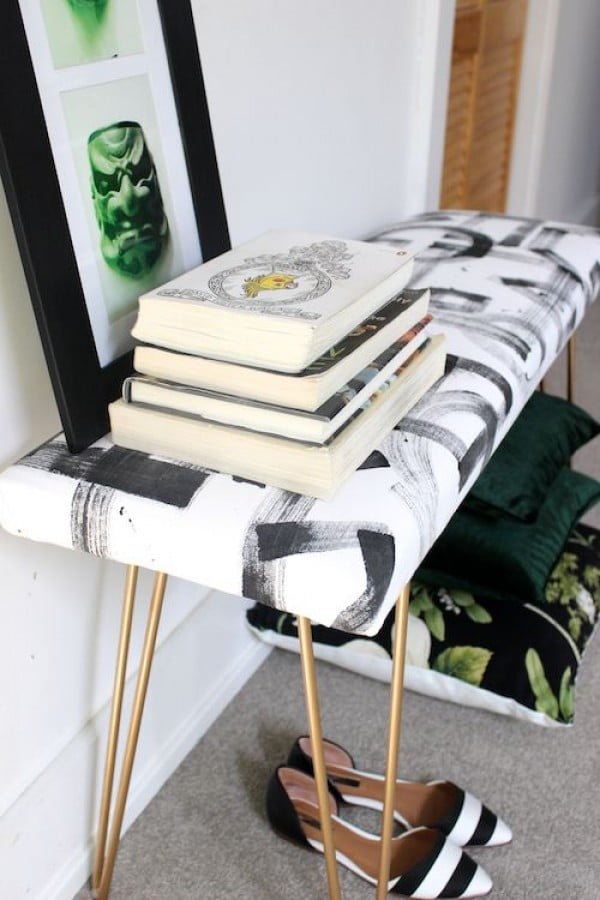
Looking for something a little more avant-garde and creative than your classic wooden bench? Why not try out this daring departure that features some charmingly bold artwork on the fabric? There isn’t a wrong way to do this sort of impressionistic design so give it a shot. It’s so easy you’ll want to make a few of these benches at home.
Bedside Benches
The great thing about hairpin legs on benches is that they are made so easy to install and look so great. Plus, of course, you can paint them to match practically anything. Add in a fabulous repurposed kilim rung on top, and you’ve got a sure winner on your hands.
Entryway Benches
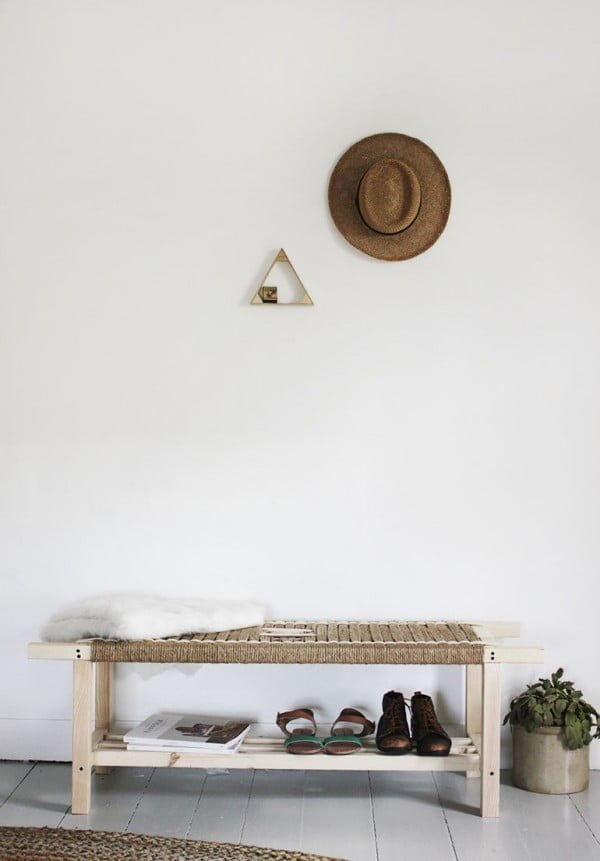
Many spaces, particularly in older homes, are best suited for very natural-looking benches. This woven topped jute bench is simply perfect for those instances where glass and chrome are not going to cut it.
End of Bed Benches
One of the most significant advantages of DIY furniture is that you can adjust the dimensions of the benches to perfectly suit your specific requirements. Unlike factory benches, which tend to come in standardized sizes, you can produce the perfect fit for your own imperfect spaces.
Modern Upholstered Benches
Who needs old junky coffee tables? Anyone who wants to add fabulously made stylish new benches to their homes. The best part is that virtually all of the woodworking is already done for you. Just add style and away you go.
Rustic Hairpin Benches
Some of the best and most simple DIY benches come from people who are not typically involved in building such things. Here is an excellent and straightforward project that looks great and even beginners can do it.
Upholstered Bedside Benches
The thing about benches is that so much of the project is built around the legs that go underneath that big slab of wood which otherwise comprises the piece of furniture. So check out the variation of the bench in the prevalent Mid-century modern design.
Numbered Pallet
Looking for an idea that is whimsical and just plain fun? This is the one made for you. Oh, and fun also means easy to do, doesn’t it? Making this bench project is a real piece of cake.
Pallet Rustic Benches

Who doesn’t love the idea of a DIY pallet project? Costs are low, creativity is the prime ingredient, and you end up with something that nobody else will ever be able to match if they tried for a thousand years. Build this pallet bench for your unique accent piece.
Reused Kilim Benches
People seldom realize the value of excellent directions until they stumble across one of the projects that features them. For those who are just starting on DIY bench building, this is the perfect place to start your quest. Build one of these easy benches by following the tutorial.
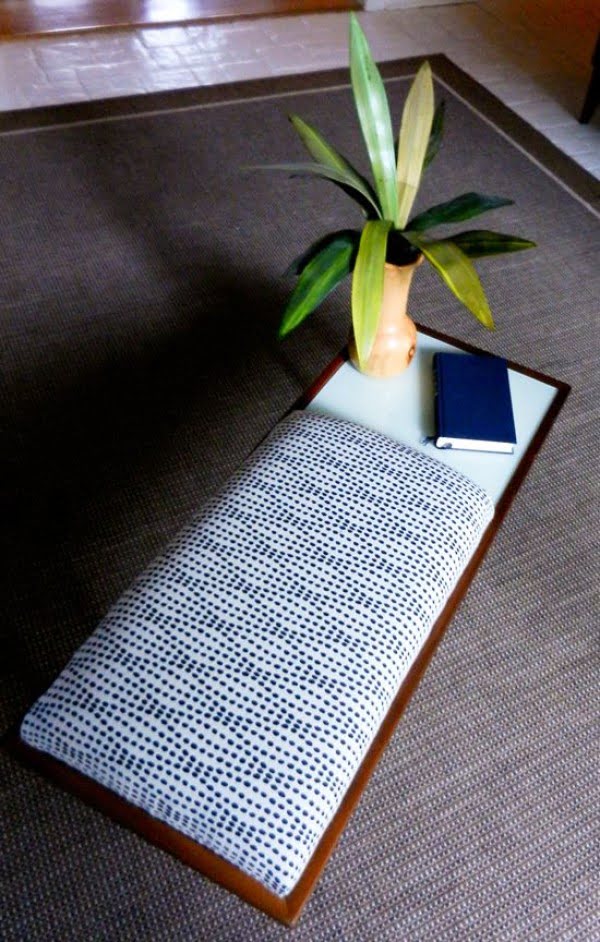
Nelson Platform Benches
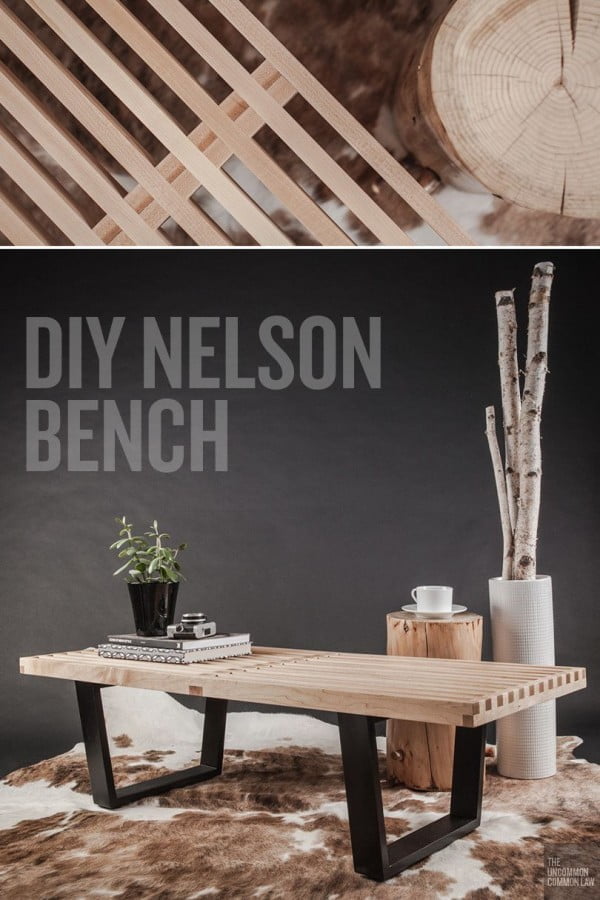
For those who are better endowed with woodworking skills and equipment, this is one of the best projects that will produce a fantastic replica of a modern classic piece of furniture that has never gone out of production since its introduction in the 1940s. Nelson benches are popular for their unique look and you can build one of them by following a tutorial.
Slat Wood Benches

Some DIYers love the slat wood design but lack the expertise to tackle a Nelson Bench knockoff; this is a great compromise that is much easier to construct and still retains much of its panache. If you want to build one of these benches there’s a nice tutorial for you.
Rustic Modern Benches
When it comes to turning old items into new ones, it is good to keep in mind that the old items and the new items do not have to belong to the same kind of things. Here, a couple of castoff dorm stools are turned into a classy, yet easy to make, bench. It’s one of the most unique benches out there.
More Like This
 18 Thanksgiving Wreaths to Wow Your Door for the Festivities
 13 Thanksgiving Trees to Spruce Up Your Holiday Decor
 21 Thanksgiving Party Decorations That Gobble Up the Festivities
 25 Thanksgiving Centerpiece Ideas That Steal the Show
 25 Thanksgiving Tablescapes That Wow
Recap