Last updated on
In short: yes, it is easy to install a handheld showerhead. Let us show you how easy it is to install it in a few different cases.
Installing a showerhead requires only basic plumbing skills. You will need to cut holes through the bathroom shower wall using a jigsaw or drill bit. Then install the mounting bracket by screwing it directly onto studs behind the walls. Finally, attach the showerhead itself to the bracket. If you plan to use a magnetic connection between the two pieces, make sure to mark where the magnet should go before drilling any holes.
If you already have a shower arm installed, any standard showerhead will fit your shower.
Note that this type of installation is different than the fixed showerhead.
How to Change a Shower Head
Showers are one of the most important parts of your home, and they can be expensive if you don’t know what you need or how to change them out when it is time for an upgrade. In this guide, we will show you some tips on changing showerheads to save money while still getting great results!
If your current showerhead needs replacing, here’s what you do:
- Remove the old shower head by loosening the nuts that hold it in place. If possible, disconnect the hoses attached to the shower head.
- Install the new shower head using the same method described above. Tighten all bolts securely.
- Test the flow rate of the new shower head. Adjust the diverter valve, then turn on the water.
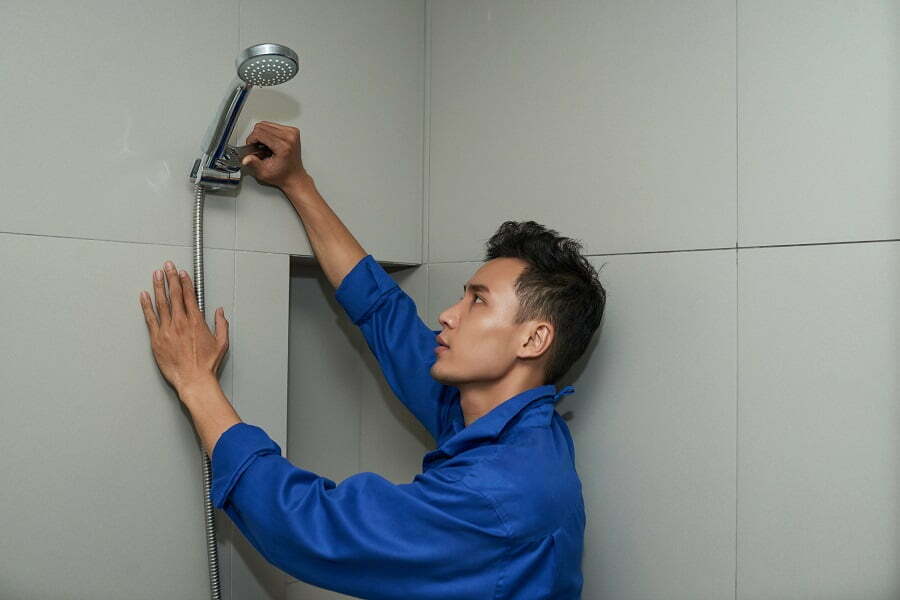
How to Install a Handheld Showerhead
Remove the old showerhead and hose assembly from your wall, if applicable. If you are replacing an existing showerhead with a handheld one, remove it first so that there is no water in the pipe when installing the new unit.
Measure where on the wall you want the new showerhead installed. The most common location for this type of installation is at eye level.
Preparation
Remove any clamps from your current showerhead. If you have a single-handle showerhead, remove the entire assembly, including the handheld spray part. For double handles, disconnect each side by removing the screws holding them together. You may need pliers to loosen these fasteners.
Unscrew the mounting bracket. This will allow access to the threaded portion of the shower arm where the showerhead was attached.
Note that the showerhead diverter valve installation will depend on the type of diverter you use. The common types are:
- 3-setting diverter.
- non-shared function diverter cartridge.
- 3-function diverter cartridge.
- 3-setting diverter trim kit.
Tools
If you’re going to install your own handheld showerhead, the following tools are needed.
- Adjustable Wrench Set
- Channel-Type Pliers
- Tub Spout Diverter Valve
- Plumbers Tape
- Shopping List
- Handheld Showers
- 1/2″ x 3′ Flexible Hose
- 3 1/4″ Hex Nut
- 5/8″ x 2 5/16″ Fitting Adapter Kit
- Drill Bit
- Screwdriver
Materials
- New Fitting
- Tub Spout Diverter Valve
- Hose Adapter Kit
- Waterproof Tape
- Screws
- Washer/Oval washers
- Plastic Cap
- Rubber O-ring
Standard Fitting
- Remove the old showerhead. Use an adjustable wrench or channel lock pliers to unscrew the showerhead.
- Clean the threads on the showerarm. Wrap them with plumber’s tape starting in a clockwise direction 4 or 5 times. Do not go past the threading. This prevents leakage if the showerhead should leak later.
- Drill holes through the center of the showerhead mounting flange. These allow air flow around the showerhead.
- Make sure they are large enough to accommodate the diameter of the hose adapter kit.
- Attach the fitting using hex nuts. Tighten until snug but do not overtighten.
- Connect the flexible tubing between the shower head and the diverter valve. Be careful not to kink the tube as you tighten the fittings.
- Install the tub spout diverter valve. It can usually be found near the bottom of the bathtub drain line. Make sure that there is no obstruction before installing this device.
- Turn off all cold water supply valves at both ends of the system. Open the faucet closest to the new showerhead so that warm water flows into the mixing chamber. Close the other end of the piping when finished.
- Test the water pressure. Check the temperature and volume of the water coming out of the showerhead.
- Replace the showerhead cover plate.
Cross-Tee Diverter Fitting
This type of showerhead uses a cross-tapered design instead of around one. It can be used with both standard and angled fittings. A diverter valve controls how much hot and cold water flows through the two sides of the showerhead. You’ll need a special adapter plate to install the diverter valve.
Remove the old showerhead first if necessary. Then install the cross tee fitting over the top of the existing showerhead. Use plumbing tools such as a wrench or pliers to adjust the angle until both ends are level. Please make sure there aren’t any obstructions between them.
Thread the flexible shower hose into the cross tee fitting. Connect the showerhead to the outlet closest to where the hose enters the fitting. Turn on the water supply and test the system.
Tub Spout Diverter Valve
The tub spout diverter valve is used when there are no preinstalled brackets available. You can install it yourself if you have plumbing experience; otherwise, hire someone who knows how to work with these valves.
Before beginning installation, remove the existing shower arm from its mounting location. Wrap several loops of plumber’s pipe-seal tape over the threads on the shower arm, then unscrew the shower arm from the wall stud.
Before removing the old tub spout, wrap several loops of plumber’s pipe-seal tape over its threaded ends. Then remove the old tub spout from the bathtub.
Insert the new tub spout into the drain opening, making sure there are no obstructions. Screw the nut onto the threaded part of the new tub spout until snugly seated against the inside surface of the bathtub.
Slide the bar into position under the bottom edge of the bathtub rim. The bar should be centered between the front edges of the tub and the tile walls.
Use a level to make sure the bar is horizontal. Then secure it with screws driven through countersunk pilot holes. Use a drill bit slightly larger than the diameter of the screws, so they don’t split the wood.
Connect the flexible hose from the handheld showerhead to the slide bar or mounting plate. Attach the end of the flexible hose to the slide bar or mount plate with a hose clamp.
Test each joint between the slide bar/mounting plate and the wall for leaks before turning on the water. Use a flashlight if necessary.
FAQ
Yes! They’re easier than installing an overhead shower because you won’t have to cut into your ceiling. If you want to use a different type of showerhead, get another adaptor that fits the same size hole.
There’s usually only one kind needed: a “cross tee” fitting. This is what connects the handheld showerhead to either side of the showerhead already installed.
You’ll first need to disconnect the current showerhead. Next, attach the adaptor to the top of the showerhead using the included nuts and bolts. Finally, connect the other end of the adaptor to the handheld showerhead by threading the flexible shower hose into place.
It depends on where you live and whether you choose to DIY or pay a professional installer. A typical job will run about $150-$200 depending on materials and labor costs.
No. You can easily complete this project without needing anything more complicated than a screwdriver. However, some people prefer to buy their own set of specialty plumbing tools like wrenches, pliers, etc., which may help save time when completing the job.
If you’ve got a standard showerhead, you can probably reuse it as long as it has been removed at least once since being put up.
The best location for a handheld shower is near the center of the room. It gives you maximum coverage while still allowing plenty of space around you.
Handheld showers give you greater control over how much pressure you apply to yourself. An overhead shower tends to spray too hard and often leaves droplets behind. Handhelds also allow you to adjust the flow rate of the stream.
Sure! Just make sure both are connected to the same supply line. The easiest way to accomplish this is to add a second cross-tee adapter to the original one.
A handheld shower allows you to customize the amount of water sprayed onto your body. With an overhead shower, there isn’t really any choice but to let all the water fall upon you.
More Like This
 18 Thanksgiving Wreaths to Wow Your Door for the Festivities
 13 Thanksgiving Trees to Spruce Up Your Holiday Decor
 21 Thanksgiving Party Decorations That Gobble Up the Festivities
Recap