Last updated on
Creating DIY room dividers can transform your space into a functional and fabulous area because these solutions offer privacy while adding creativity and personal touch to your interiors.
This article includes my original designs. Some of them may be exaggerated to make a point — that’s my style. Enjoy them for your inspiration!
Meet the world of DIY room dividers, a realm where creativity takes centerstage. While there are plenty of mainstream ideas out there, this piece dives deeper, slicing through the noise to unveil some fresh, unique spin-offs to the traditional divider.
Think beyond the face value of mere separation; each customization speaks volumes about your style and personality. Will your creation make guests do a double take or subtly merge with your decor? Stay tuned to unravel these secrets.
And yes, the best existing ideas wouldn’t be left out – resources to these will wrap up the article. Venture forward and find yourself inspired and pleasantly surprised by this revitalized list. Who knows, you might just stumble upon the idea that perfectly clicks with your aesthetic.
Let the exploration begin!
- Vintage bi-fold door divider: Create a unique space partition with character.
- Metal mesh screen divider: Embrace industrial elegance while providing privacy.
- Hanging plants room divider: Transform your space into a lush oasis for privacy and greenery.
- Bamboo sticks room divider: Harness natural beauty and create an earthy partition.
- PVC pipe room divider: Embrace versatility with a lightweight and customizable solution.
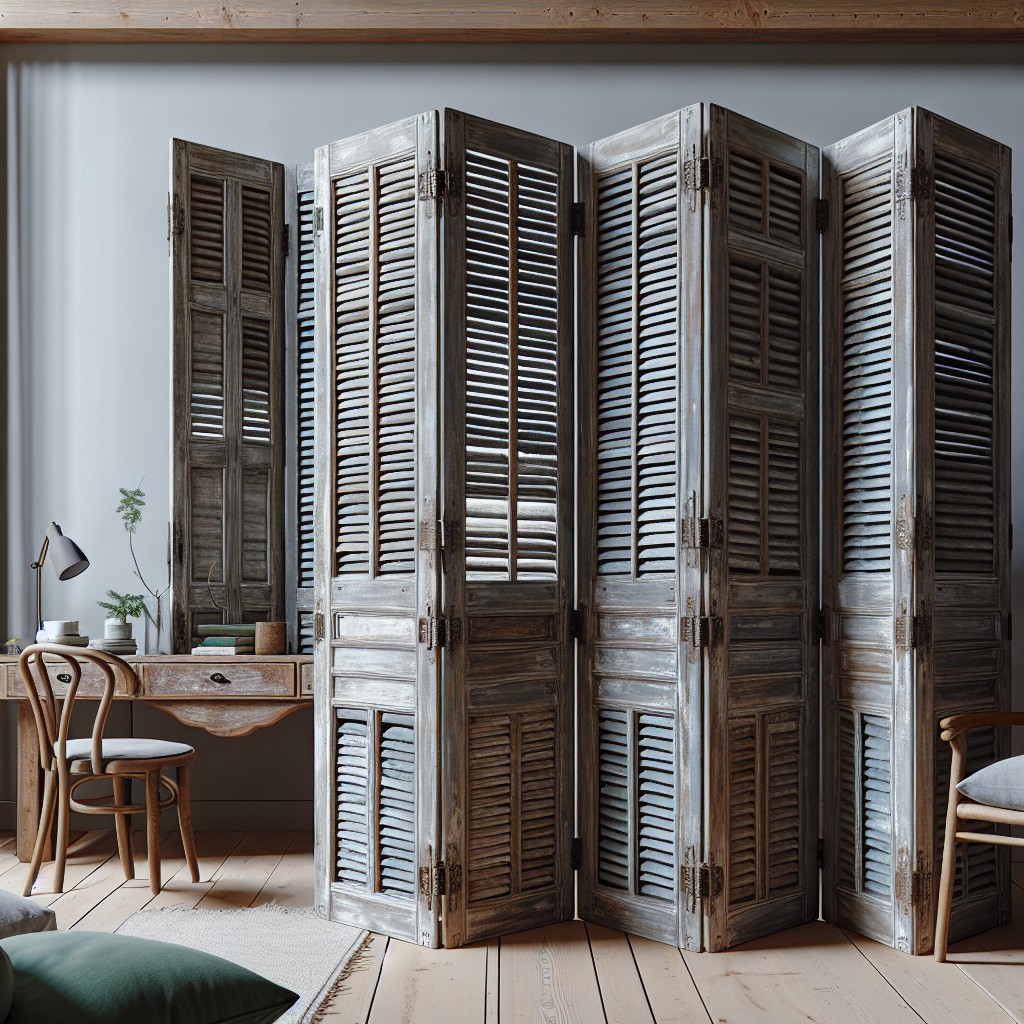
DIY Vintage Bi-fold Door Divider

Harness the timeless appeal of a bygone era by utilizing vintage bi-fold doors as a charming room divider. To embark on this project, seek out doors with character at flea markets or antique shops—ones that match your room’s aesthetic. With your finds in tow, follow these concise steps to create a unique space partition:
1. Preparation: Clean the doors and remove any hardware that detracts from the aesthetic or might hinder the divider’s function. Sand as necessary if you plan to repaint.
2. Hinge It Together: Align the bi-fold doors side by side and attach them with hinges. If they’re not already attached, this allows them to fold neatly and stand upright.
3. Personalize: Paint or stain the doors in a color that complements your décor. Consider distressing the paint for a shabby chic look or preserving the original patina for authentic charm.
4. Stabilize: For stability, install feet or anchors. These can be as simple as brackets that allow the divider to pivot without toppling over.
5. Accessorize: Add a personal touch with hooks for hanging decorative items or install glass panels for a more refined look.
Using these doors not only adds a decorative element but also serves a functional purpose by delineating spaces without the need for construction.
DIY Metal Mesh Screen Room Divider
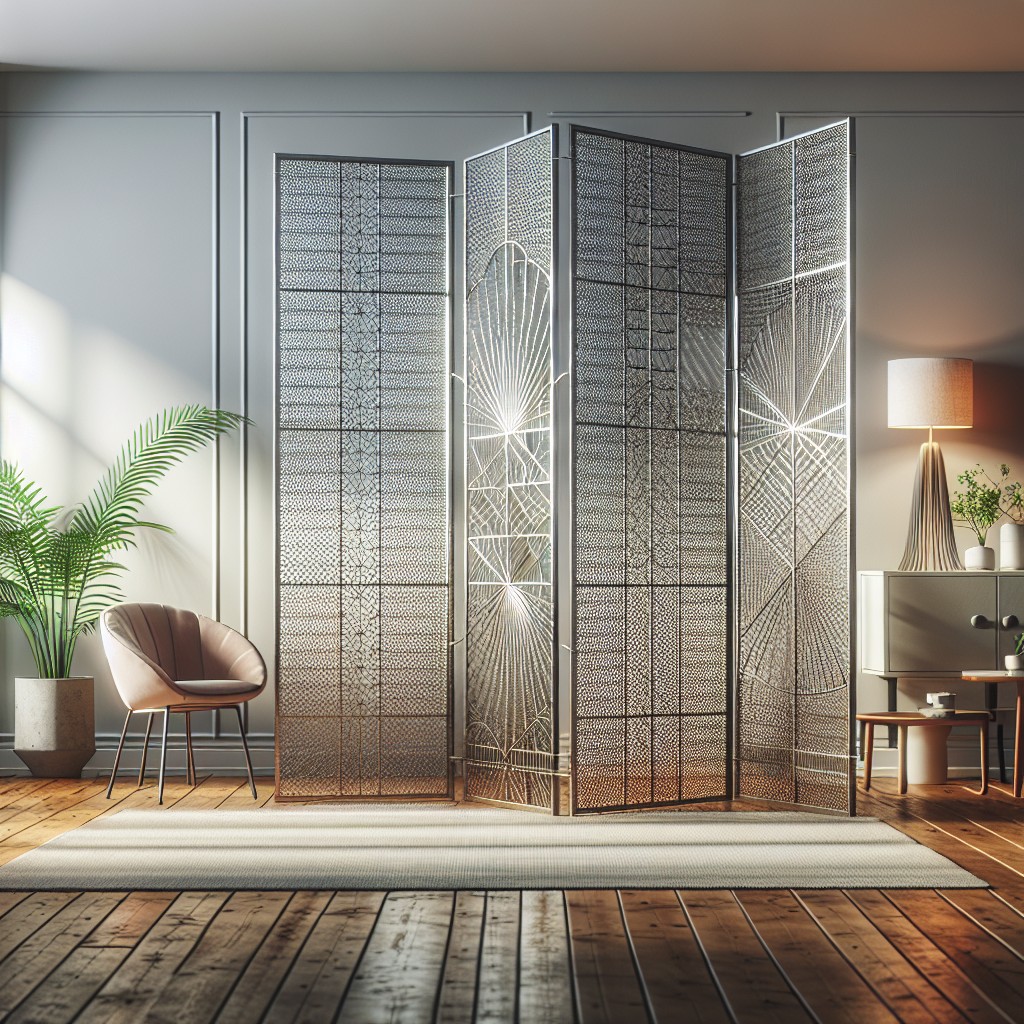
Embrace industrial elegance by crafting a metal mesh screen divider, a trendy and functional piece for your living space. The open wire design doesn’t completely block off areas, ensuring light flow and visual connectivity, while still providing a clear partition.
Select metal mesh panels in your desired weave size and construct a solid frame from wood or metal to create stability. Ensure your frame complements your home’s aesthetic—whether stained, painted, or left in its natural state. Attach the mesh to the frame using a staple gun or specific fasteners for metal, such as rivets or screws.
Customization is key. Enhance the metallic look with clamps and bolts for an extra industrial touch or soften its appearance with hanging plants or fabric. For mobility, consider adding casters to the base.
Remember, safety first—a secure assembly and stable base will prevent tipping. This divider works exceptionally well in loft-style apartments or spaces with a modern décor theme, acting as an artful backdrop or a stylish organizational surface to hang decor or plants.
DIY Hanging Plants Room Divider
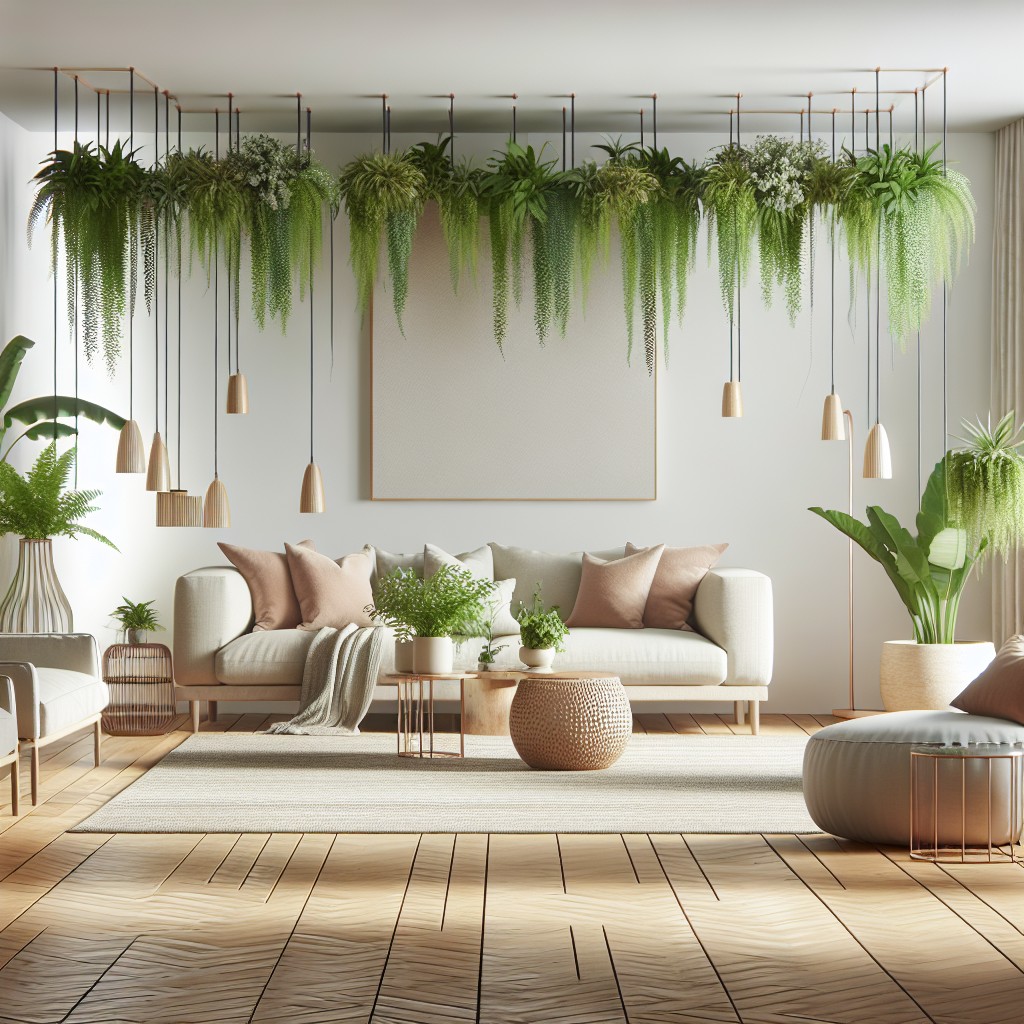
Transform your space into a lush oasis while artfully delineating areas with a divider teeming with greenery. This project harmoniously combines aesthetic appeal and functionality, using hanging planters to create natural privacy.
To achieve this verdant partition:
- Select ceiling hooks or a tension rod as your base; these will support the weight of your plants.
- Choose a variety of planters. Mismatched pots add character, while uniform ones create a sleek look.
- Consider the plants’ needs—opt for species that thrive in similar light and temperature conditions.
- Install the hooks or rod at the desired height, making sure they’re securely fastened and evenly spaced.
- Use durable materials like macramé, chains or ropes to hang the planters, ensuring they can hold the weight as plants grow.
- Play with lengths and plant sizes for a dynamic visual effect, which also allows for light to filter through.
- Integrate trailing plants to enhance the ‘divider’ effect with their cascading foliage.
A balance between form and function is key; the end result is not only a room divider but also a living piece of art that can purify the air and elevate your mood.
Bamboo Sticks Room Divider
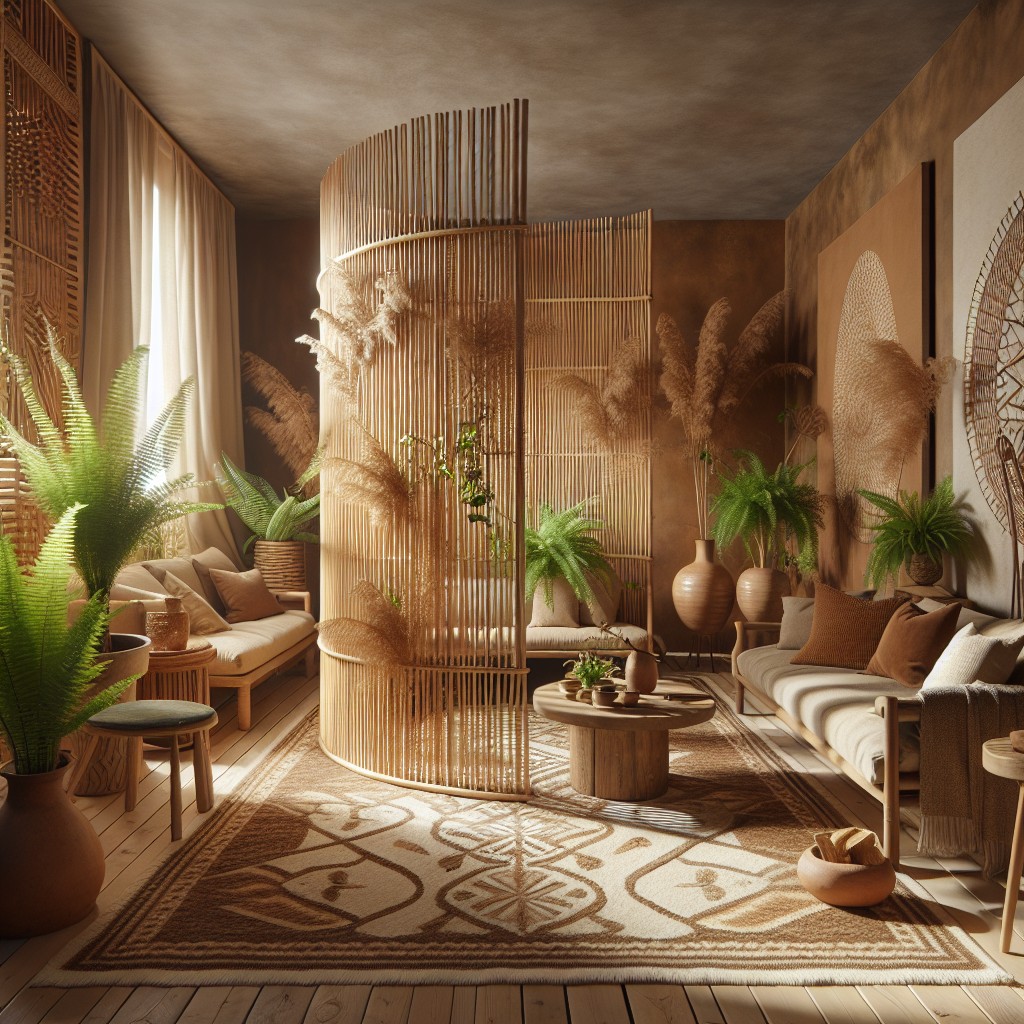
Harness the natural beauty and strength of bamboo to create an earthy and dynamic space partition.
Assembling a room divider with bamboo sticks can be both cost-effective and eco-friendly.
Start by selecting straight, sturdy sticks in varying lengths for a sculptural effect, or keep them uniform for a sleeker design.
Connect the sticks at multiple points using strong twine or clear fishing line to maintain an organic aesthetic while ensuring stability.
Space the bamboo evenly across a sturdy frame that can stand independently, or consider suspending lighter assemblies from the ceiling with hooks for an airy, floating partition.
This approach not only adds visual interest but also allows light to filter through the room, preserving the sense of an open, breathable space.
Remember, bamboo dividers work exceptionally well in areas where you aim to introduce a natural, zen-like vibe.
DIY PVC Pipe Room Divider
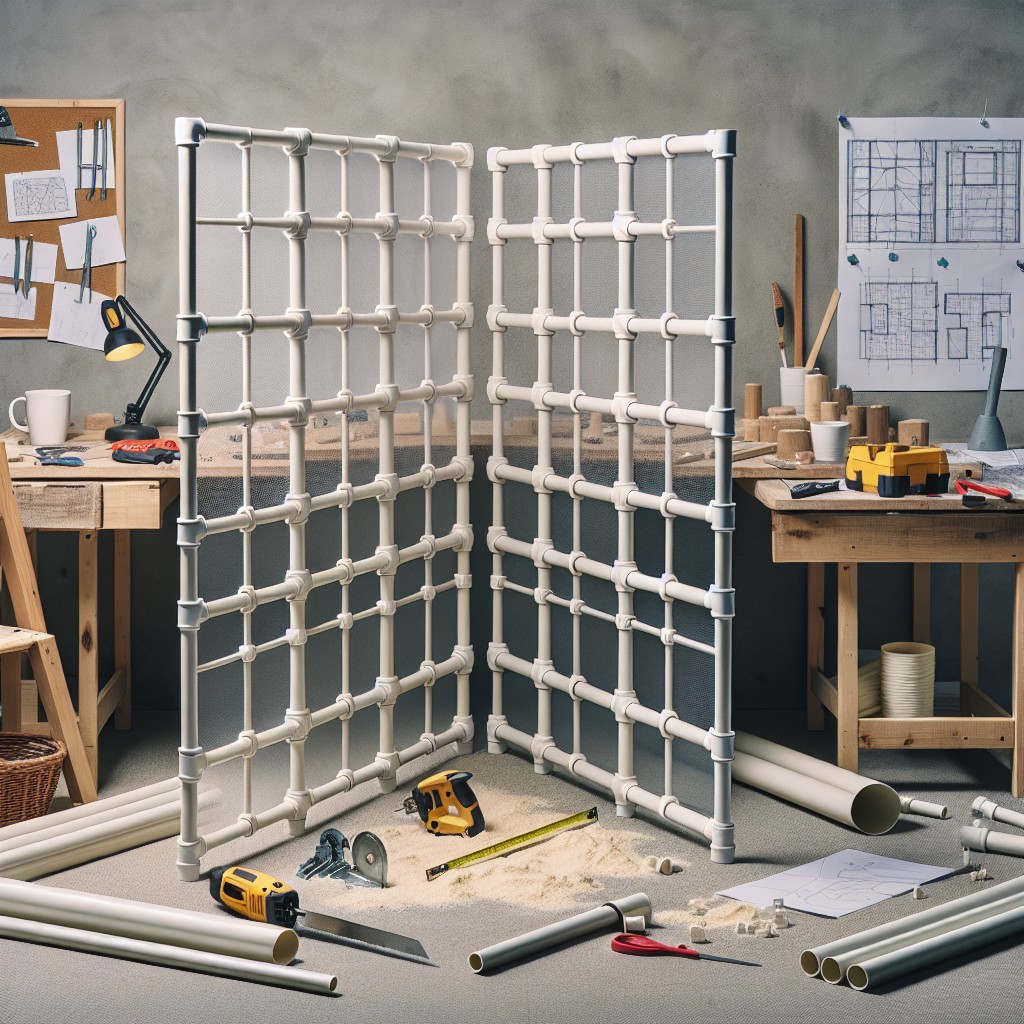
Embrace the versatility of PVC pipes for a lightweight, cost-effective solution to dividing your space. This customizable option allows you to build a framework to match your room’s dimensions perfectly.
Start by determining the height and width required for your divider, then purchase PVC pipes and connectors accordingly.
To assemble, cut the pipes to size using a PVC cutter or saw, ensuring the edges are smooth to prevent any snagging or rough spots. Connect the pieces using T-connectors and elbows to create a stable and secure frame. Keep in mind the importance of a sturdy base to prevent tipping.
For a personal touch, consider spray painting the structure to either blend with your room’s color scheme or stand out as an accent piece. Once the frame is built and painted, select a fabric or material to cover it. Sheer curtains offer a light, airy feel, while heavier fabrics provide more privacy. Attach your chosen material to the frame with either zip ties, Velcro strips, or fabric glue, making sure it is taut to avoid sagging.
Lastly, the beauty of a PVC divider is its adaptability; you can add shelves, hanging plants, or lightweight art to enhance its functionality and aesthetics. With these simple steps, you’ll have a custom room divider that not only sections off your space but also showcases your creativity.
DIY Hanging Origami Room Divider
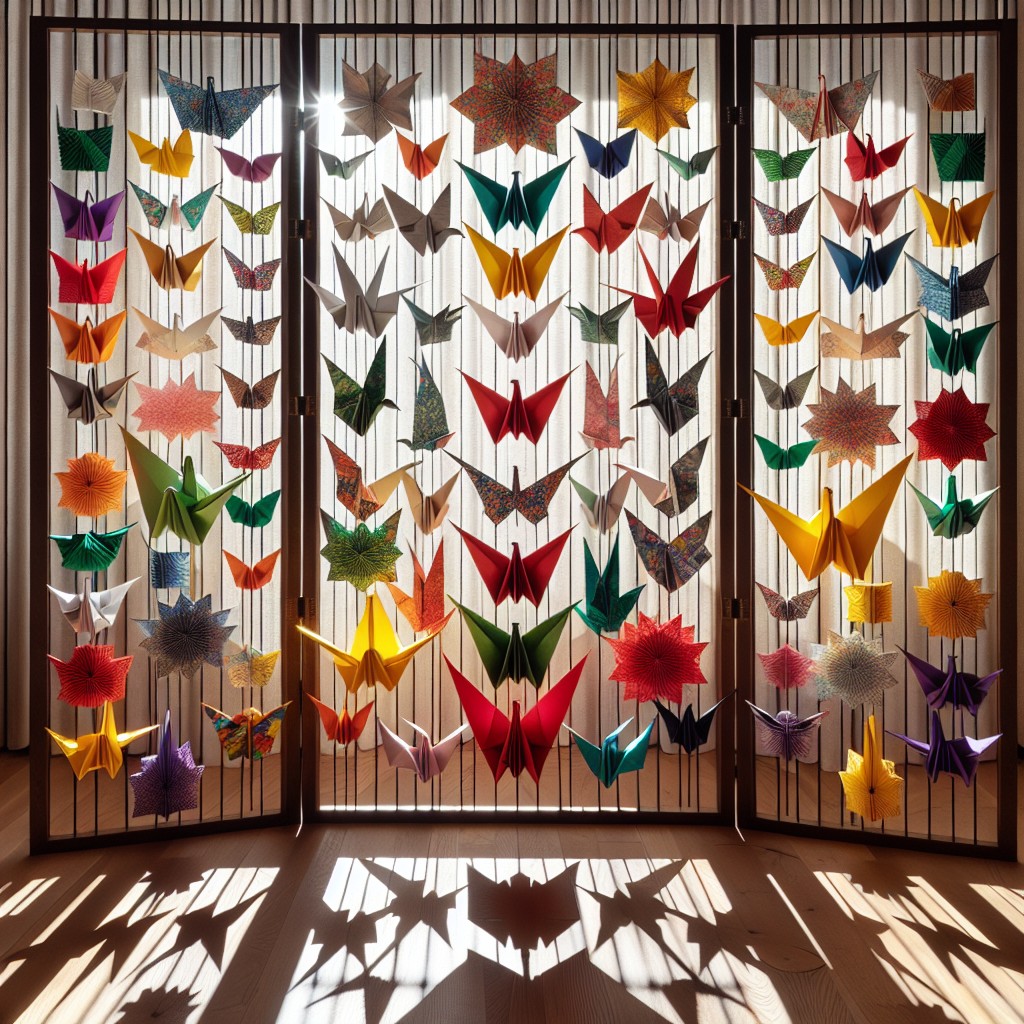
Transform your space into a tranquil retreat with a handmade origami room divider. The delicate folds of paper create a unique barrier that not only separates areas but also adds an artistic touch.
Here’s how to make it:
1. Select Your Paper: Choose lightweight, square origami papers in colors that complement your room. For a more durable divider, opt for slightly thicker paper like kami or washi.
2. Fold Your Designs: Master a few basic origami patterns. Cranes, butterflies, and geometric shapes work exceptionally well for creating an airy, sophisticated ambiance.
3. Attach to a Base: Use a thin rod, such as a curtain rod or a dowel, to hang your creations. String your origami shapes onto clear fishing line or thin thread at varied lengths for visual interest.
4. Secure the Lines: Tie or tape the ends of the lines securely to the rod. Space the strings evenly to ensure a balanced look.
5. Install the Divider: Suspend the rod from the ceiling using hook screws or a tension rod framework, depending on the weight of the paper and rod.
6. Add Lighting: For added effect, consider installing subtle lighting above to cast enchanting shadows through the origami onto surrounding surfaces.
This particular project not only serves as a room separator but also embodies a handmade aesthetic, instantly elevating the appeal of your living space.
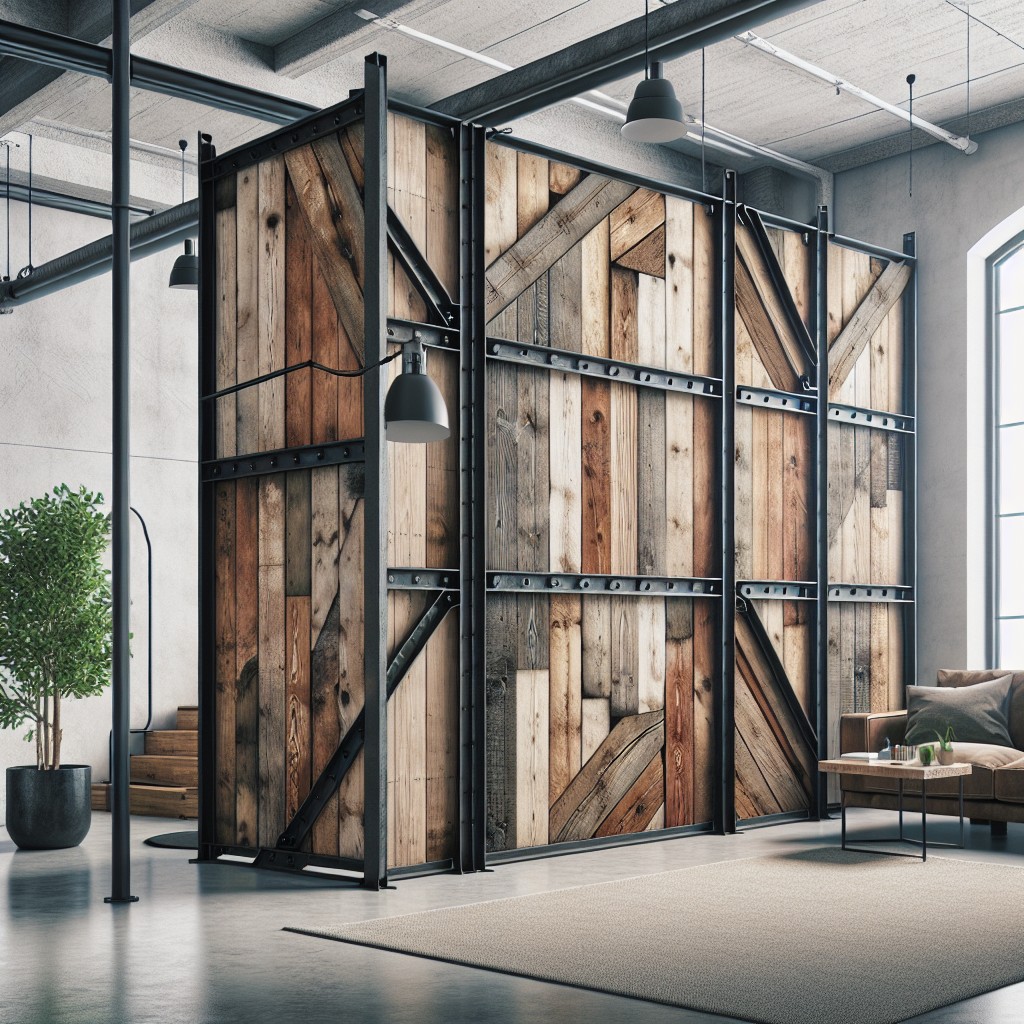
DIY Industrial Pipe Room Divider
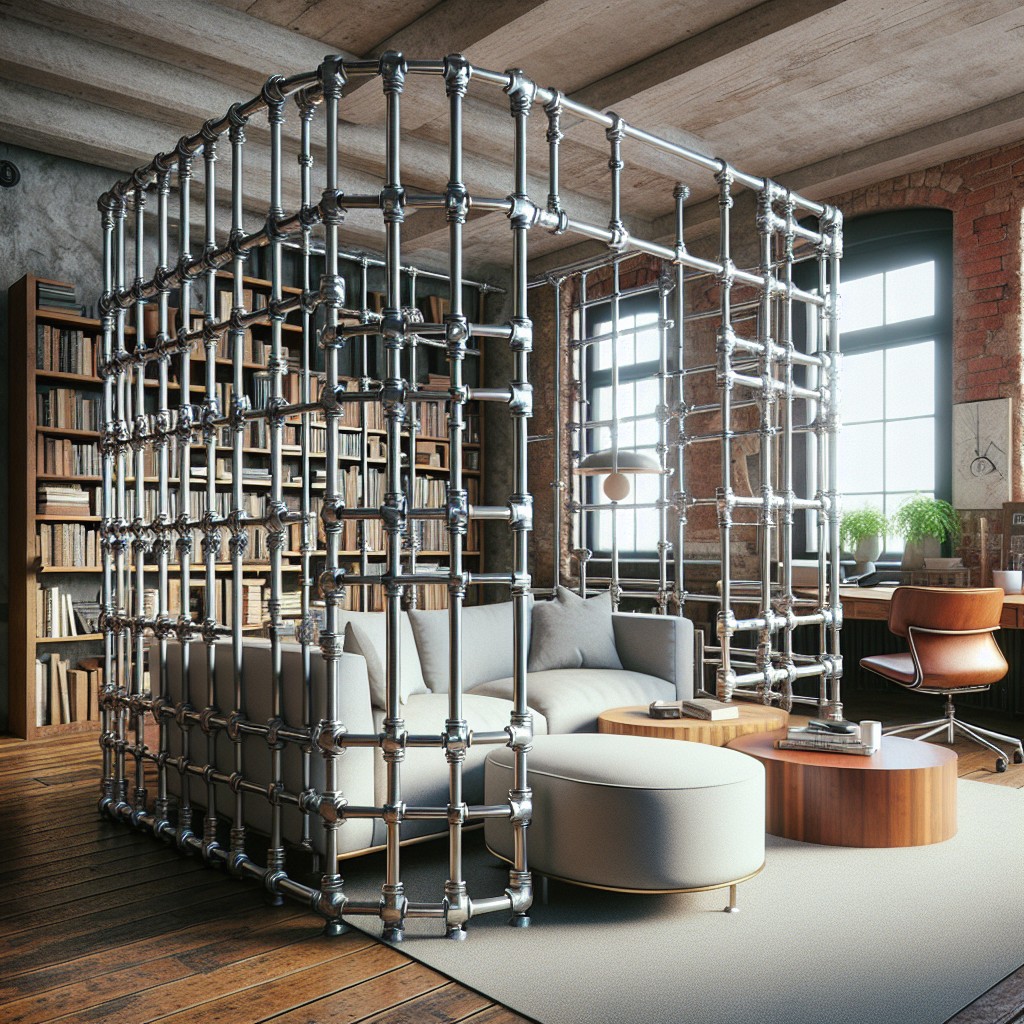
Crafting an industrial pipe room divider offers a blend of robustness and style. It’s perfect for loft apartments or to add an edgy touch to any space. Here’s how to achieve this look:
- Start by measuring the area to determine how tall and wide your divider should be.
- Acquire metal pipes and fittings. Opt for a combination of straight lengths and elbow joints, which allows for both vertical and horizontal structure.
- For the base, flange fittings provide stability when affixed to wooden boards or directly to the floor.
- Shelves can be incorporated using tees and additional pipes, enhancing the divider’s utility.
- Attach industrial-style wheels at the bottom for mobility.
- Choose metal or wooden panels to thread through the pipes, depending on your desired level of privacy.
- Secure everything tightly. Ensure pipes are threaded properly for a stable divider.
- Finish with a sealant or paint on the wooden elements to match the metallic texture if desired.
This divider will not only split up space but also serve as a statement piece, reflecting a modern, urban aesthetic.
DIY Stained Glass Room Divider
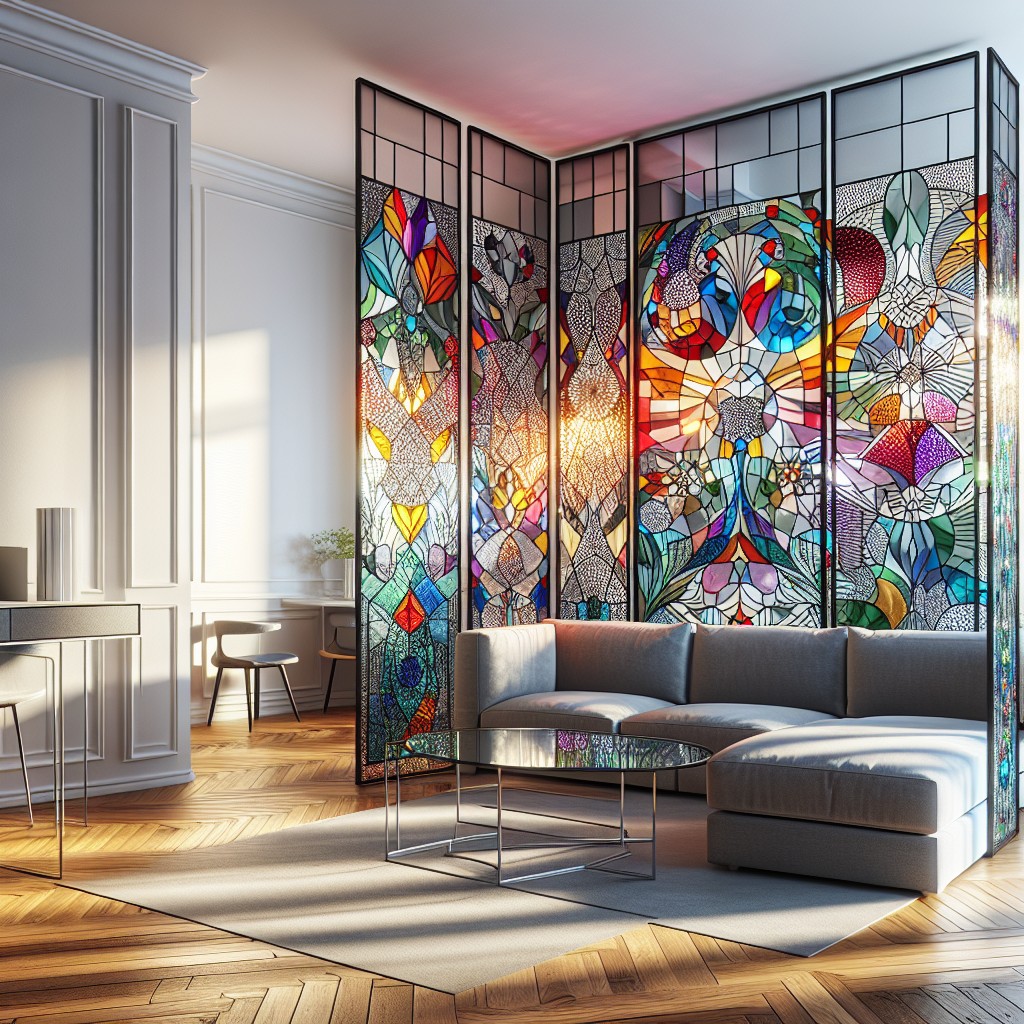
Creating a faux stained glass room divider adds a touch of elegance without the high expense of real stained glass. Begin by selecting a frame for your divider—old window frames work perfectly for this project. Clean the glass thoroughly before starting the artistic process.
For the stained glass effect, utilize self-adhesive lead strip and glass paint. Sketch out your design on paper first to serve as a blueprint. Lay the lead strips onto the glass following your drawing, pressing down firmly to adhere them. These strips mimic the lines of traditional stained glass and are repositionable if necessary.
Once your design’s outline is in place, it’s time to add color. Choose glass paints in your desired shades and fill in the sections created by the lead strips. Apply the paint evenly with a brush, working within the lines to avoid smudging. Multiple coats may be necessary to achieve a deeper color saturation.
After the paint dries completely, seal the work with a clear varnish to enhance durability and sheen. Attach hinges to connect multiple frames if a larger divider is needed, then secure the completed set to a base to ensure stability. This method allows for endless creativity, matching your room’s color scheme or drawing inspiration from classic stained glass patterns.
DIY Ribbon and Lace Room Divider
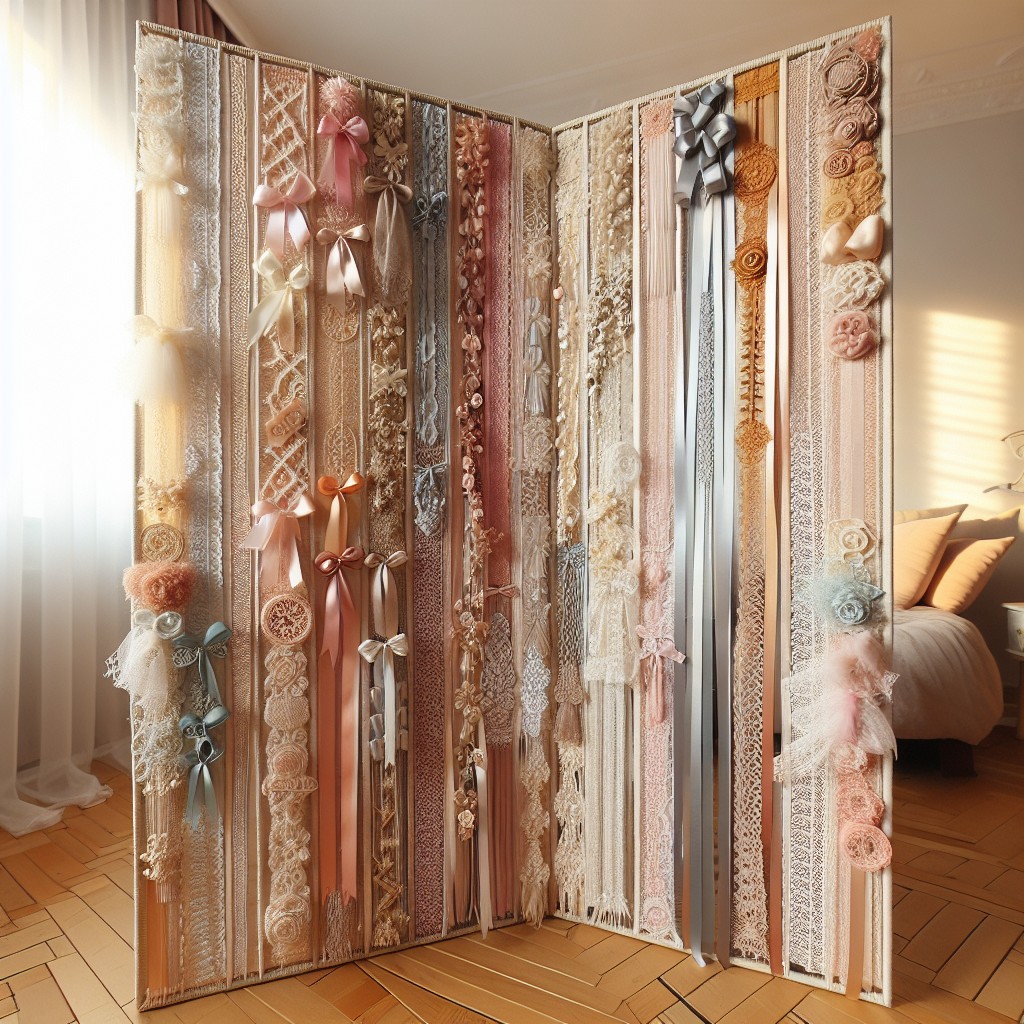
For a charming and whimsical touch, consider combining ribbons and lace to create a soft, flowing divider. This project is ideal for spaces that require a delicate partition without blocking light or visibility.
- Materials: Gather a variety of ribbons, lace strips, and possibly lightweight fabric cut into strips. Choose colors and patterns that complement your existing decor.
- Framework: Use a sturdy curtain rod or a thin, horizontal wood beam to hang your materials. Ensure it’s securely fastened to your ceiling or wall.
- Arrangement: Tie each ribbon and lace strip at varying lengths for a dynamic, textural effect. Combine different widths and textures for visual interest.
- Maintenance: This kind of divider can easily be dusted or gently cleaned. Periodically check that the ties are secure to prevent any pieces from falling.
- Versatility: Easy to change or replace strips to suit seasonal decor changes or to refresh the design.
- Space Dynamics: Perfect as a subtle zone separator in bedrooms, vanity areas, or to add an element of privacy in shared spaces without complete separation.
DIY Pegboard Room Divider
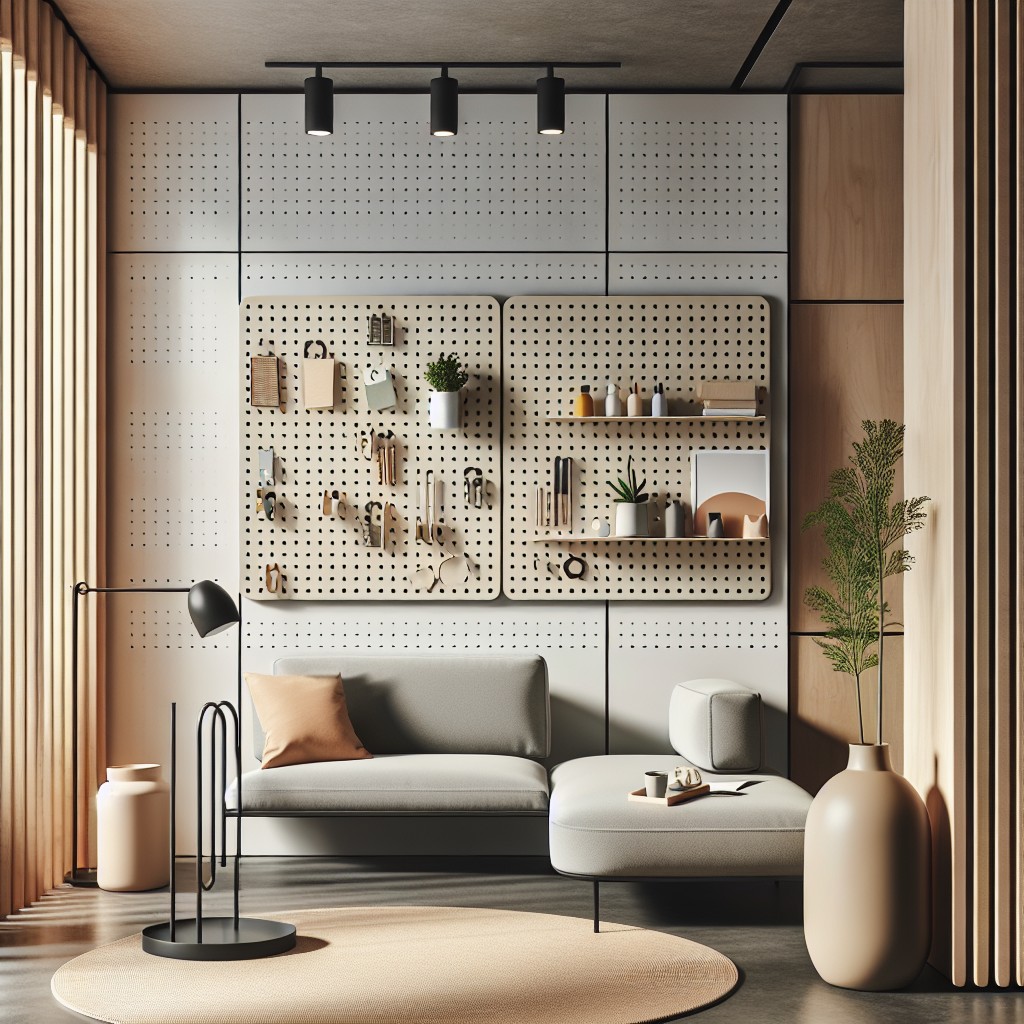
Transform an ordinary pegboard into a multifunctional room divider that doesn’t only portion your space but also serves as a customizable storage solution. Here’s how to create your own:
1. Select a Pegboard: Choose a pegboard of suitable size and thickness for stability. For a larger divider, you may consider attaching multiple panels.
2. Frame for Support: Construct or purchase a simple frame to reinforce the pegboard and ensure it stands upright. The frame can be made from wood or metal, depending on your style preference.
3. Paint for Personalization: Paint your pegboard in a color that complements your room’s aesthetic. Consider multiple shades or patterns for visual interest.
4. Hinges for Flexibility: For a folding divider, attach hinges between each panel. This allows you to adjust the shape and store it compactly.
5. Accessorize: Add hooks, shelves, and baskets to your pegboard for organization. This flexibility allows you to change your storage configuration as needed.
6. Stabilize the Divider: Ensure safety by securing the structure. Flat, wide feet can be added to the bottom of the frame, or employ a base weighted with sandbags or decorative elements.
By emphasizing modular design, your pegboard divider is not only functional but can evolve with your changing decor and storage needs.
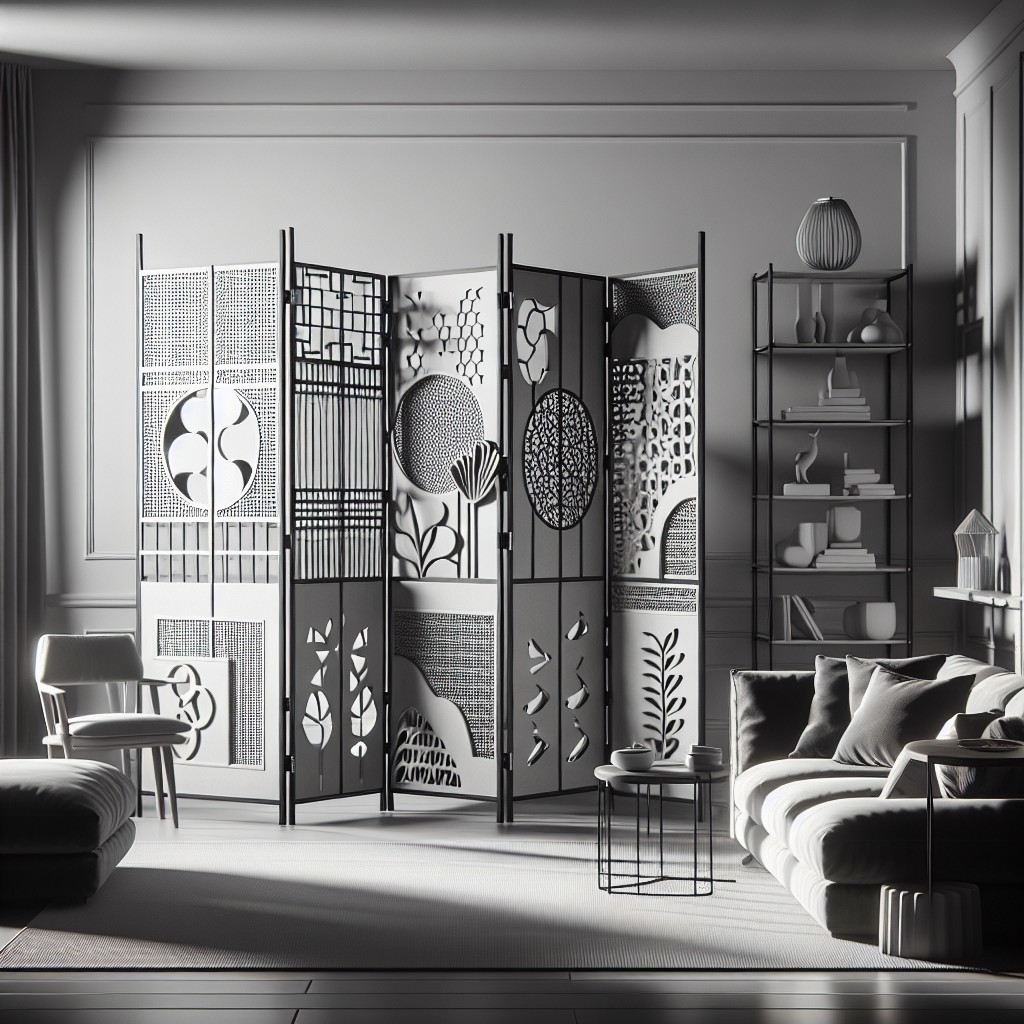
DIY Oriental Style Screen Divider
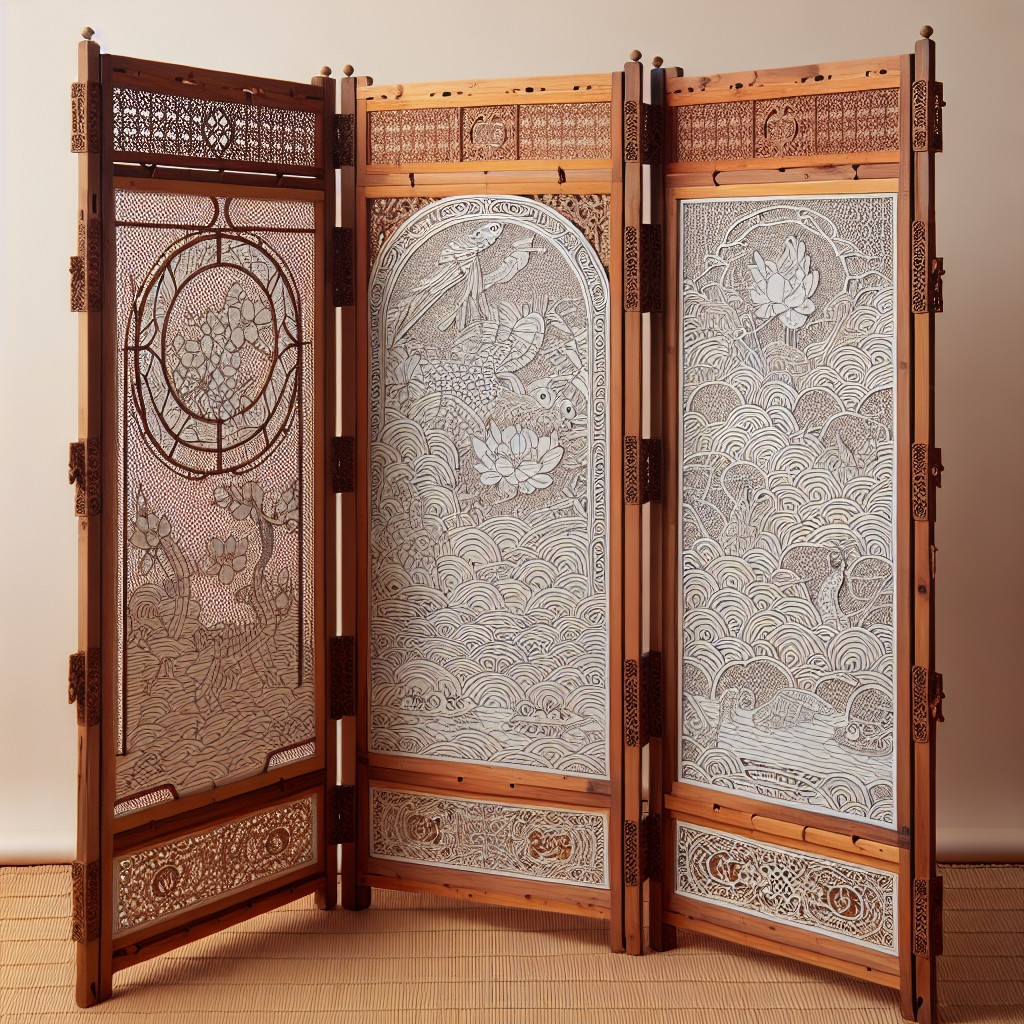
Creating an Oriental-style screen divider infuses a touch of elegance and tranquility into your space. To accomplish this look, gather lightweight wood panels and choose fabric with Asian-inspired motifs – think cherry blossoms, koi fish, or calligraphy.
For the frame, hinged together panels work best, offering flexibility in positioning.
Paint or stain the wood in a color that complements the fabric, such as black, red, or a natural wood finish. After the paint dries, stretch the fabric over each panel, securing it with a staple gun. Ensure the fabric is taut to maintain a clean, professional appearance. For an added artistic touch, frame each fabric panel with thin trim pieces.
This divider is not only a decorative piece but also functional, allowing you to partition a room while adding an element of privacy. The lightweight construction makes it easy to move or fold away when not in use. Remember to balance positioning with stability to prevent tipping. For a cohesive room design, accessorize with complementary elements such as bamboo plants or paper lanterns.
DIY Colorful Yarn Curtain Divider
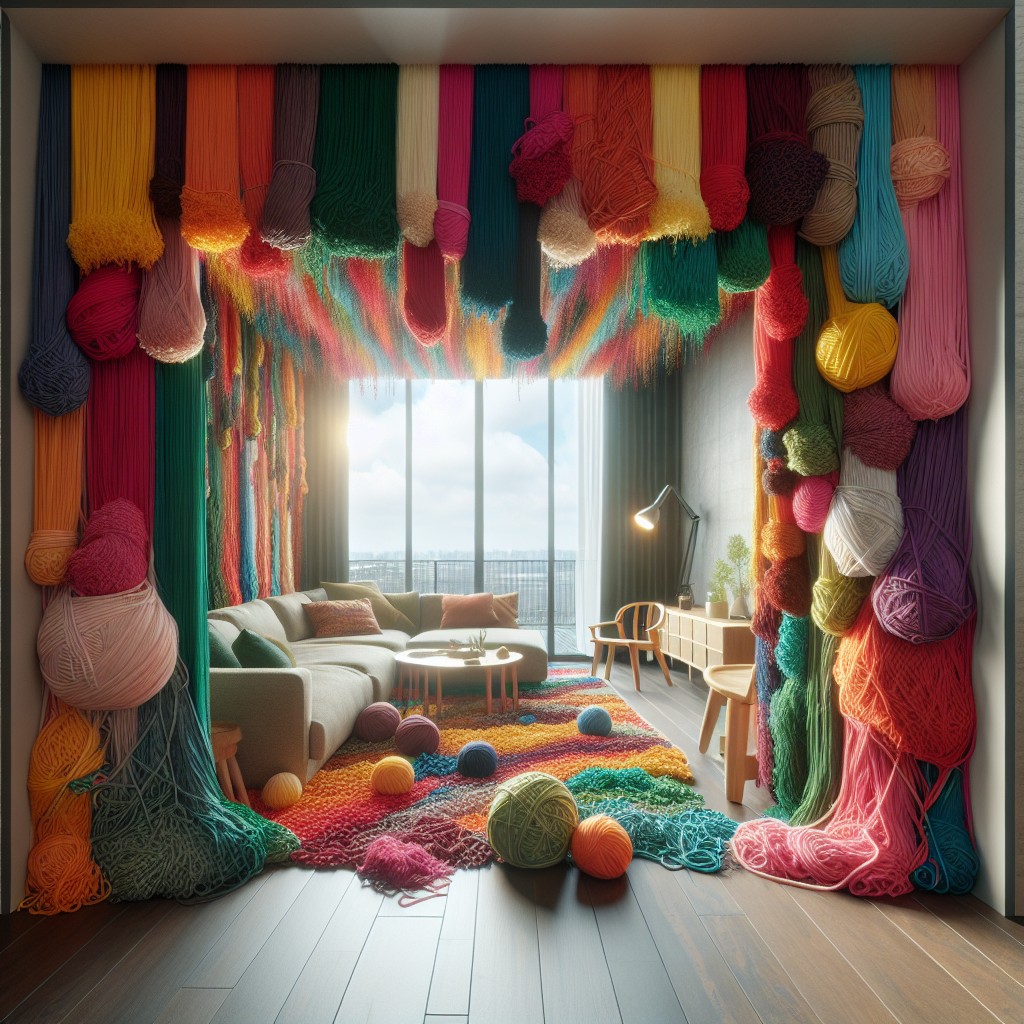
Transform any room into a vibrant and artistic space with a yarn curtain divider. This project is simple, budget-friendly, and offers ample room for creativity. Here’s how to achieve this look:
1. Materials Needed: Gather an assortment of yarn in various colors and textures, along with a dowel rod or curtain rod to hang your creation from.
2. Measurements: Calculate the width of the space to cover and decide on the length of the yarn strands, keeping in mind they can be trimmed later for a perfect fit.
3. Preparation: Cut the yarn into strands, ensuring they’re twice the length of the desired final size to create a folded look.
4. Assembly: Securely tie strands of yarn onto the rod with a larks head knot – fold a strand in half, loop it around the rod, and pull the ends through the loop.
5. Design Variation: Alternate colors or create patterns for visual interest. Consider adding beads or knots into the strands for extra texture and dimension.
6. Installation: Once your yarn curtain is assembled, fix the dowel rod onto brackets or hooks at the desired height, making sure it’s level for an even drop.
7. Finishing Touches: Adjust the yarn lengths if needed, and trim any outliers for a neat, cohesive look.
Enjoy your new colorful creation that adds both separation and a pop of creativity to any room!
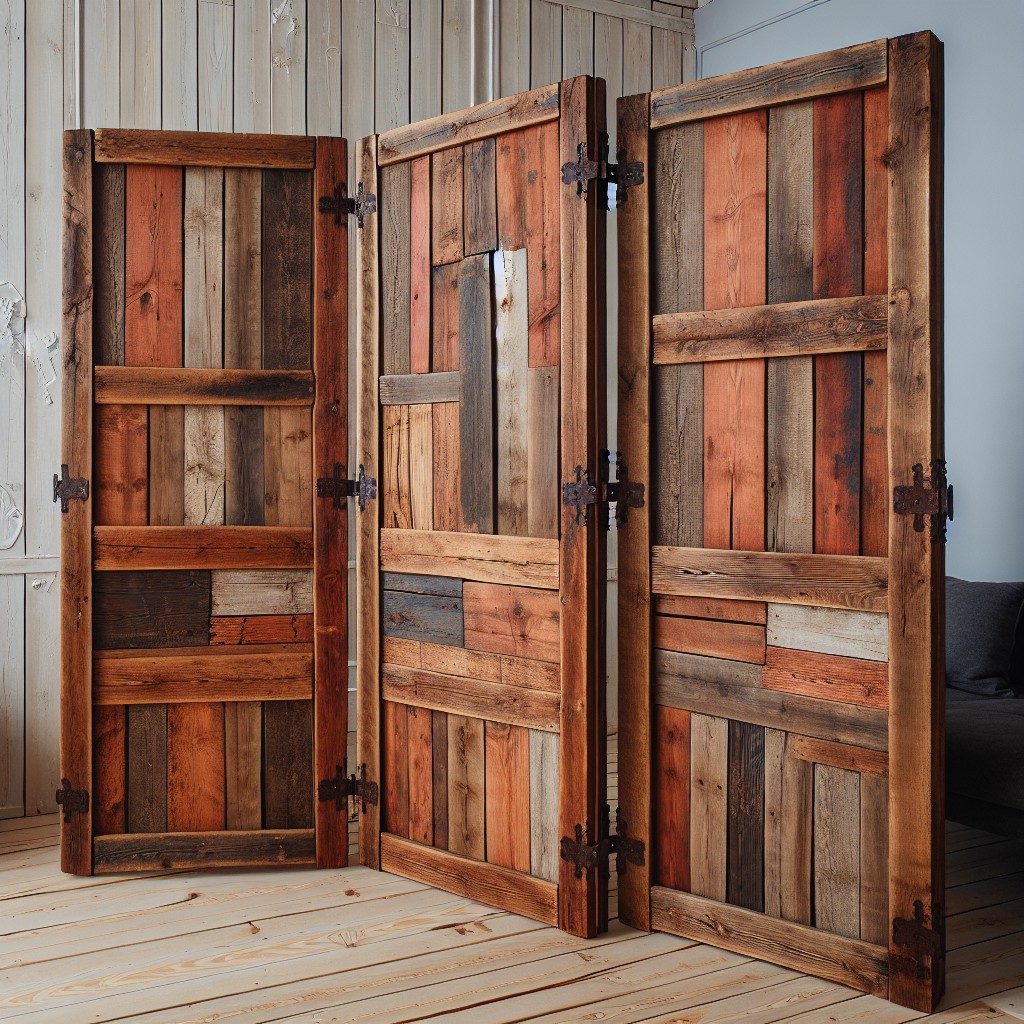
Recycled Old Shutters Divider
Transforming recycled shutters into a unique room divider is not only economical but also ecologically friendly. Here’s how to repurpose those old shutters into a charming and functional piece:
1. Sourcing: Visit local thrift stores, salvage yards, or online marketplaces to find old shutters. Look for ones that match in size and style to create a cohesive look.
2. Prepping: Clean the shutters with mild soap and water, removing any dirt or peeling paint. Sand them down if necessary, to create a smooth surface for painting or staining.
3. Painting or Staining: Apply a fresh coat of paint or wood stain to the shutters to suit your room’s color palette. For a vintage look, consider a distressed paint technique.
4. Hinging: Once dry, attach the shutters together with hinges. This allows for easy folding and positioning of the divider. Ensure the hinges are evenly spaced for stability.
5. Stabilizing: Add support by fastening feet or a base to the bottom shutters, providing a solid foundation and preventing tipping.
6. Decorating: Personalize the divider by attaching hooks for hanging decor, planters, or even photos to add a personal touch and enhance the functionality.
By following these steps, you create a piece that’s not just a divider but a statement in your room, embodying both history and your personal style.
DIY Lantern-styled Paper Divider
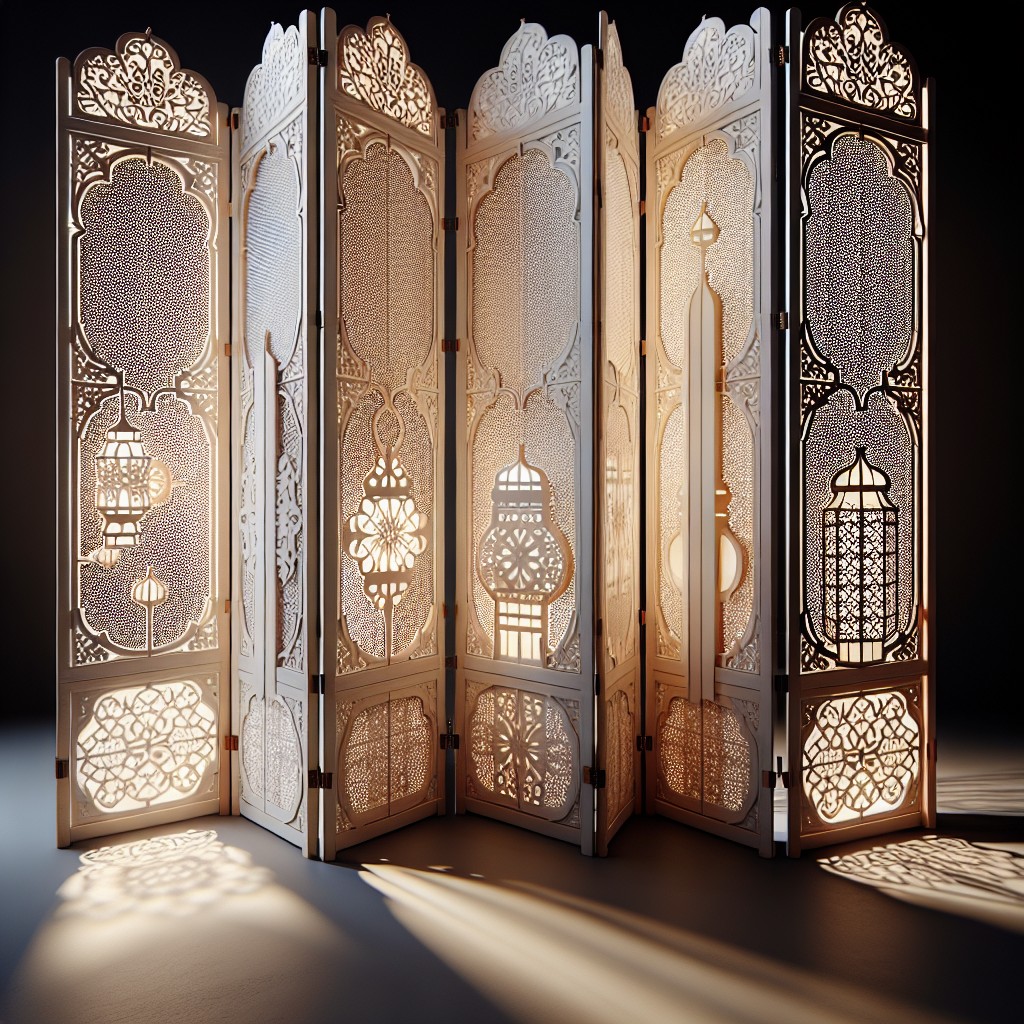
Harness the enchanting ambience of a lantern-lit space by constructing a divider that mimics the warmth and patterned allure of lanterns. Utilizing lightweight materials such as paper and a frame made from wood or sturdy cardboard, you can create panels that softly diffuse light and add an intimate vibe to your room.
Choose paper with a robust texture, like rice or parchment, which will not only glow attractively when backlit but will also withstand the wear and tear of everyday use.
Firstly, measure and cut your frame to the desired size, ensuring stability for free-standing capability. Next, attach your chosen paper to the frame, stretching it taut to achieve a smooth surface.
If you opt for additional ornamental flair, incorporate cut-out designs that cast playful shadows, akin to the intricate patterns of traditional lanterns. For practicality, hinge multiple panels together for versatile positioning and easy storage capabilities.
Remember to consider the light source; while natural light provides a soft glow, artificial backlighting can transform the divider into a striking night-time feature.
Through this creative endeavor, you’ll introduce not just a visual barrier but an artistic installation that enriches your room’s atmosphere.
DIY Wooden Crate Bookshelf Divider
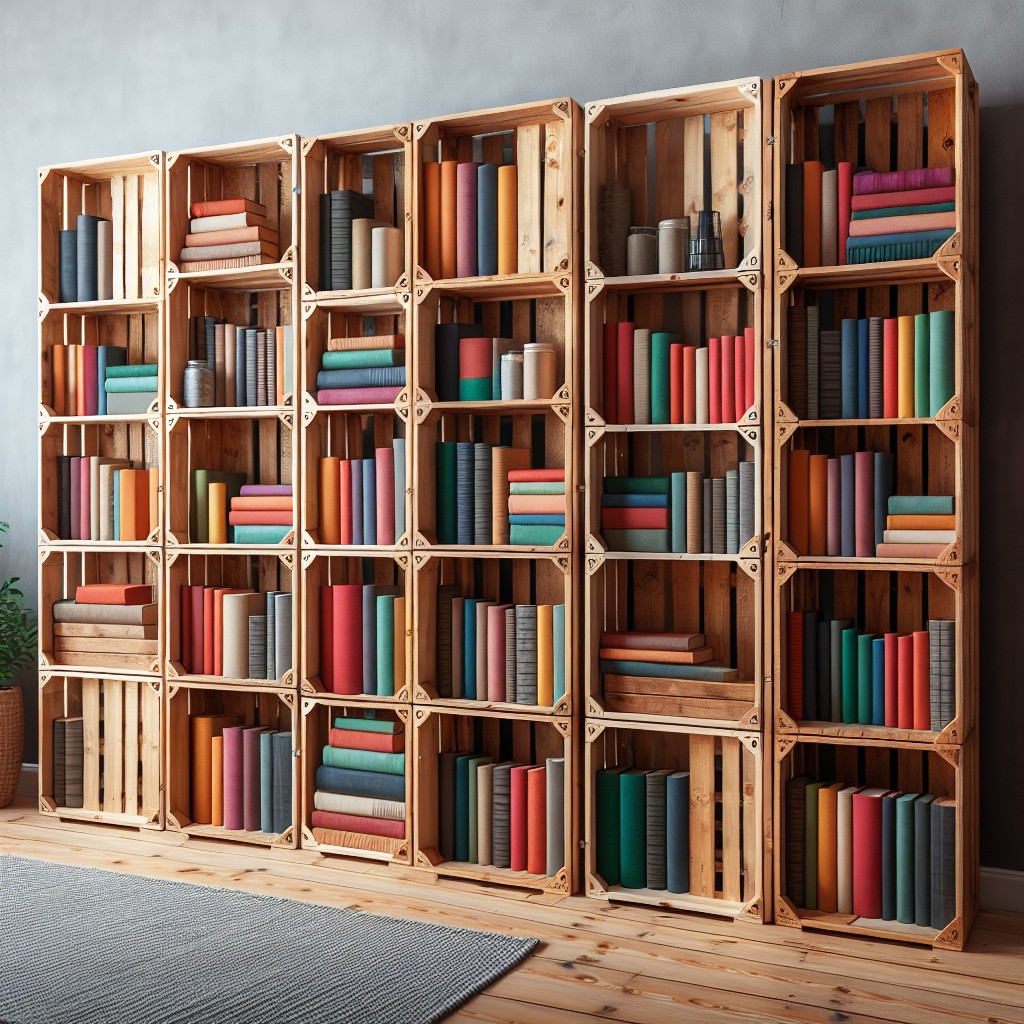
Transforming wooden crates into a bookshelf divider not only adds functionality but also delivers a rustic charm to any space. Here’s how to achieve this practical decor piece:
- Collect wooden crates from local stores or purchase them from craft shops. Ensure they are sturdy and in good condition.
- Sand the crates to remove any rough edges and prepare them for stain or paint.
- Apply a coat of wood stain or paint in a color that complements your room’s palette for a cohesive look. Allow it to dry completely.
- Plan your layout by stacking the crates in various configurations until you find a pleasing, balanced design.
- Secure the crates together using wood screws or brackets to maintain structure stability.
- Reinforce the divider by attaching a set of legs or a base for added support if the structure is tall.
- Once assembled, use the shelves to display books, plants, or decorative items for a functional and stylish space divider.
DIY Racks and Hooks Clothes Room Divider
Transform an ordinary clothes rack into a multi-purpose divider with a personalized touch. By incorporating hooks and shelves, this functional piece can elegantly separate your space while offering additional storage.
Select an adjustable clothes rack to accommodate the height of your room. Ensure stability with a steady base to prevent tipping when adding weight.
Enhance privacy by draping fabrics or curtains over the rack. Choose materials that complement your room’s color scheme and aesthetic.
Add a variety of hooks at different heights to hang items, such as hats, scarves, or even small framed art. This customization doubles as a vertical display for your personal belongings.
Incorporate shelves or baskets at the base, ideal for shoes, books, or decorative items, contributing storage solutions without compromising style.
By using a clothes rack divider, you re-envision the divide between functional and decorative, creating a versatile and chic area in your home.
Kids-themed DIY Room Divider
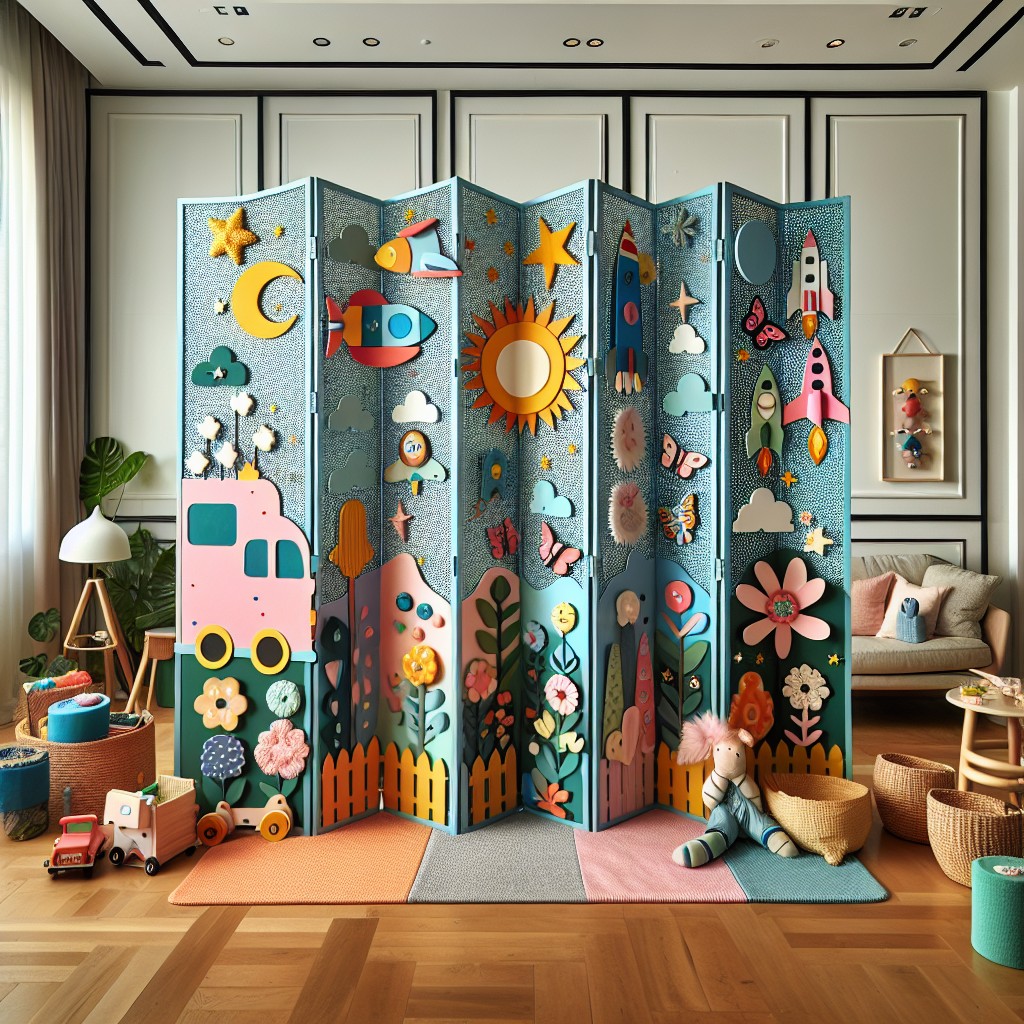
Transforming a shared kids’ room into personalized spaces becomes simple with a playful divider. Here’s how:
1. Choose a Theme: Pick a theme that resonates with your child’s interests – whether it’s a favorite cartoon character, space exploration, or a fairy-tale kingdom.
2. Create the Structure: Use lightweight foam boards or fabric pinned to a frame. Ensure the materials are safe and free of sharp edges.
3. Decorate with Interactivity in Mind: Add elements like pockets for storing toys or incorporate a felt board for an interactive experience.
4. Involve Your Child: Have your child help with painting or arranging stickers. This makes the divider a unique piece that reflects their personality.
5. Flexibility: Design the divider to be easily folded and stored away. It can double as a play mat or a backdrop for imaginative play.
By involving your child in the creation process, not only do you get a functional room divider, but it also serves as a canvas for children’s creativity and growth.
DIY Old Wood Planks Divider
Create a charming rustic partition using reclaimed wood planks. This project not only adds character to your space but also promotes sustainability through upcycling. Here’s how to get started:
1. Gather Materials: Source old wood planks from pallets, barn wood, or salvaged lumber yards. Ensure they’re clean and free of nails.
2. Stabilize the Wood: If the planks are warped, sand or plane them to ensure they lie flat and fit together well.
3. Design Your Divider: Lay planks out on the floor to create your desired divider size. You can opt for a vertical or horizontal arrangement.
4. Frame Construction: Build a simple frame from 2x4s to give your divider structure and support. Attach it to the edges of the laid out planks.
5. Secure Planks: Use screws or nails to affix each plank to the frame. For extra durability, consider wood glue between connections.
6. Staining or Painting: Customize with stain or paint for a more finished look or leave the wood bare for a truly rustic appeal.
7. Hinges for Flexibility: Add hinges if you desire a foldable divider, enabling easy storage and movement.
8. Standing Support: Install feet or a base to ensure your room divider stands stable and upright, or attach it securely to the wall for a semi-permanent solution.
By incorporating this piece, you not only create a partition but also impart a sense of history and texture to the decor.
DIY Monochrome Photography Room Divider
Transform personal photographic memories into a visual spectacle with a monochrome photography divider, crafting an intimate yet stylish partition in any room.
Begin with selecting a range of black and white photographs of various sizes for a cohesive, artistic appeal.
Next, use an oversized frame or create a custom one from lightweight wood to serve as the base of your divider.
Attach wire, strings, or clear fishing lines across the frame horizontally, maintaining equal distances to ensure a balanced look.
Secure your chosen images with clips or clothespins for an effortlessly chic, interchangeable display—ideal for swapping out photos to match your evolving taste or the change of seasons.
This divider doesn’t just serve a functional purpose but doubles as a personal gallery, subtly defining spaces while ensuring the continuity of light and visual flow.
Embrace the simplicity of a monochrome palette to achieve a modern, minimalist effect, or blend it into a black-and-white-themed room for a seamless aesthetic.
Remember, the beauty of this project lies in its simplicity and personalization; let your cherished moments tell a story while adding character to your living space.
DIY Loft-style Room Divider
Embrace the minimalist aesthetic of loft living with this project. Start with a simple frame constructed from industrial pipes or reclaimed wood to lend an authentic loft vibe.
Choose a material for the infill – think along the lines of frosted glass panes for a touch of privacy or wire mesh for a more raw, transparent look.
For a fluid design, attach the frame to ceiling tracks, allowing for easy repositioning within the space. Add locking casters if you opt for a freestanding divider.
Accessorize with clip-on spotlights or hanging planters to enhance functionality without compromising the clean, open-plan feel characteristic of loft design.
DIY Rope and Wood Room Divider
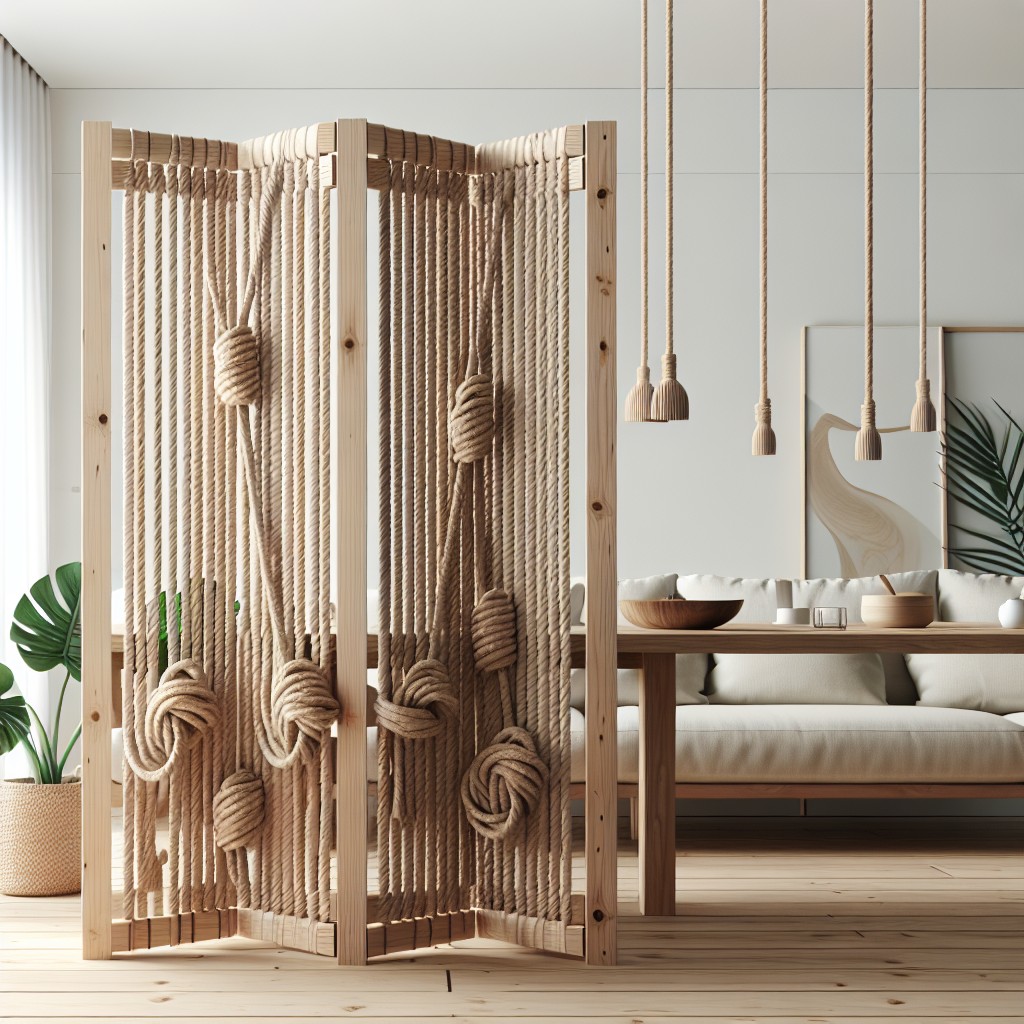
Creating a DIY rope and wood room divider blends rustic charm with functional design. By selecting durable rope and solid wood, this project not only adds texture to your space but also offers a practical solution for defining areas.
1. Materials and Tools Required:
- Solid wood planks or a reclaimed wooden ladder
- Natural fiber rope, such as jute or sisal
- Drill with a bit matching the rope’s thickness
- Wall hooks or ceiling anchors
- Scissors or a sharp knife
- Measuring tape
2. Construction Steps:
- Measure the space to determine the divider’s desired width and height.
- Cut the wood to match the measurements, ensuring all pieces are of equal length.
- Drill evenly spaced holes along the top and bottom of each wooden piece.
- Cut lengths of rope, considering enough excess for securing.
- Thread the rope through the drilled holes, securing each end with a firm knot.
- Attach wall hooks or ceiling anchors at the points where the divider will hang.
- Suspend the wooden pieces from the anchors, adjusting for straightness and tension.
3. Design Tips:
- Stain or paint the wood to complement your existing decor.
- Vary the spacing between wooden pieces for different visual effects.
- Integrate decorative knots to enhance the nautical or bohemian aesthetic.
- Incorporate beads or small hanging accents for a personalized touch.
This divider serves functionally while adding a unique visual element, adaptable to various decor styles from coastal to boho.
DIY Quilt Fabric Room Divider
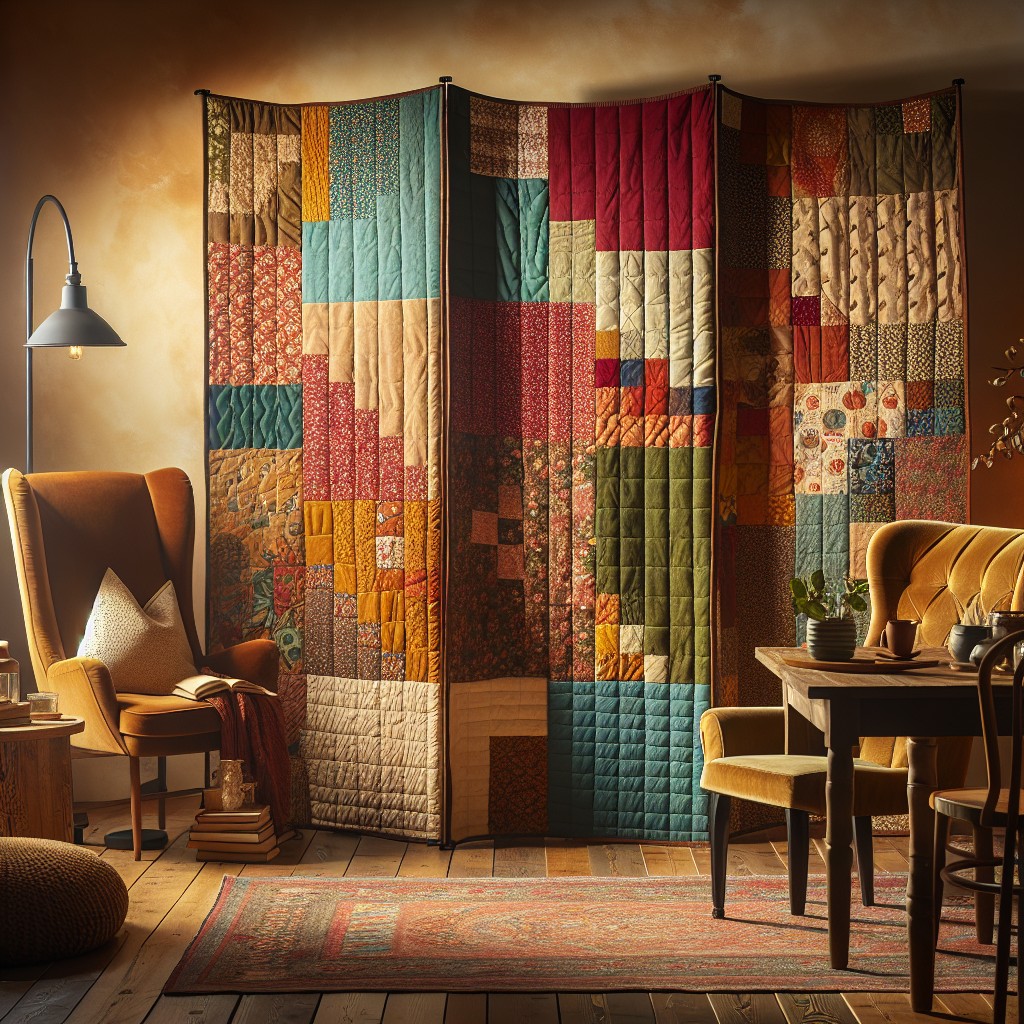
Transform ordinary spaces with a touch of coziness using quilt fabric to create a unique room divider. Here’s how to piece together this charming partition:
- Measure the area: Determine the desired width and height of your room divider to ensure enough fabric is on hand.
- Choose a quilt pattern: Pick a quilt fabric that complements your room’s aesthetic. Vintage patterns add rustic charm, while modern designs can inject a contemporary flair.
- Construct a frame: Use lightweight wood or PVC pipes to create a sturdy frame that suits the quilt fabric size. Reinforce with brackets for stability.
- Secure the fabric: Attach the quilt to the frame. Staples for wood or fabric ties for PVC pipes work well. Ensure the fabric is taut to avoid sagging.
- Add finishing touches: Consider a trim or ribbon border for a polished look, and possibly install wheels for easy movement.
This approach offers an artistic and practical solution, seamlessly dividing spaces while showcasing traditional crafts.
Recycled Wine Bottle Room Divider
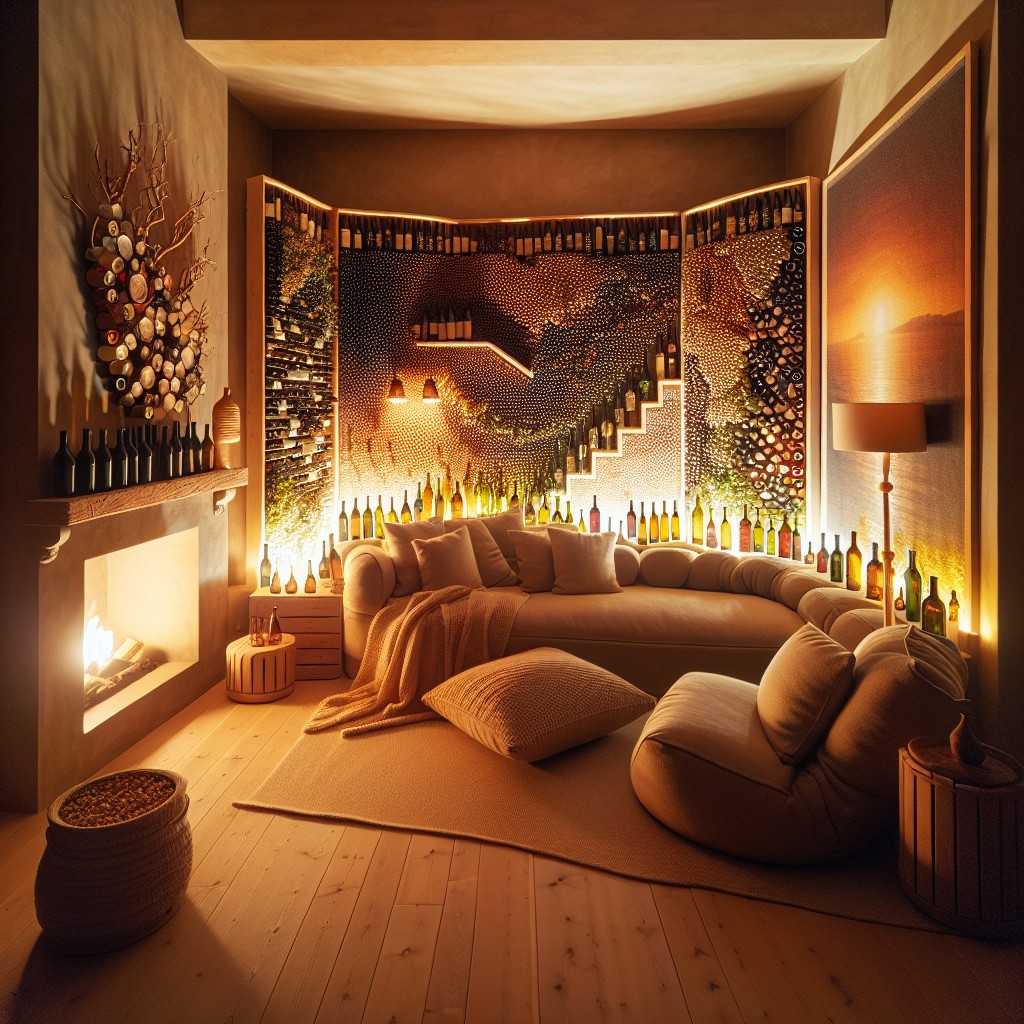
Harness the charm of upcycled materials with this eco-friendly creation. Select bottles of similar shapes for uniformity or mix various sizes for a playful aesthetic.
Clean them thoroughly, removing labels and adhesive. Choose a sturdy frame that can handle the weight of the bottles – metal or solid wood work best.
Secure the bottles side by side with a strong adhesive, or create clamps on the frame to hold them in place.
Consider installing backlighting to make this divider a functional luminary feature, casting colorful shadows into your space.
Note: always ensure the structural integrity of your divider for safety.
DIY Modern Art Room Divider
Harness your creativity and transform blank canvases into a chic and functional art installation that doubles as a room divider. Start by purchasing several large artist’s canvases, which you can often find at arts and crafts stores or online.
1. Plan your color scheme and design. Opt for abstract patterns for a modern look, or if you’re artistically inclined, paint a cohesive mural that spans across each canvas.
2. Once your artwork is complete and dry, attach small hinges between the canvases using a screwdriver. These will allow you to adjust the divider’s shape and store it flat when necessary.
3. For stability, add feet or a base to the bottom canvases. Wooden dowels or metal brackets work well.
4. If you’re looking for a less permanent solution, skip the hinges and use strong removable adhesive strips to join the canvases. This offers flexibility to rearrange or replace individual panels as your tastes change.
This piece will act not only as a divider but also as a focal point in your room, showcasing your unique artistic ability and style.
DIY Floor Mirror Room Divider
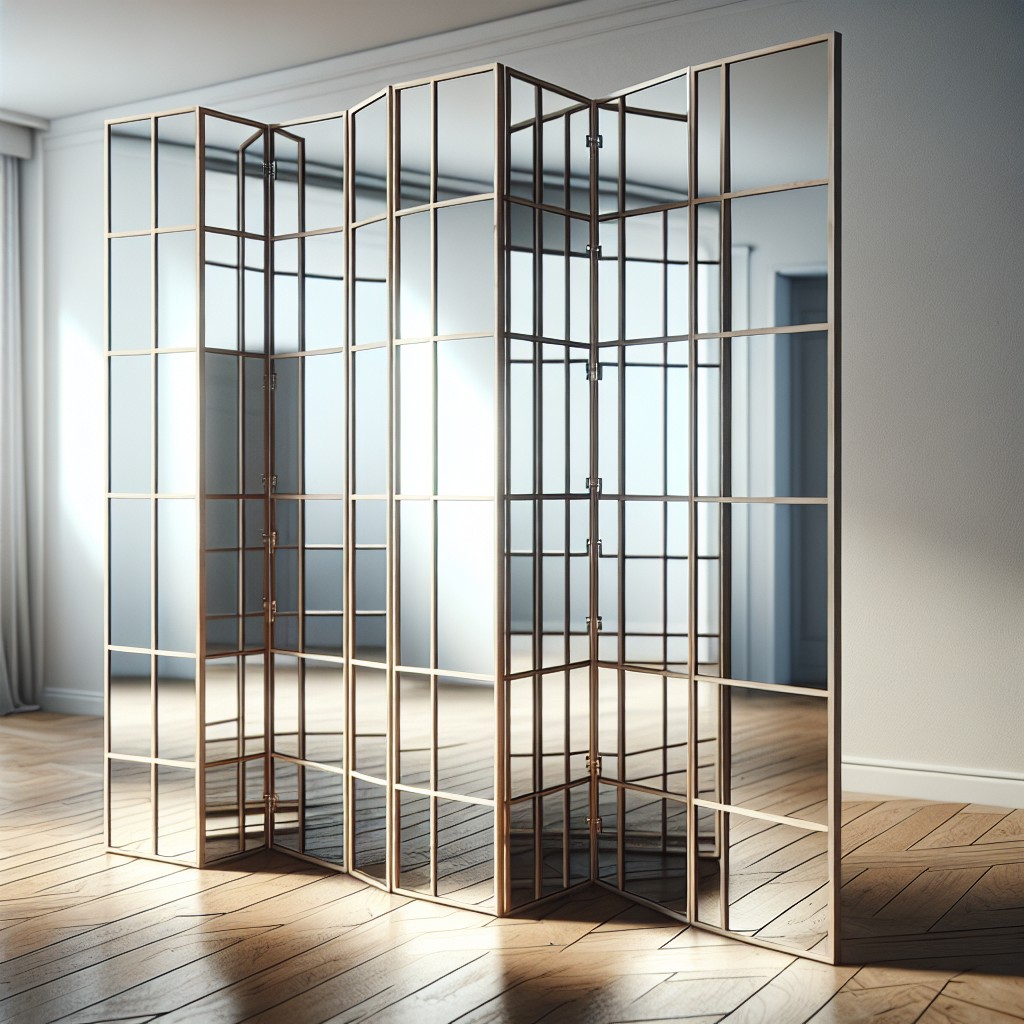
Transform a basic floor mirror into an elegant and functional room divider with these straightforward steps. Gather tall, freestanding mirrors—hinged together, they’ll provide an aesthetically pleasing and reflective partition.
1. Stability is Key: Attach sturdy hinges to the frames of the mirrors at multiple points to ensure a secure connection.
2. Safety Measures: Consider safety backing on the mirrors to prevent shattering in case of accidents.
3. Aesthetic Touches: Enhance the frame with paint or decorative elements to complement your room’s style.
4. Adjustable Angles: Position the hinges so the mirrors can fold both ways, allowing for flexible placement and light direction.
5. Soft Padding: Place felt pads on the bottom of the mirrors to protect your floors and facilitate smooth movement.
With their dual functionality, these dividers can separate spaces while maintaining light and visual flow throughout the room.
DIY Lattice Room Divider
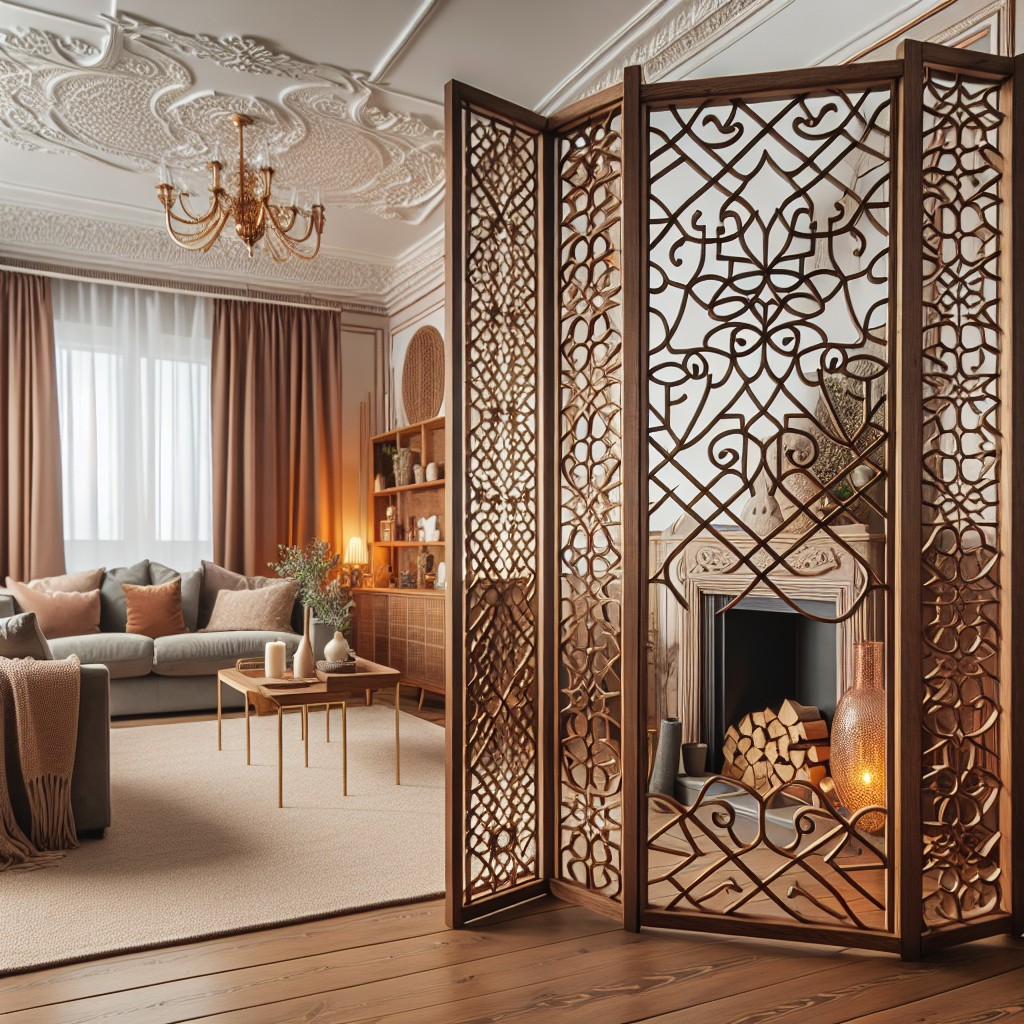
Transforming a lattice into a room divider is both economical and stylish. Lattices typically used in gardens can also serve as a chic semi-private screen indoors.
- Purchase a pre-made lattice panel from your local home goods store, or create one from scratch with wooden slats.
- Decide whether to leave the natural wood finish or paint it to match your room’s color scheme. If painting, use a primer first for better adhesion and durability.
- For a free-standing option, attach sturdy feet or a base to the frame. Ensure these supports are wide enough to prevent tipping.
- For added privacy, weave fabric or ribbon through the lattice openings, or hang small potted plants for a green touch.
- Secure the lattice in place for permanent room division or add hinges to connect multiple panels, allowing for folding and easy storage.
- If the lattice is for temporary use, lightweight eye hooks can be screwed into the ceiling and walls to hang the divider when needed.
The beauty of this project lies in its flexibility and the multitude of customization options available.
DIY Sea Shell Room Divider
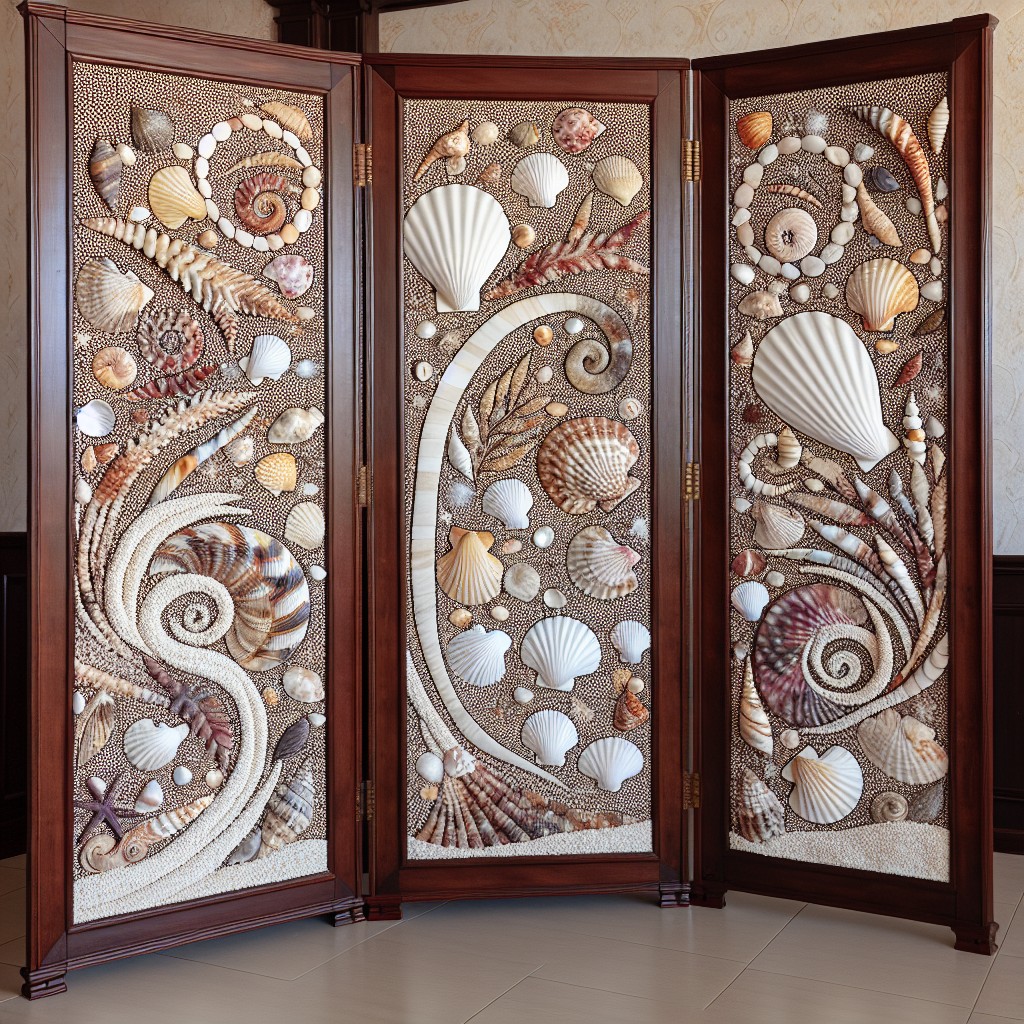
Transform the ambiance of a room with the soothing touch of the ocean by constructing a sea shell room divider. Here’s how to achieve this:
1. Gather Materials: Collect a variety of shells of different sizes and colors, ensuring you have enough to cover the desired area. Opt for durable string or fishing line for hanging.
2. Create Shell Strands: Drill small holes in each shell’s top and thread them onto the string. Space them evenly or at varied intervals for visual interest.
3. Secure Horizontal Supports: Attach a wooden dowel or metal rod to the ceiling or wall edges to serve as the base for hanging your strands.
4. Hang the Strands: Tie each shell strand to the support securely, establishing the full width of your desired divider.
5. Balance and Adjust: Ensure the strands are equally spaced and hang straight, cutting excess line and making any needed adjustments.
Enjoy the delicate clinking sounds and natural oceanic feel as light filters through your seaside-inspired creation.
DIY Storage Cubes Room Divider
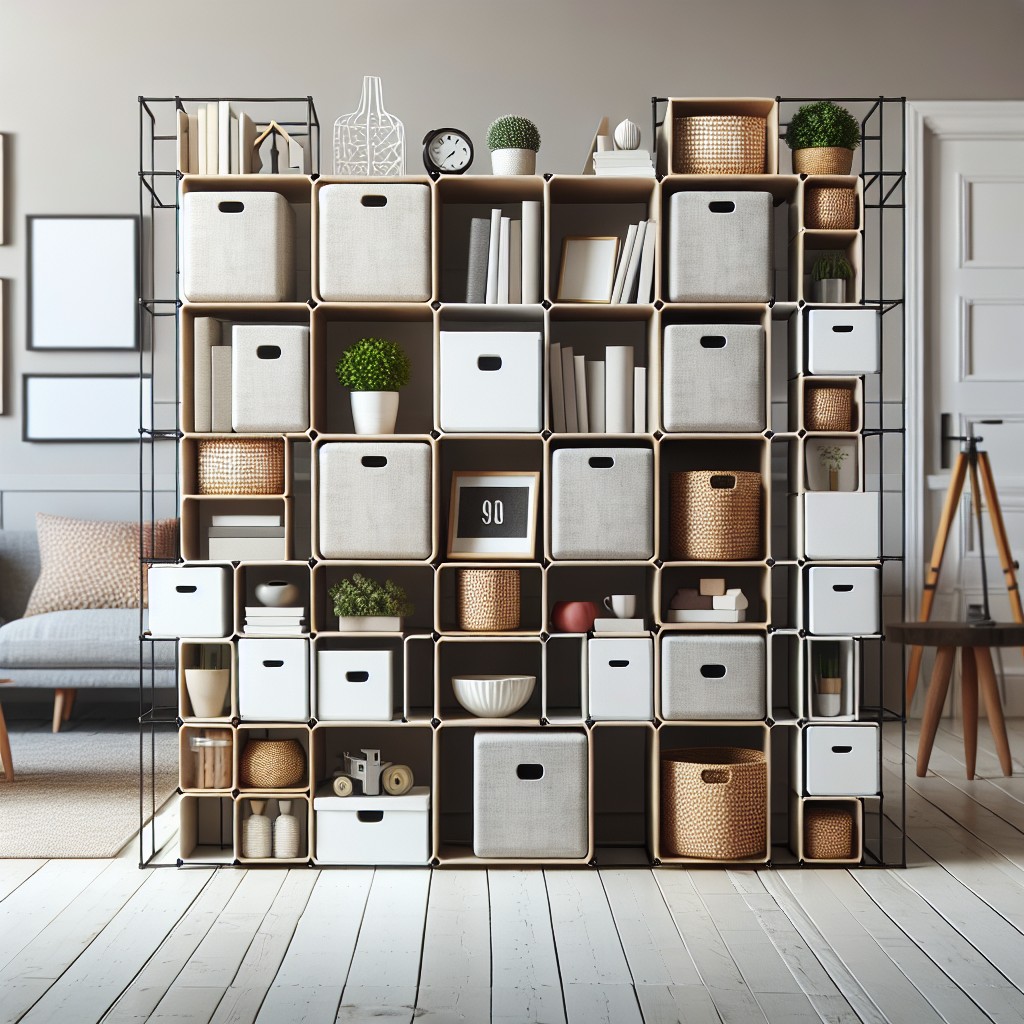
Maximize space functionality by utilizing storage cubes as a room divider. This approach offers both aesthetic charm and practical storage solutions for small apartments or shared spaces.
- Choose modular storage cubes that stack securely, ensuring a stable and customizable divider.
- Consider the cube material for an additional style element; opt for natural wood for a warm look or sleek metal for a modern vibe.
- Align cubes vertically and horizontally to craft an eye-catching geometric pattern.
- For a cohesive look, stick to a uniform color scheme or alternating shades to add visual interest.
- Fill selective cubes with books, decorative objects, or plants to create an engaging display while maintaining transparency.
- Incorporate storage bins or baskets within the cubes for concealed organization, perfect for tucking away personal items.
- Leave some cubes empty to serve as open windows, balancing the divider’s function and maintaining an airy atmosphere.
- For added stability, secure the cube structure to a wall with brackets, especially if extending to a considerable height.
- Integrate ambient lighting such as string lights or clip-on lamps to highlight the divider and add a cozy ambiance.
This method seamlessly ties together form and function, offering a creative and tangible division of space.
DIY Flower Stand Room Divider
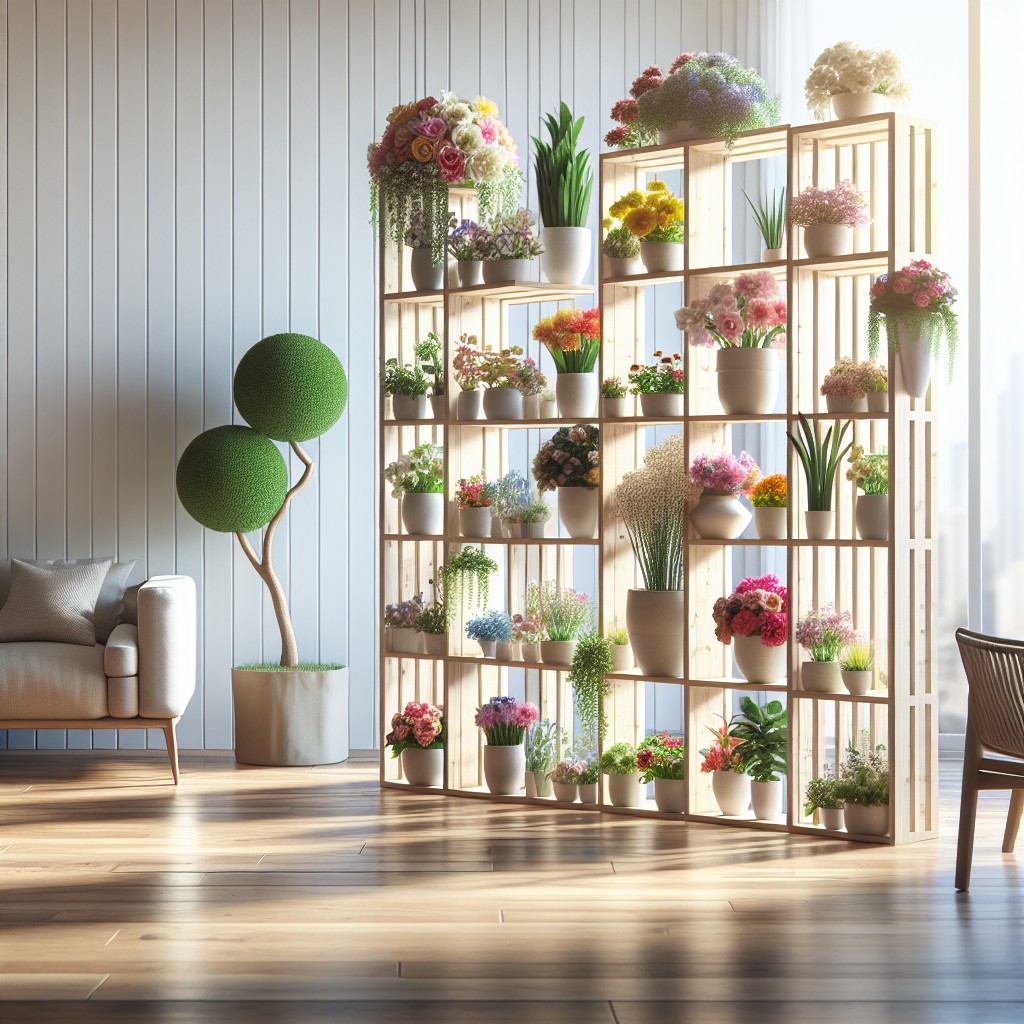
Transform your space with a touch of nature by creating a flower stand divider. Utilize a series of lightweight metal or wooden frames as the base structure. Attach horizontal shelves at varying heights, ensuring they are secure and evenly spaced to provide ample support for plant pots.
Select a balanced mix of indoor plants that suit your light conditions—consider incorporating both trailing and upright varieties for visual interest. Utilize pots that complement your decor, whether that’s a sleek ceramic look or a rustic terracotta vibe.
For added privacy, consider taller plants or occasionally placing two pots side by side on the same shelf. Remember to provide adequate drainage for your plants, and consider saucers to protect the shelves from water damage.
This divider not only serves as a visual barrier but also enhances air quality and injects life into any room. Regularly rotate plants to ensure even growth and prevent the divider from becoming too dense on one side. Keep the design versatile for easy reconfiguration or additions in the future.
DIY Tri-fold Picture Frame Divider
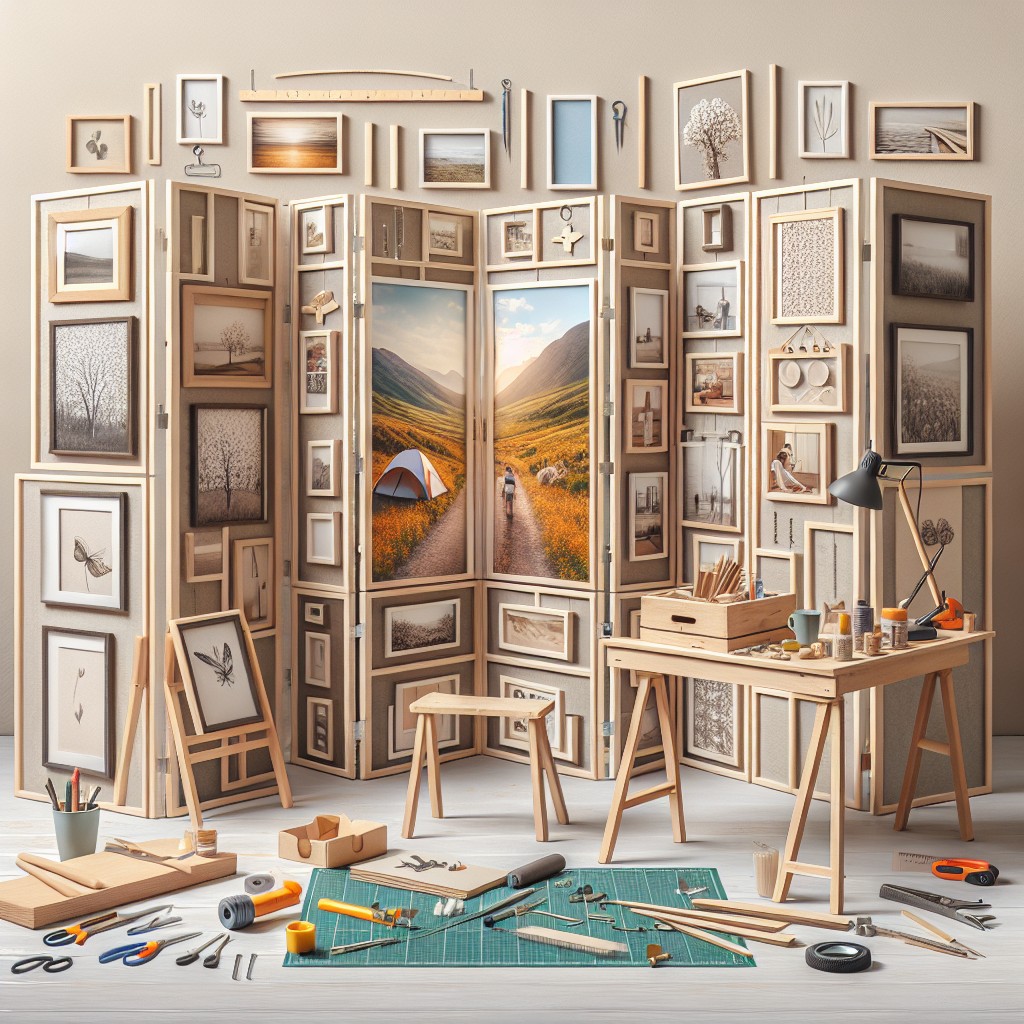
Transforming ordinary picture frames into a tri-fold divider adds a personalized touch to your space while serving a practical function. This project is ideal for showcasing favorite photos, art, or fabric swatches, and it doubles as a conversation piece.
1. Select three large picture frames of identical size. Opt for frames with ample space for your chosen display items. Thrift stores are excellent sources for budget-friendly options.
2. Remove the glass and backings, setting them aside.
3. Paint or stain the frames if desired, ensuring consistency in color and style.
4. Once dry, reinsert the glass.
5. Attach hinges using screws or strong adhesive. Position hinges evenly, ensuring frames fold smoothly.
6. Insert photos, artwork, or fabric behind the glass, securing with the original backings.
7. For stability, consider adding feet or a base if the frames are particularly tall.
The beauty of this project lies in its versatility; you can frequently change the display for a fresh look, or coordinate with seasonal decor.
Ideas Elsewhere
- https://www.thespruce.com/diy-room-dividers-4138361
- https://www.countryliving.com/home-design/decorating-ideas/g30755770/room-divider-ideas/
- https://www.familyhandyman.com/list/12-incredible-diy-room-divider-ideas/
- https://www.ohohdeco.com/room-divider-screen-build/
- https://www.realsimple.com/13-clever-room-divider-ideas-7552421
- https://www.diyncrafts.com/37609/home/30-imaginative-diy-room-dividers-that-help-you-maximize-your-space
More Like This
 20 Fairy Houses With Natural Materials That Will Make You Believe In Magic
 20 Cheap Walkway Ideas DIY Benefits
 15 Ingenious DIY Pantry Cabinet Ideas
 15 Creative DIY Buffet Table Ideas for Your Next Gathering
 15 Genius Office Supply Storage Ideas to Boost Your Productivity
Recap