Last updated on
Unearthing the principles behind choosing the correct drill bit size is key to perfecting your DIY endeavors because it eliminates guesswork and enables precise, efficient work.
Key takeaways:
- Measure the diameter of the fastener’s body for the pilot hole.
- Use an adjustable wrench to determine the diameter of a fastener.
- Invest in calipers for precise measurement of drill bit size.
- Create test holes in scrap material to find the right fit.
- Consider purchasing drill bit sets for variety and cost-effectiveness.
Check the Screws or Fasteners
When working with screws or fasteners, the goal is to ensure a snug fit without damaging the material. Here’s how you can pinpoint the right drill bit size:
- Measure the diameter of the fastener’s body, ignoring the threading. This measurement indicates the minimum size for the pilot hole.
- Consult the manufacturer’s specifications, often found on the packaging, for recommended pilot hole sizes.
- Examine the threads. Coarse threads may require a slightly larger drill bit to accommodate the greater material displacement when driving the screw.
- Match the length of the fastener to the depth of your pilot hole. The drill bit should be long enough to bore a hole that allows the fastener to sit flush or, if necessary, countersink.
By carefully considering your fasteners, you ensure secure and lasting construction with every project.
Use an Adjustable Wrench

An adjustable wrench can quickly determine the diameter of a fastener, ensuring you select the correct drill bit. To use this tool effectively, open the jaws of the wrench and place them around the fastener. Adjust the wrench until it fits snugly, then measure the distance between the jaws with a ruler or tape measure.
This measurement corresponds to the size of the drill bit you’ll need for a pilot hole. For wooden applications, choose a bit slightly smaller than the measured diameter to secure the screw’s grip. In metal, match the diameter to provide enough clearance for the threads. Remember to always compare the measurement taken with a drill bit gauge or size chart to confirm accuracy before drilling.
Invest in Callipers
Precision is crucial when selecting a drill bit size, and calipers ensure you achieve it. Here’s how to effectively use this tool:
- Measuring Diameter: Calipers are perfect for measuring the exact diameter of a bolt or the hole it will go into, down to fractions of a millimeter.
- Digital vs. Analog: Opt for digital calipers for ease of reading measurements directly on an LCD. Analog calipers require reading scales and can be more challenging for beginners.
- Zeroing Before Use: Always zero your calipers before measuring to ensure accuracy.
- Inside vs. Outside Measurement: Use the correct caliper jaws – the larger outside jaws measure shafts and drill bits, while the smaller inside jaws gauge hole sizes.
- Depth Gauge Feature: Some calipers also feature a depth gauge, useful for measuring the depth of a hole to match drill bit length.
Remember, a tight fit is essential for screws and anchors, and calipers remove the guesswork from the equation.
Make Test Holes
When unsure about the right drill bit size, a practical approach is to create test holes:
- Select a piece of scrap material that is the same as your workpiece.
- Starting with a smaller bit, drill a pilot hole. Increment the bit size gradually until you reach the desired fit.
- Ensure each test hole is drilled away from the last to avoid weakening the test material.
- Insert your fastener into the holes to check for snugness without forcing it.
- Once a proper fit is achieved, note the drill bit size for use on your actual material.
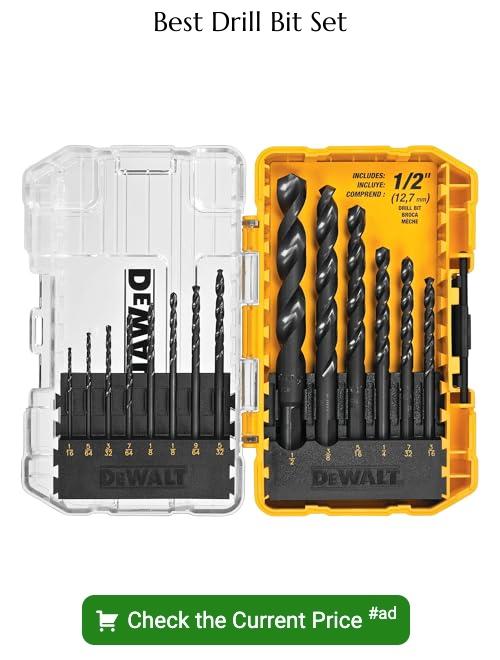
Invest in Drill Bit Sets
Investing in quality drill bit sets offers numerous benefits:
1. Variety – A set typically includes a range of sizes, allowing for precise hole drilling in various materials.
2. Material Compatibility – Sets often feature bits designed for different materials such as wood, metal, and masonry.
3. Cost-Effectiveness – Buying a set can be more economical than purchasing individual bits separately.
4. Organization – Sets come in cases or holders that keep bits organized and easily accessible.
5. Replacement Parts – Should a bit break or wear out, having a set means you’re likely to have a spare on hand.
6. Efficient Work Flow – With all necessary sizes available, switching between bits for different tasks is quick and seamless.
Choosing a set with a wide range of sizes will ensure you’re prepared for any project that comes your way.
Matching Drill Bit to Screw Size
To ensure the correct fit between a drill bit and screw size:
- Measure the Screw Diameter:
Assess the diameter of the screw’s solid body, excluding the threads. This determines the size of the hole needed for a snug fit.
- Subtract a Fraction:
For wood screws, subtract 1/16 inch from your initial measurement to account for the threads. This provides a tight grip once the screw is driven into the wood.
- Match the Pilot Hole:
Use a bit that matches the inner diameter of the screw’s threads for the pilot hole. This allows the threads to dig into the material, ensuring stability.
- Consult a Size Chart:
Reference a drill bit and screw chart to quickly find the corresponding drill bit size for the intended screw, especially for standard sizes.
- Test on Scrap Material:
If unsure, drill a test hole in a piece of scrap material. Fit the screw; if it goes in with some resistance and provides a solid anchor, you’ve achieved the right match.
Choosing the Correct Drill Bit for the Material
Different materials require specific drill bits to ensure efficient and precise work. Here’s a brief guide to help you select the right one:
- Softwood: Use twist drill bits or brad point bits for clean holes.
- Hardwood: Opt for brad point bits or auger bits to reduce splintering.
- Metal: High-speed steel (HSS) bits are ideal, cobalt bits for very hard metals.
- Masonry: Carbide-tipped masonry bits work best, use a hammer drill if available.
- Glass or Ceramic: Spear point (glass and tile) bits are necessary to prevent cracks.
- Plastic: Stick with regular HSS bits but at a slow speed to prevent melting.
Always ensure that the bit is suitable for your drill’s speed and power, and choose bits with coatings – such as black oxide, titanium, or carbide tips – that increase durability and performance in specific materials.
Consider Shank Type Compatibility With Your Drill
When selecting a drill bit, the shank is just as crucial as the bit size. The shank is the end of the drill bit that fits into the drill’s chuck, the part that tightens to hold the bit in place. There are primarily three shank types to be mindful of:
1. Round Shank: Provides a solid, accurate centering when placed in a three-jaw drill chuck. They are generally easier to secure and are common for general drilling purposes.
2. Hex Shank: Features a hexagonal shape allowing for better torque and less chance of slippage. Ideal for use with quick-change chucks on certain power tools for a faster setup.
3. Tri-Flat Shank: Offers a similar advantage to the hex shank with three flat sides, ensuring a firm grip and reducing the risk of slipping within the chuck, especially under high torque conditions.
Verify the compatibility of your drill’s chuck with the shank type of the desired drill bit. A mismatch can lead to improper bit performance and potential damage to your tools. Always consult your drill’s manual for specific guidance on compatible shank types.
Determining Drill Bit Size for Wall Anchors
When selecting a drill bit for wall anchors, your primary aim is to ensure the anchor fits snugly into the pre-drilled hole. Here’s how to choose the ideal match:
- Check the Anchor Packaging: It typically states the recommended drill bit size. For accuracy, always follow this guideline.
- Use a Visual Comparison: Hold the drill bit alongside the anchor. The bit should match the anchor’s diameter excluding any threading.
- Ensure a Tight Fit: The hole should be slightly smaller than the anchor to grip securely. If the anchor slips easily into a hole without the need for gentle tapping with a hammer, the drill bit used was too large.
- Material Matters: In softer materials like drywall, a bit on the smaller side may suffice. For harder materials, use the exact size recommended.
Remember, the integrity of your mounted object depends on this choice, so accuracy is key.
Selecting Drill Bit Size for Drywall Anchors
When installing drywall anchors, choose a drill bit that precisely matches the anchor’s diameter. This ensures a tight fit, which is crucial for the anchor to properly support the intended load.
Typically, the packaging of drywall anchors will indicate the necessary drill bit size. If absent, measure the anchor’s diameter with calipers for precision.
For tapered anchors, use a bit corresponding to the anchor’s widest point. Drill straight into the drywall to the depth specified by the anchor instructions, which usually equals its length.
The hole should be snug so the anchor can expand against the drywall, providing a secure hold. Always drill perpendicularly to the wall to avoid an oblique hole that might compromise the anchor’s stability.
Choosing Drill Bit Size for Concrete Anchors and Toggle Bolts
Selecting the appropriate drill bit for concrete anchors and toggle bolts is a task that requires precision. When working with these fasteners, the holes drilled must accommodate their unique expansion and locking mechanisms.
Here are a few points to consider:
- Always refer to the manufacturer’s instructions for the recommended drill bit size, as the correct fit is crucial for the anchor’s strength and stability.
- For toggle bolts, measure the diameter of the bolt’s body, not the toggle wings, to determine the size of the hole needed; the hole must allow the folded toggle to pass through before expanding behind the material.
- If the specific size is not listed or if you lost the packaging, a general rule of thumb is to use a bit that matches the diameter of the anchor’s outer thread for a snug fit.
- Use a masonry bit for drilling into concrete, as these bits are specially designed to penetrate hard materials without causing cracks or structural damage.
- Take into account the hardness of the concrete — older, cured concrete may require a more robust carbide-tipped or diamond-tipped bit to ensure a clean, precise hole.
- Go slow and steady when drilling; applying too much pressure can cause the bit to overheat or the concrete to fracture.
- After drilling, clear the hole of all debris to ensure the anchor or toggle bolt can be inserted properly, preventing instability once weight is applied.
By paying attention to these details, you ensure a secure fit for your concrete anchors and toggle bolts, which is critical for the safety and longevity of the mounted fixture or structure.
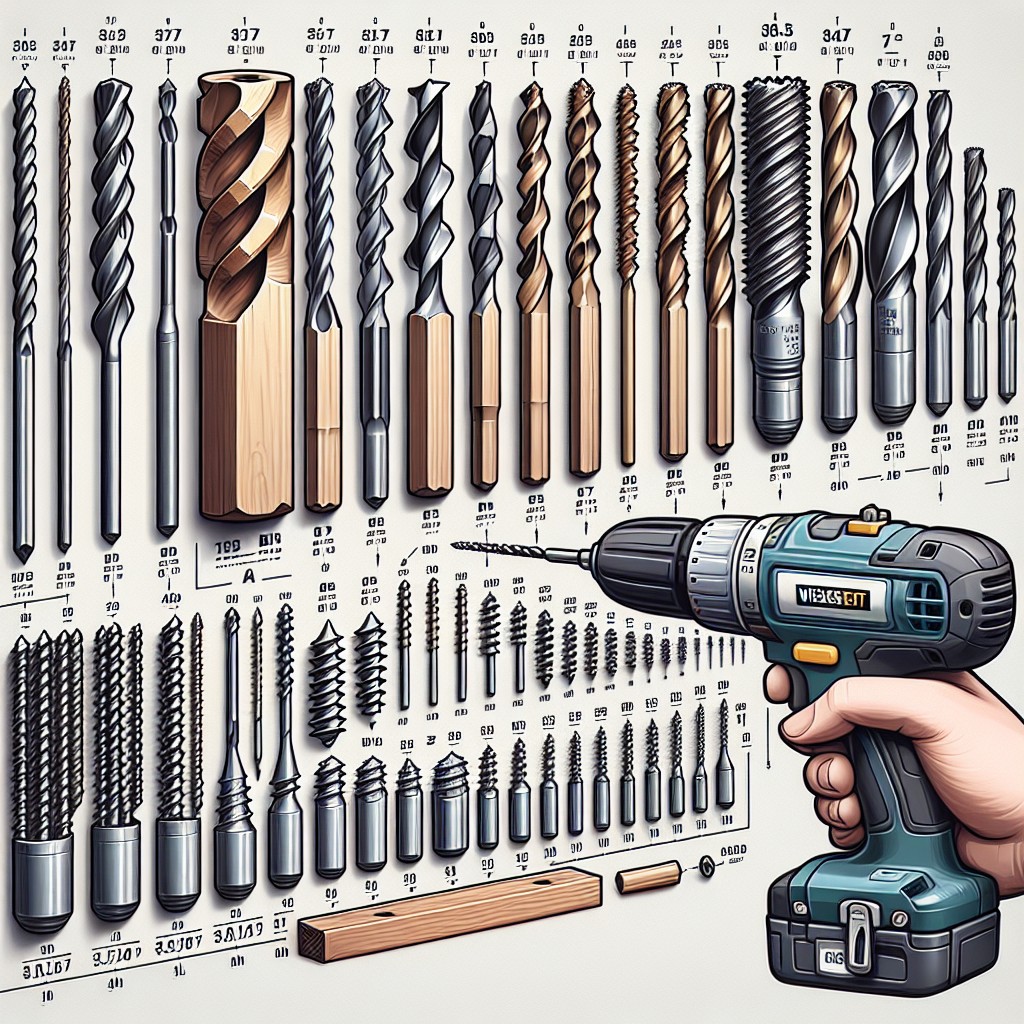
Understanding Drill Bit Types and Their Applications
Selecting the right drill bit extends beyond mere size; the type of bit is crucial for the task at hand. Twist bits, commonly used for general wood, plastic, and light metal, are versatile and a staple in most tool kits. Auger bits, with their spiral shape, excel in wood, boring clean and deep holes effortlessly. For heavier metal drilling, cobalt bits or those with a titanium coating offer durability and heat resistance. Masonry bits, distinguished by their carbide tips, are designed to pierce through concrete and stone. When working on tiles or glass, a diamond-tipped or carbide-tipped bit is essential to reduce cracking. Specialty bits, like Forstner bits, are ideal for making large, flat-bottomed holes in wood. Recognizing the application will lead to choosing a bit that not only fits properly but also performs efficiently, ultimately prolonging the life of both your bits and materials.
Purchasing the Appropriate Size Drill Bit
When selecting a drill bit for your project, considering the material and purpose is crucial. For woodworking, opt for brad-point bits, while masonry tasks call for carbide-tipped bits. Metal projects demand HSS (high-speed steel) bits. Each material type has a corresponding drill bit designed to cut through it efficiently, ensuring a clean and precise result.
Bits are available in standard and metric sizes; the former uses fractions of an inch, and the latter is in millimeters. Choose a bit slightly larger than the screw’s core diameter but smaller than its threads to ensure a snug fit. For pilot holes, refer to the recommended size on the fastener package.
Store personnel can offer guidance on suitable bits for specific tasks. Online shops often have detailed product descriptions and customer reviews to help make an informed choice.
Lastly, take note of the drill bit’s length. Standard bits handle most jobs, while longer bits are designed for thick or deep materials. Ensure the chosen bit fits your drill model, either a standard chuck or a quick-change system.
Using a Drill Size Conversion Chart
A drill size conversion chart is an essential tool when precision is key—it translates wire gauge sizes, letter and fractional inch drill bit sizes into metric measurements. Here’s how to make the most of this handy chart:
– Firstly, locate the size of the screw or bolt you are using on the chart. You’ll find the corresponding drill bit size listed adjacent to it.
– If you’re working with tap drills for threaded holes, match the tap size to its drill bit equivalent on the chart for the correct fit.
– For materials with differing hardness, such as softwood versus hardwood, the chart may recommend different sizes to compensate for the material’s resistance.
– Use the chart’s metric conversion to ensure accuracy, especially for precise engineering tasks where imperial measurements may not suffice.
– Remember, a conversion chart doesn’t account for the type of drill bit needed, just the size. Use this information in addition to considering the material you’re drilling into.
– When in doubt, start with a bit slightly smaller than the chart suggests and work your way up to avoid creating a hole that’s too large.
Keep this chart within easy reach for a quick reference guide that saves time and enhances accuracy in your drilling projects.
More Like This
 22 Mini Zen Gardens to Conquer Your Inner Chaos
 22 Mini Cactus Garden Ideas That Prickle with Delight
 20 Fairy Houses With Natural Materials That Will Make You Believe In Magic
 20 Cheap Walkway Ideas DIY Benefits
 15 Ingenious DIY Pantry Cabinet Ideas
Recap