Last updated on
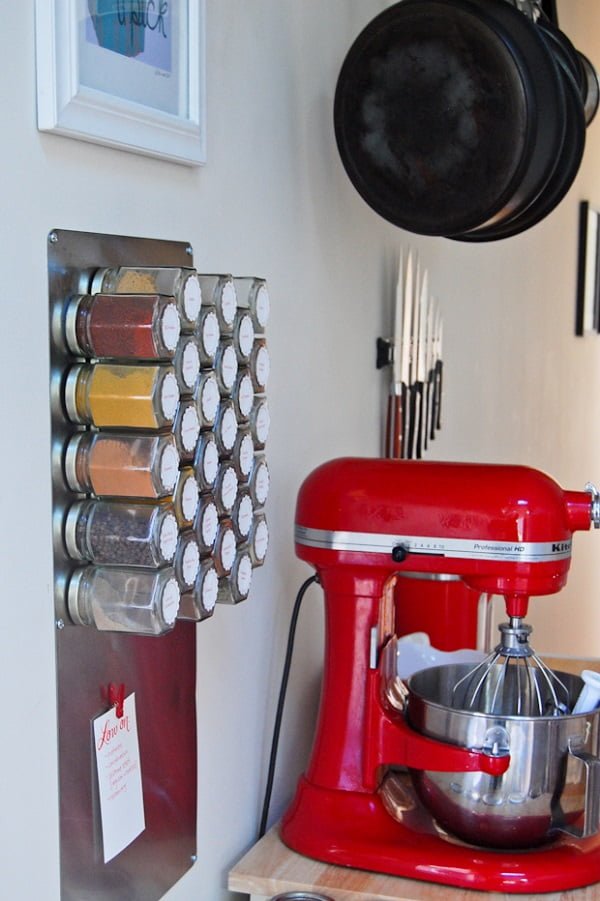
Since cabinet space is minimal in our kitchen, I decided to look into getting a wall-mounted, magnetic spice rack to free up some space. However, I soon realized that most pre-made versions are outlandishly expensive, and worse, they just didn’t have the look or the function that I wanted.
Many have non-airtight, flimsy containers that come pre-filled with questionable spices that you may not even want or need, which drives the price higher. So I decided to make my own! I’m really happy with how it came out, and it’s certainly saving us valuable cabinet space! Of course, I’m sure there are dozens of different ways you could accomplish a similar result, but I’m just sharing how I made mine.
The Base
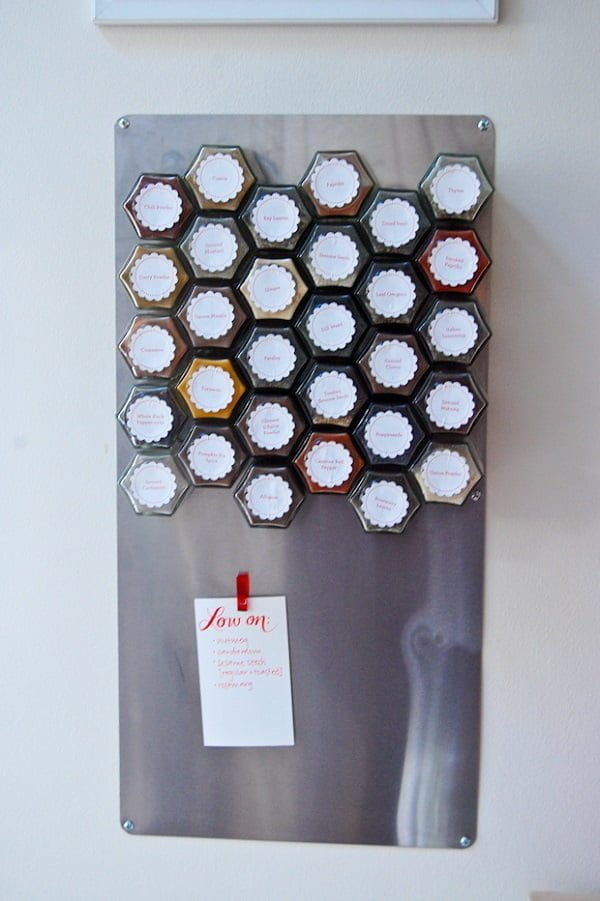
I got the stainless steel base from Amazon for $26 ($15 + $11 shipping). If you’re a handy person and want to save some money, you could buy a sheet of stainless steel from a hardware store or another supplier and drill holes for the screws in each corner yourself, but I opted to pay a bit more to have it ready to go. This also has rounded edges so you won’t injure yourself on sharp corners. I love the size of this (12×24″) because it’s narrow enough to make it a space-saving solution, but it’s pretty tall so I have room to grow into when I add spices to my collection. All you have to do with this is mount it to your wall with screws (or, in my case, have your boyfriend do it).
The Jars
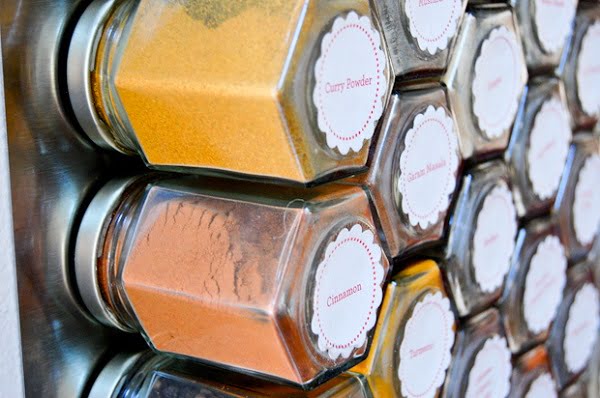
I ordered these 3.75 oz. glass, hexagonal jars from SpecialtyBottle.com. I chose the hexagonal shape because as you can see, they fit together really nicely to use space efficiently, plus they create a nice honeycomb shape. Clear glass jars are suitable for my purposes since my spice rack isn’t in direct sunlight. However, if yours will be in direct sunlight, consider opaque glass bottles or another opaque container—just make sure they’re airtight and food-safe. That’s important to ensure the freshness and longevity of your spices. At 3.75 ounces, most of my store-bought spice jars’ contents fit easily in these bottles, and they’re light enough to be held by a strong magnet but hefty enough to feel sturdy. And at 64¢ each, they’re also cost efficient. I counted all the spices I use the most and decided that 30 jars would be best for me to start, so the tab came in at only $19. Shipping to my location was about $12, so the total was about $31.
The Magnets
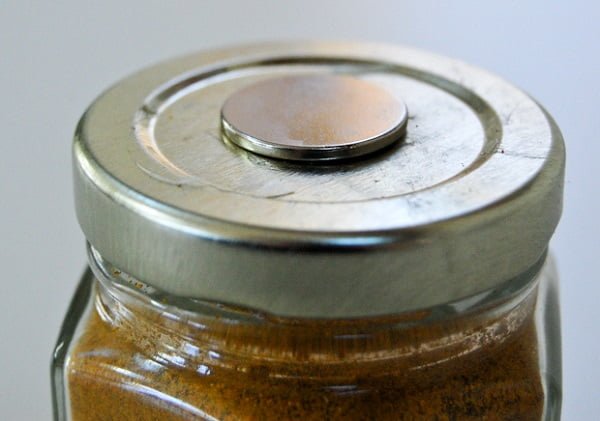
This was the tricky part. I actually had to try several different types and sizes of magnets until I found one that worked: these super strong Neodymium magnets. They have a diameter of 3/4″, which is perfect to sit right in the center of the jar lids and hold them easily. At $14.99 for 10, they’re not cheap, but you have to use this size of Neodymium magnets or the jars will simply not hold. Trust me, I know from experience! Learn from my trial and error. These came to $45 for my 30 jars. To attach the magnets to the lids of the jars, I used a dot of Gorilla Glue superglue in the center of each lid, and carefully placed the magnet on top. These magnets are really, really strong, so be careful! Luckily, since they’re magnets and the lid is metal, you don’t have to hold them together while the glue sets—they provide their own pressure. Just let it dry for at least 30 minutes to an hour just to be safe before you try to mount the jars to the base.
The Labels
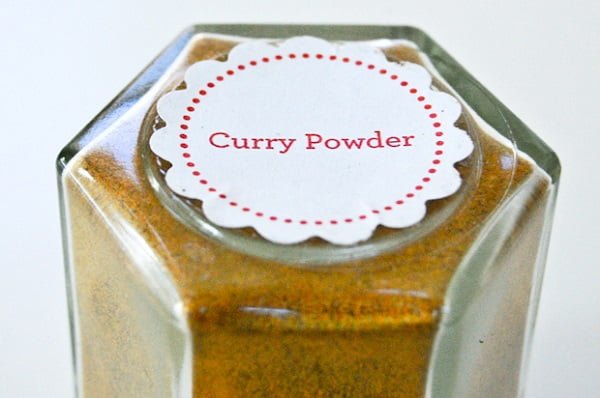
There’s a thousand ways you could label these jars—you could simply put some masking tape on the bottom of the jar and write the spice name on with Sharpie—but I decided to print some simple labels on some sticker paper that I had lying around. The cost of two sheets of sticker paper would be about $1.50 plus the miniscule cost of the ink to print the labels. You could also have your local print shop do this for a pittance. I just designed some 1.25″ circles in Adobe Illustrator and typed out all of my spice names, then printed them on the sticker paper. I used a 1.5″ diameter scalloped-edge paper punch that I had, but you can just cut them out with scissors or an X-acto knife. Then, I just peeled off the backing and stuck them on the bottoms of the jars as smoothly as I could.
That’s it!
Since I have a lot of room left on my spice rack as I continue building my collection, I used a magnet to attach a little index card I made to keep a running list of spices that need refilling soon. This is a great way to keep those low spices top-of-mind whenever you glance at your spice rack, so next time you go to the bulk spice aisle in the grocery store, you can just grab this card to make sure you get what you need.
And you’re done! Just arrange your spices on the wall-mounted stainless steel base and you have your very own, DIY magnetic spice rack!
The total cost for this project was just over $100 (for 30 jars).
The cheapest comparable I could find is this 20-piece set for $85, which has a lot of complaints about the non-airtight containers, weak magnets, and general lack of function. All the others seem to come without a base, without jars, are poor quality, or only have room for a few jars. I guess it’s true that if you want something done right, you have to do it yourself! I really love how this spice rack looks and functions, and I think it’ll serve me well for years to come.
Notes
- Again, you can save quite a bit more if you can create your own stainless steel mount or have another magnetic surface already in your kitchen that you can use.
- You can also mount these on the side of your magnetic fridge, but only if you have a free, open side of your fridge (do not use the door—it withstands too much abuse and you don’t want to break a jar every time you open the fridge).
- If you have a cabinet that can accommodate it (no interior shelves, adequate width to open the door without hitting the jars), you could mount the base on the inside of a cabinet door.
Source: This article first appeared on AmyBites.com, unfortunately the site is no longer available and we’re republishing the article here to save this wonderful tutorial.
Recap