Last updated on
Understanding the essential nature of concrete moisture barriers becomes vital because these safeguards can heavily influence the longevity and structural integrity of your construction projects.
Key takeaways:
- Moisture barriers prevent damage to flooring materials
- They protect concrete from deterioration and corrosion
- Moisture barriers improve indoor air quality
- They contribute to energy efficiency in heating and cooling
- Moisture barriers enhance the adhesion of surface treatments
Importance of Moisture Barriers for Concrete
Moisture barriers play a crucial role in preserving the structural integrity and longevity of concrete installations. These essential layers prevent moisture from passing through concrete slabs, which can lead to a myriad of issues:
1. Moisture Damage to Flooring: Overlaying floor materials, like hardwood and carpet, are susceptible to warping and mold when exposed to excess moisture seeping from concrete.
2. Concrete Deterioration: Concrete itself can suffer from freeze-thaw cycles and rebar corrosion, leading to cracks and compromised strength.
3. Indoor Air Quality: Moisture barriers help to block the rise of vapor that can carry soil contaminants, including harmful gases like radon, into indoor environments.
4. Efficiency in Heating and Cooling: By keeping out dampness, these barriers contribute to maintaining consistent indoor temperature and reducing energy costs.
5. Adhesion for Surface Treatments: Paints, sealants, and coatings adhere better to concrete that is not affected by moisture, ensuring a more durable and aesthetically pleasing finish.
Incorporating a well-installed moisture barrier presents a proactive step in construction that safeguard structures against potential moisture-related problems.
Types of Concrete Vapor Barriers
Concrete vapor barriers come in various materials and thicknesses, each offering different levels of protection against moisture transmission.
Polyethylene Sheet: A common choice, it ranges from 6 to 15 mils thick, with 10 mils being standard for residential applications.
Polyolefin-based Products: More resistant to chemicals with a similar thickness range to polyethylene.
Epoxy or Urethane Coatings: Applied as liquid to form a seamless barrier, they excel in industrial environments.
Bituminous layers: Often used in commercial settings, these are sheets of asphalt-impregnated fabric or felt.
Elastomeric sheets: Rubberized asphalt layers that conform well to irregular surfaces.
Laminated Film Barriers: Multi-layer products combining polyethylene with other materials like aluminum foil for increased impermeability.
Selecting the right type depends on the specific requirements of the project, such as the concrete’s environmental exposure and the desired longevity of the barrier.
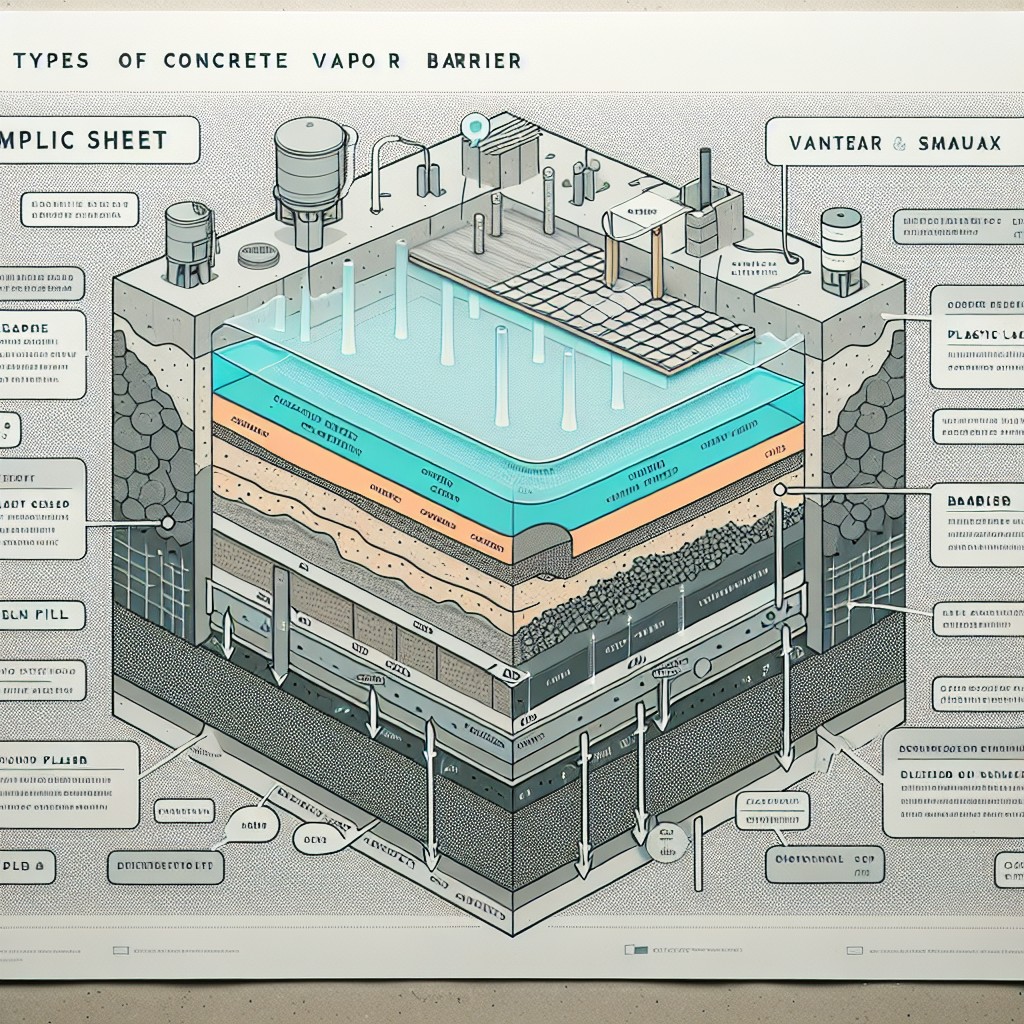
VBS Concrete Vapor Barrier for Underneath Cement Floors
Utilizing a VBS (Vapor Barrier System) beneath cement floors is pivotal in controlling moisture migration from the ground through to the indoor space. This system acts as an impermeable layer specifically designed to prevent water vapor from permeating the slab.
- A VBS is typically manufactured from polyethylene film or other synthetic materials, offering high resistance to punctures and tears, which is essential during the installation process.
- The effectiveness of a VBS is measured in perm ratings—the lower the perm rating, the less moisture transmission occurs.
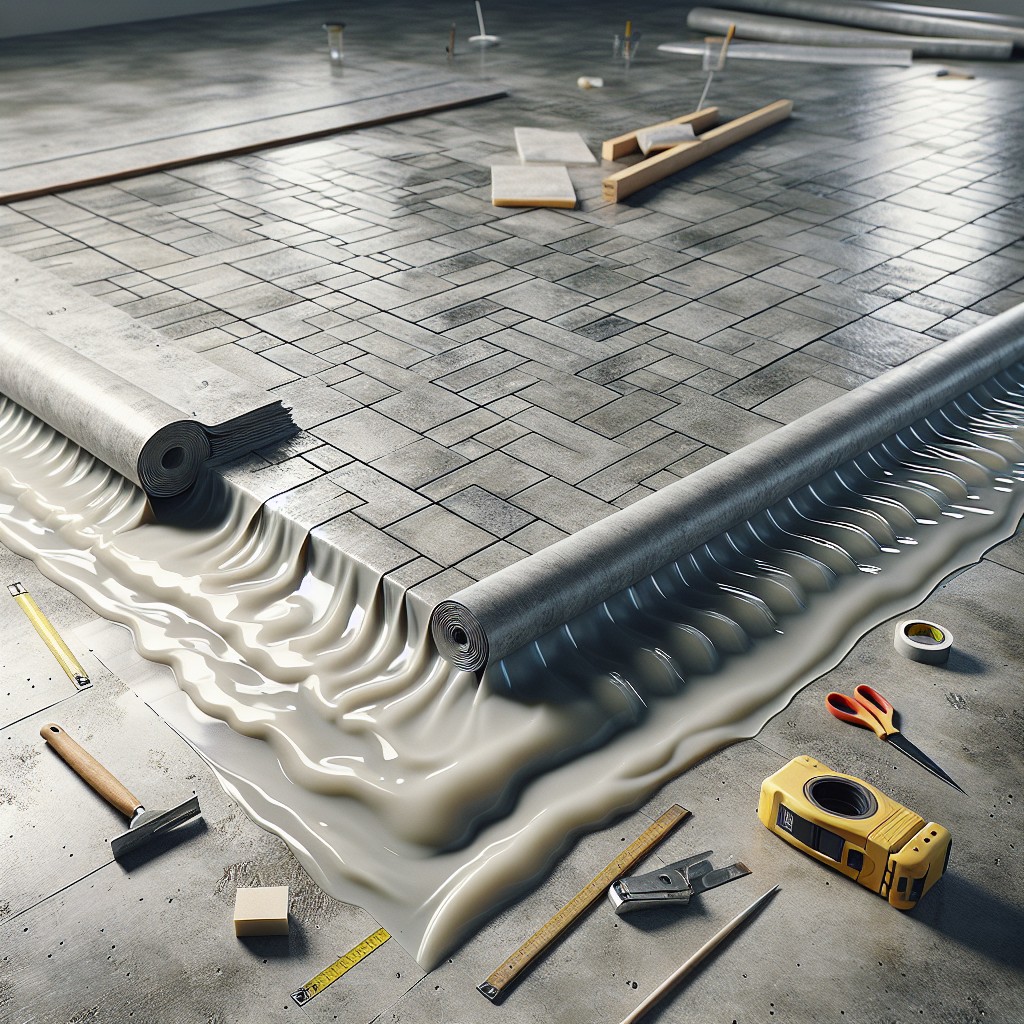
- The installation involves rolling out the VBS material flat over the prepared subfloor before the concrete is poured, ensuring an overlap between seams to avoid gaps.
- It’s crucial that the barrier extends fully to the edges of the foundation or crawl space to maintain a continuous moisture block.
- For added protection, sealing tape is applied at the seams, around penetrations, and at terminations to create a fully encapsulated area under the slab.
- The benefits of including a VBS translate to a drier and more durable foundation, reduced potential for mold and mildew growth, and enhanced overall indoor air quality.
By integrating a VBS into the concrete slab construction, long-term structural integrity and interior comfort are significantly enhanced.
Specs & Information of Tried and Tested Concrete Vapor Barriers
Understanding the specifications and performance data of concrete vapor barriers is crucial to ensuring the right selection for any construction project. Here’s a concise look at the key features of top-performing vapor barriers:
– Permeance Rating: This measures the material’s resistance to vapor flow, typically noted in perms. The American Society for Testing and Materials (ASTM) standard E1745 sets the permeance for vapor barriers used under concrete slabs to less than 0.1 perms. – Tensile Strength: A higher tensile strength means the material can resist breaking under tension. Well-tested barriers often exceed the minimum ASTM D882 standard of strength. – Puncture Resistance: Critical for maintaining integrity during and after installation. ASTM D1709 and ASTM E1643 provide guidelines for the puncture resistance of vapor barriers, helping them withstand job site conditions. – Thickness: Common thicknesses range from 10 mil to 20 mil. Thicker barriers offer more protection, though the choice may vary based on site-specific conditions and flooring type. – Chemical Resistance: Quality vapor barriers must withstand contact with lime and other alkali chemicals present in concrete, ensuring long-term performance without degradation. – Seaming Requirements: ASTM E1643 specifies the methods for seaming, which is vital to preventing moisture intrusions at the joints.Selecting a product that matches or exceeds these specifications ensures a long-lasting barrier against moisture, safeguarding flooring and building interiors from potential damage.
Steps for Installing Concrete Vapor Barriers
Before beginning installation, ensure the substrate is clean and free of debris, sharp objects, or anything that could puncture the barrier.
Next, roll out the vapor barrier, overlapping edges by at least 6 inches, and use seaming tape to create a consistent protective layer.
Carefully handle the material around penetrations such as pipes or columns, sealing those areas with tape or liquid sealants to maintain the integrity of the barrier.
Finally, add a bleed water system if needed, and secure the vapor barrier’s perimeter to prevent shifting during the concrete pour.
Remember, consistency and attention to detail during installation safeguard your project against moisture issues.
Understanding Concrete Vapor Barriers
Concrete floors can permit moisture from the ground to seep upward by capillary action. Moisture vapor barriers, essentially sturdy plastic sheets, are laid between the concrete and the ground to block this moisture intrusion.
The concept behind these barriers is straightforward: they act as a shield, keeping water vapor from permeating the slab. This is critical because excess moisture can lead to flooring failures, mold growth, and structural damage over time. Vapor barriers are especially vital in spaces where moisture-sensitive flooring materials, like wood or carpet, are to be installed over the concrete.
Moisture vapor barriers are gauged by their perm rating, which indicates the level of permeability to water vapor. A lower perm rating signifies a more effective barrier. Building codes can dictate the required perm ratings for different projects, ensuring that the chosen barrier is sufficient to protect from moisture-related issues.
When considering the concept’s application, it’s important to remember that the barrier’s effectiveness can be compromised by incorrect installation, such as punctures or incomplete coverage. Therefore, understanding the installation process and material specifications is just as crucial as selecting the right vapor barrier for your concrete project.
Acceptable Levels of Vapor Barrier Permeability
When it comes to the permeability of vapor barriers, the unit of measurement is critical. The standard unit called a “perm” helps classify the rate at which moisture passes through materials.
Here are some key points to keep in mind:
- Lower perm values are indicative of higher resistance to moisture passage. For concrete applications, a perm rating of 0.1 or less is ideal, rendering the material virtually impermeable.
The American Society for Testing and Materials (ASTM) provides guidelines for perm ratings. According to ASTM E1745, vapor barriers must have a perm rating less than or equal to 0.3 perms to qualify for use under concrete slabs.
The type of flooring to be placed atop the concrete slab can dictate the perm rating requirements. Some flooring materials, like vinyl or wood, are more sensitive to moisture and may necessitate vapor barriers with even lower perm ratings.
It’s crucial to consult local building codes and manufacturer recommendations; they can specify perm rating requirements tailored to regional climate variations and material specifications.
Understanding these perm rating nuances ensures that the chosen vapor barrier will provide adequate moisture defense for your concrete slab, safeguarding your investment and the longevity of the structure.
Risks of Excessive Moisture in Concrete
Excessive moisture in concrete can lead to a host of issues, compromising both the integrity of the structure and the health of the occupants. Here’s why managing moisture is critical:
1. Flooring Failure: Moisture can cause adhesives under flooring to weaken, resulting in delamination, warping, or bubbling of floor coverings.
2. Mold and Mildew Growth: Damp conditions are perfect for mold and mildew to flourish, potentially causing allergic reactions and respiratory issues.
3. Corrosion of Reinforcement: Moisture can seep into concrete and reach the steel reinforcement bars, leading to rust, expansion, and eventually, cracking of concrete.
4. Reduced Lifespan of Concrete: Sustained moisture exposure can accelerate the deterioration of concrete, shortening structural lifespan and leading to costly repairs.
5. Compromised Indoor Air Quality: Excessive dampness can cause musty odors and contribute to an overall decline in the quality of indoor air.
By addressing moisture early, these risks can be mitigated, ensuring the longevity of concrete structures and the well-being of individuals using the space.
Necessity of Vapor Barriers Under Concrete Slabs
Vapor barriers serve as essential defense mechanisms in preserving the structural integrity and longevity of concrete slabs. By effectively blocking moisture from seeping upward, these barriers prevent a myriad of problems such as:
- Mold and Mildew Growth: Moist environments are breeding grounds for mold and mildew, which can lead to health issues and compromise the air quality indoors.
- Flooring Failure: Excess moisture can damage adhesives and cause floor coverings like tiles, wood, or carpet to deteriorate prematurely.
- Concrete Deterioration: Water vapor can lead to alkaline disintegration in concrete, resulting in surface breakdown and weakening the slab over time.
Understanding the underlying reasons for including vapor barriers elucidates their critical role in construction, ensuring durable and safe concrete installations.
Determining the Ideal Thickness for Concrete Vapor Barriers
Selecting the appropriate thickness for a concrete vapor barrier is crucial for effective moisture mitigation. Typically, vapor barriers range from 10 to 15 mils for residential projects to a more robust 20 mils for commercial applications where the potential for moisture-related issues is higher.
A thicker barrier not only resists punctures during and after installation but also limits moisture diffusion more effectively. For high-traffic areas or floors that will bear heavy loads, the added durability of a thicker vapor barrier helps ensure long-term protection. On the other hand, less demanding environments might be adequately served by a thinner, more cost-effective option.
It’s essential to consider the soil’s moisture content and the building’s intended use when choosing thickness. Consulting with a structural engineer or an experienced contractor can provide valuable guidance tailored to your specific project requirements. Remember, opting for a vapor barrier that meets or exceeds industry standards can spare you from costly repairs stemming from moisture damage down the line.
Materials Suitable for Use As Vapor Barriers Under Concrete
When selecting materials for an effective vapor barrier beneath concrete, polyethylene sheeting is a top contender due to its durability and moisture-resistant properties. Commonly chosen thicknesses range from 10 mil to 15 mil, but in areas with high moisture content, a thicker 20 mil sheet may be necessary for added protection.
Another option is the use of extruded polystyrene or high-density polyethylene (HDPE) panels, which provide a robust defense against moisture penetration. These panels are especially valuable in situations where the barrier might be subjected to stress or puncture.
For scenarios demanding superior moisture control, composite barriers that combine polyethylene with a layer of polypropylene fabric can offer an advanced level of protection. These composites can bridge small cracks and help with the concrete curing process, reducing the risk of water vapor infiltration.
Regardless of material choice, the critical factor is the perm rating, which should ideally be around 0.3 perms or less, ensuring sufficient resistance to moisture transmission. It is crucial to ensure the selected barrier meets ASTM E1745 Class A, B, or C standards for vapor retarders used in contact with soil or granular fill under concrete slabs.
Correct Placement of Vapor Barriers
Ensuring proper placement of vapor barriers is crucial to their effectiveness. Here are some key points to guide you:
1. Direct Contact with Concrete: The vapor barrier should lie directly beneath the concrete slab, with no intervening materials that could compromise its integrity.
2. Smooth Subgrade: Before laying the vapor barrier, confirm the earth beneath is uniform and smooth. This prevents punctures or damage to the barrier, which can lead to moisture intrusion.
3. Overlap and Seal Seams: When placing multiple sheets of vapor barrier, overlap them by at least 6 inches and seal the seams with a moisture-resistant tape to create a continuous barrier.
4. Secure the Edges: Extend the vapor barrier over the footing or turn up against the foundation wall to create a seal that blocks moisture from creeping around the edges.
5. Repair Any Tears: If the barrier is accidentally punctured or torn during installation, repair it immediately with tape specifically designed for sealing vapor barriers.
By heeding these considerations, the effectiveness of your moisture barrier is much more assured, defending your concrete against the dangers of moisture penetration.
Advantages of Using Quality Concrete Vapor Barriers
Employing a high-quality vapor barrier brings numerous benefits to construction projects. These include:
- Durability: Such barriers withstand construction traffic and resist punctures, reducing the likelihood of compromise during and after installation.
- Mold Prevention: By blocking moisture, they curb the growth of mold and fungi, critical for indoor air quality and health.
- Flooring Protection: They safeguard against moisture-related flooring issues, extending the longevity of surface materials like hardwood and carpet.
- Structural Integrity: Moisture control contributes to the long-term stability of the concrete slab, preventing costly structural issues.
- Legal and Code Compliance: They ensure adherence to building codes that often stipulate specific moisture-vapor transmission rates.
- Energy Efficiency: They contribute to a building’s overall thermal efficiency by preventing the ingress of moisture, which can affect insulation performance.
By choosing a quality vapor barrier, you set the stage for a successful project and enduring results.
Comparing 10, 15, 20 Mil Thickness Vapor Barriers
When selecting a vapor barrier for concrete, thickness plays a crucial role in performance. Generally measured in mils (1 mil equals 0.001 inch), common thicknesses include 10, 15, and 20 mil.
A 10 mil barrier, while more economical, offers a basic level of protection and is considered sufficient for residential projects with less stringent durability requirements. However, it may be susceptible to punctures during installation and over time, particularly in high-traffic areas or under heavy loads.
Moving up to 15 mil increases resistance to punctures and tears. This mid-range option strikes a balance between cost and performance, making it suitable for both residential and light commercial applications. The added durability can extend the lifespan of the barrier and improve overall moisture protection.
At the top end, a 20 mil barrier provides the strongest resistance against moisture and is most resilient to damage during and after installation. This robust option is especially recommended for commercial and industrial settings where the concrete will experience heavy use or where maximum longevity is a priority.
Choosing the appropriate thickness is a key decision that can impact the longevity and effectiveness of your moisture barrier. Consider factors such as the project’s specific needs, anticipated traffic, and environmental conditions to make the most informed choice.
Addressing Moisture-Related Flooring Problems With Vapor Barriers
When tackling moisture-related flooring issues, vapor barriers stand as a vital defense. They protect flooring materials like hardwood, laminate, and carpet from the potentially damaging effects of moisture rising from concrete foundations. Here’s how they contribute to solving moisture issues:
- Prevention of Warping and Buckling: By blocking moisture transmission, these barriers help to maintain the structural integrity of flooring, preventing unsightly and unsafe warping and buckling.
- Mold and Mildew Mitigation: Vapor barriers reduce the risk of mold and mildew growth underneath flooring, a common concern in humid environments or where concrete slabs are in direct contact with soil.
- Flooring Adhesive Preservation: Moisture can compromise the effectiveness of adhesives used for flooring installation. By maintaining a dry interface, vapor barriers contribute to the long-term adhesion and stability of the flooring.
- Preservation of Manufacturer Warranties: Many flooring manufacturers require the use of vapor barriers to maintain warranty coverage. Adhering to these guidelines ensures that you keep these protections in place.
Utilizing a vapor barrier does more than just protect your flooring; it brings peace of mind, knowing that the investments you make in your property are safeguarded against moisture’s hidden perils.
The Science of Vapor Barriers and Moisture Control in Concrete
Concrete naturally absorbs moisture due to its porous nature, setting up a relentless battle against unwanted water transmission. Vapor barriers, essentially large sheets made of plastic or synthetic materials, act as a protective layer when placed beneath concrete slabs. They help control moisture by providing a non-porous divider that inhibits the passage of water vapor from the underlying soil into the concrete.
The science behind this interaction relates to the differential in humidity levels between the concrete and the ground; water vapor always moves from higher humidity areas to those of lower humidity. A properly installed vapor barrier restricts this movement, steadying the moisture content within the concrete slab. This control is especially crucial during the curing phase, where even distribution of moisture is key to achieving optimal concrete strength and durability.
Moreover, by preventing moisture from reaching the upper surface of the concrete, these barriers safeguard flooring materials such as tile, wood, and carpet that are sensitive to moisture, further exemplifying the multifaceted role they play in long-term structural and material integrity.
Installation Tips for Epoxy Coatings and Decorative Concrete Over Vapor Barriers
Successfully applying epoxy coatings or decorative concrete over vapor barriers requires attention to detail during the installation process:
1. Ensure Proper Curing of Concrete: Before installation, confirm the concrete is fully cured. Typically, this takes at least 28 days. Epoxy coatings and decorative treatments bond best with thoroughly cured concrete.
2. Check for Flatness and Level: High spots or uneven surfaces on the concrete slab can lead to improper sealing and should be ground down. Use self-leveling products for low spots.
3. Test for Humidity: Perform calcium chloride testing or use a relative humidity meter to measure moisture levels. Epoxy and other coatings should not be applied if moisture levels are too high.
4. Clean the Surface: Remove all contaminants, such as dirt, grease, and oil. Use appropriate cleaners and degreasers, and ensure the surface is completely dry before proceeding.
5. Remove Existing Coatings or Sealers: If the concrete has any previous coatings, they must be stripped. Chemical or mechanical methods can be effective based on the existing material.
6. Prime the Surface: A suitable primer enhances the bond between the concrete and the new coating. Apply primer per the manufacturer’s guidelines for the best results.
7. Apply Epoxy or Decorative Treatments: Mix the product accurately, and apply uniformly. Some products may require multiple coats; allow sufficient drying time between applications.
8. Heed Manufacturer’s Specific Instructions: Always follow the epoxy or concrete treatment manufacturer’s application guidelines. This includes temperature and humidity conditions during application for optimal curing.
9. Allow Adequate Drying/Curing Time: Before allowing foot traffic or placing furniture on the surface, ensure the product is completely dry. Rushing this process can lead to imperfections and reduced durability.
10. Engage Experts When Necessary: If unsure about any step or if the project scale is large, consider hiring a professional. Their expertise can prevent costly errors commonly associated with DIY applications.
Establishing Acceptable Moisture Levels in Concrete Before Flooring Installation
Before laying flooring over concrete, it’s crucial to assess the slab’s moisture levels. Here’s a concise guide to help you ensure the concrete is ready for installation:
1. Relative Humidity (RH) Testing: This is a preferred method where a probe is inserted into the concrete. Standards recommend an RH of 75% or lower for flooring installations.
2. Calcium Chloride Test (MVER): This quantifies the amount of moisture vapor emitting from a square meter of concrete over 24 hours. The maximum acceptable level is typically 3 pounds per 1,000 square feet per 24 hours for vinyl floors, although requirements vary based on flooring type.
3. pH Testing: Besides moisture, check the alkalinity of the concrete. High pH levels can compromise adhesives and floor finishes. Ideal pH levels are between 6 and 9.
4. Waiting Period: Allow new concrete slabs to cure for a minimum of 28 days, sometimes longer under certain environmental conditions, before conducting moisture tests.
Monitoring these parameters safeguards against moisture-related complications, protecting both the concrete slab and the flooring material.
Under-Slab Moisture Barrier Options
Selecting the appropriate under-slab moisture barrier hinges on understanding the environmental conditions and construction requirements. Polyethylene sheeting, commonly utilized, comes in various thicknesses; typically, a 10-mil sheet provides basic protection, while thicker sheets, like 15-mil or 20-mil, offer increased resistance to moisture and punctures, thereby extending the lifespan of the concrete slab.
Advanced barriers incorporate high-density polyethylene (HDPE) with a layer of polypropylene, enhancing their strength and resistance to chemicals. Another option is a composite barrier, which combines multiple materials to create a robust, low-permeability membrane that can handle even harsh site conditions.
For high-performance scenarios, consider liquid-applied barriers. These seamlessly adhere to the substrate, creating a fully monolithic barrier without seams or joints, ideal for irregular foundation shapes.
Lastly, consider the role of additives mixed directly into the concrete to repel water, although these are generally supplements to, rather than replacements for, a physical vapor barrier. Understanding both the site-specific conditions and the intended use of the structure guides the choice towards the most effective moisture barrier for any project.
Importance of Quality in Preventing Water and Vapor Transmission Through Concrete Slabs
High-quality moisture barriers are essential in safeguarding the structural integrity and longevity of concrete slabs. A lesser quality barrier might initially appear cost-effective, but it can lead to costly long-term issues such as:
- Permeability Problems: A top-grade vapor barrier offers low permeability, effectively blocking moisture from seeping through. Inferior barriers might allow vapor to pass, bringing about potential damage to flooring materials and causing mold or mildew growth.
- Durability During Installation: Quality barriers are resilient against punctures or tears during installation. This durability ensures that the barrier’s integrity remains intact, providing reliable moisture protection throughout the slab’s lifespan.
- Long-term Resilience: High-quality moisture barriers resist chemical breakdown due to the alkaline nature of concrete or exposure to soil contaminants, ensuring their function isn’t compromised over time.
- Compatibility with Flooring: An effective vapor barrier supports the adherence and performance of subsequent flooring materials, preventing expensive flooring failures due to moisture-related issues.
More Like This
 22 Mini Zen Gardens to Conquer Your Inner Chaos
 22 Mini Cactus Garden Ideas That Prickle with Delight
 20 Fairy Houses With Natural Materials That Will Make You Believe In Magic
 20 Cheap Walkway Ideas DIY Benefits
 15 Ingenious DIY Pantry Cabinet Ideas
Recap